… for Visual Effects

Tip #170: How to Capture Motion and Moving Subjects

Larry Jordan – LarryJordan.com

Minimize blur by following these tips.

Avoiding blur is the goal of all action photos.
The more subjects move, the more blur in your photos.

Topic $TipTopic

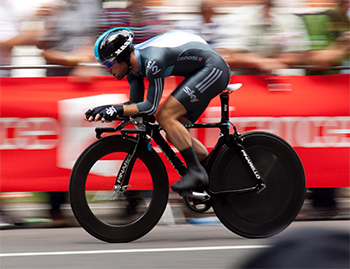
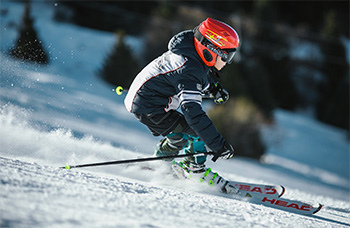
Some of the best and most memorable moments in life are in motion. Unfortunately, digital cameras hate movement. Most of the time, moving subjects register as a blur on photographs. So how do you shoot moving objects? Here are some tips:

1. Shutter Speed

When the subject is moving and you want to take a shot of, say a basketball player getting the ball on a rebound, then you should opt for fast shutter speeds. You should use a shutter speed that is at least 1/500th of a second or higher. Keep in mind that faster shutter speeds require more light for a proper exposure.

2. Increase The Aperture

The aperture is the hole where light comes into your camera into the image sensor. Choose a low f-stop to open up the aperture and allow more light in. This will help you counter the low light you get from the fast shutter speed. Keep in mind that opening the aperture decreases depth of field, that is, the area in a photo that’s in focus.

3. Use a Flash

Using a flash with your motion shots is a good way to counter the low light conditions when using a faster shutter speed. It is extremely easy to correct dark photos by using your flash. Keep in mind that most flashes are very short range, so a single flash won’t light a gym.

4. Use a High ISO

Using a high ISO can help you increase the shutter speed and aperture of your camera without increasing the likelihood of getting blurry or dark photographs. However, using high ISOs usually results in a grainy picture with a lot of digital noise.

An extended version of these tips first appeared in PremiumBeat.


Please rate the helpfulness of this tip.

Click on a star to rate it!

… for Visual Effects

Tip #177: Ten Tips for Better Slow Motion

Larry Jordan – LarryJordan.com

Slow motion often makes scenes more intense.

An example of a slow motion shot.
Action and drama are both enhanced by selectively using slow motion.

Topic $TipTopic

This tip first appeared on Fstoppers.com.

Here are ten tips that can improve how you shoot and use slow-motion.

  1. Understand your subject. Slow motion is all about movement, and certain subjects do not lend themselves to being interesting in slow motion.
  2. Select a frame rate. Shoot at a higher frame rate than the project you’ll put the video into.
  3. Think about light. Faster frame rates require more light. In general, set the shutter speed to twice the frame rate.
  4. Emphasize drama. Slomo adds drama and intensity to intense scenes.
  5. Emphasize action. Cinema today uses slowmo to enhance action scenes.
  6. Emphasize death. in certain instances, the death of a main character or their impending death will be played in slow motion, which adds to the gravity of the situation
  7. Create alternative reality. Use slow motion to convey a sense of detachment from reality that helps your viewers distinguish what is real versus what is perceived based on your storyline
  8. Emphasize fear. Slow motion can emphasize the anxiety and terror of a dramatic moment.
  9. Use sound to match the motion. Use the sound recorded on set, then slow it down in the final mix to emphasize the slower visual motion.
  10. Use slow motion carefully. Like seasoning, use it wisely and food tastes great. Use too much and the food becomes inedible.

Please rate the helpfulness of this tip.

Click on a star to rate it!

… for Visual Effects

Tip #117: Create a Custom HDR Effect

Larry Jordan – https://LarryJordan.com

Custom Effects Boost Efficiency

HDR plug-in from FCPeffects
This is the original FCPeffects plugin, with Dave’s custom version.

Topic $TipTopic

Dave Casselman writes:

I apply the HDR plug-in from FCPeffects.
from the Effects Browser to nearly every roping video I edit. But I always cut it back to about 40%.

That got me thinking that I maybe could find the setting in Motion to permanently make a copy that only worked at 40%. I opened a copy of HDR Tools in Motion and clicked around ’til I found the Overall Mix setting and moved the slider to 40%. Then I saved the copy with the new name of HDR 40% back into the Effects Browser along with the original. Then I made it the default shortcut. (See Tip #69)

Wow! I now have a really great shortcut.


Please rate the helpfulness of this tip.

Click on a star to rate it!

… for Visual Effects

Tip #171: 7 Tips To Better Timelapse Shots

Larry Jordan – https://LarryJordan.com

The best timelapse requires practice and planning.

timelapse, video, motion images
The best time-lapse images require planning.

Topic $TipTopic

This tip first appeared in Digital Photography School.

Timelapse photography is a great way to capture motion, plus, it’s eye-catching! Here are seven tips that can help improve your next shoot.

  1. Don’t use auto settings. To avoid constant changes in your images or exposure, set your camera to Manual mode.
  2. Focus manually. Auto-focus will have the lens chasing whatever moves. Worse, auto-focus eats batteries.
  3. Shoot in lower resolution so you don’t fill storage too quickly. Videos don’t demand 24 megapixel images.
  4. Anticipate the changes in the landscape and compose accordingly.
  5. Don’t press the shutter with your finger. While an intervalometer is indispensable, if you don’t have one, use a remote shutter release to fire shots manually at the specified time interval.
  6. Music is as important to the final video as the images themselves.
  7. Practice shooting a simple timelapse, say in your backyard, before committing the time and gear to the real thing. Problems are easier to fix when all the gear is local.

Please rate the helpfulness of this tip.

Click on a star to rate it!

… for Visual Effects

Tip #173: 4 Tips to Better Chroma-Keys

Larry Jordan – https://LarryJordan.com

The first rule is great lighting. But, you also need more…

A green-screen example screen shot.
A good chroma-key requires more than perfect lighting.

Topic $TipTopic

This tip first appeared at NoFilmSchool.com.

The first rule of great keys is great lighting. But, there are other things you can do improve the quality of your keys. Here are four tips that can make your keys cleaner and easier.

  1. Choose the right background color. We pick green because it isn’t in skin tone and most of us don’t wear green clothes. But, when there’s green in the foreground, use blue. (Also, green is more reflective, which means it tends to contaminate your shots more.)
  2. Don’t overexpose the background. Both foreground and background need to be properly exposed.
  3. Avoid wrinkles and folds in the background. If you use fabric, iron it. If you use paint, paint on a very smooth surface. Both the background lighting and surface need to be flat.
  4. The less compressed the video codec, the better the key. Chroma-key looks for specific color values – and the first thing that gets compressed in any video format is the color information.

Ideally, when your lighting is flat and you follow these tips, you should be able to create a clean key with one click.


Please rate the helpfulness of this tip.

Click on a star to rate it!