Tip #1164: How to Retime a Clip in AME
… for Adobe Premiere Pro CC
Tip #1164: How to Retime a Clip in AME
Larry Jordan – LarryJordan.com
Retiming ALWAYS changes the playback speed of a clip.

(This tip is from a recent webinar on Media Compression in Adobe Media Encoder.)
Retiming a clip means to change the frame rate at which a clip plays back. For example, from 24 fps to 25 fps. This can easily be done in Adobe Media Encoder. Here’s how.
- Open Adobe Media Encoder. (Any version will do, this isn’t a new feature.)
- Using the Media Browser, import the clip who’s speed you want to change into the Queue.
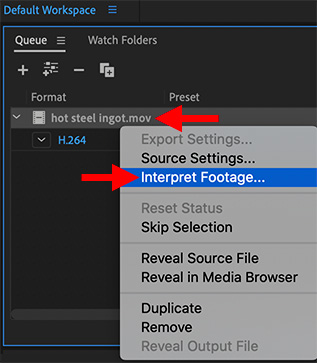
- Control-click the name of the movie file in the Queue (see screen shot) and select Interpret Footage.
- In the resulting dialog, change “Assume this frame rate:” to the new frame rate you want to use for playback.
- Click OK and you are done.
NOTE: When retiming clips, while you can convert these into any codec, it is a good practice to convert them into a high-quality intermediate codec like ProRes 422, or a high-data rate GoPro Cineform or DNx file. This retains the maximum image quality during the conversion.
EXTRA CREDIT
Unlike changing the frame rate, which drops or adds frames, interpreting footage plays every frame in the clip, but at a different speed.
So, going from a faster frame rate to a slower one creates slow motion, while going from a slower frame rate to a faster one creates a timelapse.
Leave a Reply
Want to join the discussion?Feel free to contribute!