Tip #1319: Customize a Zoom Cut
… for Adobe Premiere Pro CC
Tip #1319: Customize a Zoom Cut
Larry Jordan – LarryJordan.com
The key to making this transition invisible is to find matching colors in the two shots.

A Zoom cut zooms into the middle of a clip, cuts to a second shot, then zooms back out. What you may not know is that this transition can be customized to make it even more effective.
- Apply Effects > Video Transitions > Zoom > Cross Zoom to a transition in the timeline.
NOTE: Any transition needs “handles,” extra media before the In and after the Out, in order to exist.
- Select the transition in the timeline.
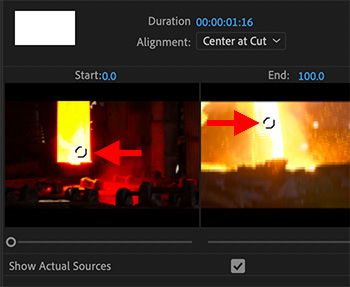
- Open the Effect Controls panel and check Show Actual Sources.
- In addition to showing images of the actual timeline clips, these small thumbnails also show two white circles (indicated by red arrows in the screen shot). These white circles define the target of each zoom.
- Drag these “zoom targets” so that they both are on top of reasonably matching colors.
Now, when you zoom, the cut will occur when both shots display similar colors, making the actual transition harder to see and, therefore, more convincing.
With no way to ramp the in and out of standard Adobe effects, they look cheesy (harkening back to repos using the Vital SqueeZoom!) and are pretty useless.
A workaround is to create one of these as a two-layer effect, using Scale to zoom the video, and either cutting at the apex of scale-up, or doing a short dissolve at the apex point on both tracks to smooth the transition.
Or buy one of the numerous transition and efx packages out there which augment your transition choices.
Mike:
You make a really good point. The effects in Premiere are OK, but there is a world of outstanding effects from 3rd-party developers that work perfectly with Premiere.
Larry