Tip #275: Faster Trims by Changing a Preference
… for Adobe Premiere Pro CC
Tip #275: Faster Trims by Changing a Preference
Larry Jordan – LarryJordan.com
Change one preference to make trimming smarter… and faster.

Recently, Adobe added a preference setting that makes timeline trimming much faster and easier, but this preference is turned off by default. Here’s what happens when you turn it on.
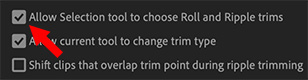
- Open Premiere > Preferences > Trim (Edit > Preferences > Trim on Windows).
- Check the top box (“Allow Selection tool to choose…”) to enable this option.
Now, when you hover the cursor over an edit point:
- If the cursor is just to the left of the edit point, the cursor switches to the Ripple trim tool, allowing us to adjust the Out of the out-going clip.
- If the cursor is just to the right of the edit point, the cursor changes to the Ripple trim tool, allowing us to adjust the In of the in-coming clip.
- If the cursor is centered over the edit point, the cursor switches to the Roll trim tool, allowing us to adjust both the In and Out settings at the same time.
- Press the Cmd key (Control on Windows) to switch between Ripple and Trim modes.
This “smart” selection of the correct trim tool based upon its position relative to the edit point is a huge time-saver when trimming.
Leave a Reply
Want to join the discussion?Feel free to contribute!