Tip #277: Source Monitor Audio Zooming…!
… for Adobe Premiere Pro CC
Tip #277: Source Monitor Audio Zooming…!
Larry Jordan – LarryJordan.com
There are three different ways to zoom into audio in the Source Monitor.

The Source Monitor can tell us a lot more about our audio than you might, at first, suspect. It all relates to “zooming” and here’s how it works.
- Double-click a clip in either the Project panel or Timeline to load it into the Source monitor.
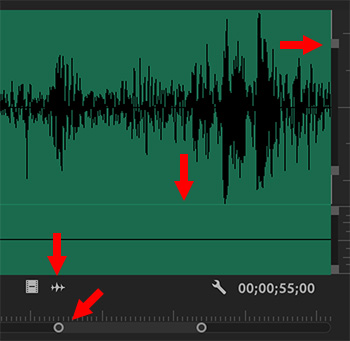
Then, looking at this screen shot:
- Click the waveform icon (left-most arrow) to display the waveform.
NOTE: A waveform is the visual representation of the volume of the sound. Bigger waveforms are louder.
- To zoom into a portion of the waveform, drag one of the white dots (second arrow from left). Or, type [plus] or [minus].
- To increase, or decrease, the display height of a waveform, drag the thin light horizontal line (third-arrow from left).
- To magnify the size of the waveform, drag the small gray dot at the top right of an audio channel (arrow on right). Each audio track has this control on the right.
NOTE: These last two options only change the waveform display, they do not alter the audio itself.
EXTRA CREDIT
To reset a clip back to its normal display, simply load a different clip in the Source Monitor. The next time you display an altered clip, the waveforms will be back to normal.
I don’t see the thin light horizontal line – how does one activate those – does Adobe have a name for them? And, I have only 2 gray squares at the far right, where you have 4.