Tip #301: Stabilize a Shaky Clip in Motion
… for Apple Motion
Tip #301: Stabilize a Shaky Clip in Motion
Larry Jordan – LarryJordan.com
There are multiple options to stabilize – or steady – a clip.
 This was first explained in this Apple KnowledgeBase article.
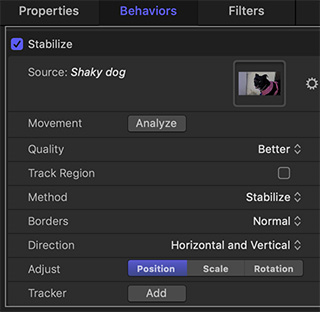
Use the Stabilize tracking behavior to smooth shaky motion in a movie or image sequence. Using the Stabilize behavior, there are three ways to analyze a clip:
- Use the behavior’s default advanced motion analysis technique that evaluates the entire frame of a clip to extract movement data without using onscreen trackers.
- Use onscreen trackers that analyze a reference pattern (a small group of pixels) in the canvas. These are the same trackers used by the Match Move and Analyze Motion behaviors.
- Use a combination of the advanced motion analysis and onscreen trackers.
How to Stabilize a Clip
-
- Select the layer containing the clip you want to stabilize.
- Choose Behaviors > Motion Tracking > Stabilize.
- Go to Inspector > Behaviors, then use the Direction pop-up menu to choose one of the following options:
- Horizontal and Vertical: Applies the stabilize transformation to the X and Y dimensions.
- Horizontal: Applies the stabilize transformation to the X dimension.
- Vertical: Applies the stabilize transformation to the Y dimension.
-
- Enable or disable the Adjust buttons, as follows:
- Position: Enable this button to apply the analyzed position data to the clip. (The X and Y position changes in the footage are smoothed or stabilized.) To stabilize the X and Y position of the shot and leave scale or rotation changes intact, enable Position and disable Scale and Rotation.
- Scale: Enable this button to apply any analyzed scale data to the clip. (Scale changes in the footage are smoothed or stabilized.) To stabilize or smooth changes in scale and leave position or rotation changes intact, enable Scale and disable Position and Rotation. (The Scale option is not related to the Zoom option in the Borders pop-up menu.)
- Rotation: Enable this button to apply analyzed rotation data to the clip. (Changes in the rotation of the footage are smoothed or stabilized.) To stabilize or smooth changes in rotation in the shot and leave position or scale changes intact, enable Rotation and disable Position and Scale.
- Enable or disable the Adjust buttons, as follows:
- For the smoothest result, enable all three Adjust buttons (Position, Scale, and Rotation).
NOTE: You can change the Method, Borders, Direction, and Adjust parameters before or after the clip is analyzed.
Why would you do this in Motion instead of FCPX? Does it do a better job or just give you more control?
Steve:
If I’m using Motion to create a stand-alone Motion Graphic video, say for social media, or something for Premiere, there’s no reason to send a file to FCP X for stabilization.
Motion doesn’t need FCP X in order to be useful.
Larry