Tip #947: When to Use the Work Area Bar
… for Adobe Premiere Pro CC
Tip #947: When to Use the Work Area Bar
Larry Jordan – LarryJordan.com
The Work Area Bar controls which section of the Premiere timeline will render.

The work area bar is a hold-over from the days of slower computers, but, even today, it can save you time. Here’s how to use it.
The work area bar determines what will render, when a rendering option is selected.
To enable it:
- Click the fly-out menu next to the project name in the top left corner of the timeline and select Work Area Bar.
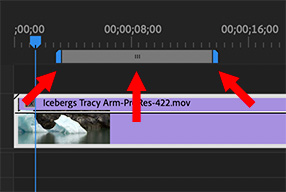
- A bar (see screen shot) appears at the top of the timeline.
- Click the small lines in the center (center arrow) and drag left or right to change its position in the timeline.
- Drag the left or right blue edges (left and right arrows) to change its duration.
The Sequence menu has three options specific to the Work Area Bar:
- Render Effects in Work Area. This only renders effects contained within the Work Area.
- Render Entire Work Area. This renders everything that needs rendering within the Work Area.
- Delete Work Area Render Files. This provides a controlled way to delete render files for a portion of the timeline without deleting all render files.
The benefit to using the work area is that you can control what you render and when. If you have a complex project, or a slow computer, rendering in small sections allows you to see the finished result for just the section you are working on quickly, without wasting time with a length render of your entire project.
Leave a Reply
Want to join the discussion?Feel free to contribute!