Tip #1648: Create a Variable Speed Change in Motion
… for Apple Motion
Tip #1648: Create a Variable Speed Change in Motion
Larry Jordan – LarryJordan.com
Variable speed changes requiring using frame counts, not timecode.

Creating a variable speed change to a video clip in Motion is involved and somewhat hidden. Also, the Help files don’t help.
NOTE: While this feature is called “Variable Speed Change,” you are not ramping into that speed. You are switching, instantly, from one speed – say 100% – to another – say, 50%.
Here’s how this works.
- Select the clip you want to modify in the Layers panel.
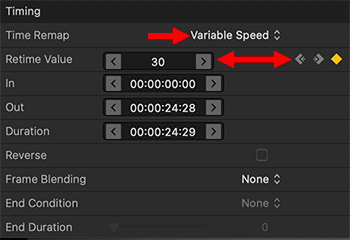
- Go to Inspector > Properties and scroll down to show the Timing panel.
- Change the Time Remap setting to Variable Speed. This sets a 100% speed timing keyframe at the beginning and end of the clip.
- Put the playhead where you want the speed change to start, then set a Retime Value keyframe.
- Move the playhead where you want the speed change to end and set a second Retime Value keyframe.
- Then, adjust the Retime Value (which is a frame counter) to adjust which frame appears at that keyframe.
NOTE: This is a good reason to switch the timecode display to frames, by clicking the small, down-pointing white arrow to the right of the timecode display. All timing changes are measured in frames.
For example, let’s say you want the clip to run at 50% speed for the first two seconds, then freeze for two seconds, then return to normal. The project is 30 fps. (You need to know the project frame rate for this to work.)
- Set a keyframe on the starting frame (Frame = 0)
- Set a keyframe at the two second mark (Frame = 60)
- With the playhead parked on the second keyframe, change the Retime Value to 30. This slows clip playback so that the 30th frame in the clip appears at 60th frame of the project. In other words, the clip plays at 50% speed.
- Move the playhead to Frame 120 and set another Retime Value keyframe.
- Set the Retime Value to 30. This creates a still frame from the second keyframe to the third. Why? Because the Retime Values are the same.
- When the still frame is done, the clip returns to 100% speed as it heads to the last keyframe. Remember, these keyframes represent instantaneous switches in speed, not ramps.
EXTRA CREDIT
This feature takes experimentation to learn what works. However, as a tip, don’t remove the starting and ending keyframes.
The frame rate of the source clip does not appear to be significant.
One other note, resetting the clip does not seem to remove keyframes. If you reset a parameter, you may need to remove keyframes manually.
Leave a Reply
Want to join the discussion?Feel free to contribute!