… for Adobe Premiere Pro CC

Tip #1830: Well, DUH! When Transcripts Don’t Work

Larry Jordan – LarryJordan.com

Yup. Obvious. But I got caught by both of these.
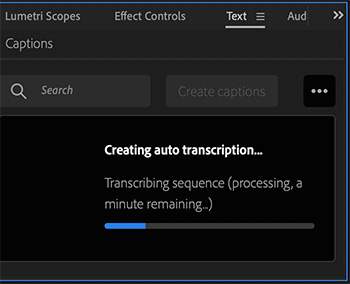
Transcripts can only be created when the server can hear the dialog in your sequence.

Topic $TipTopic

You would think this would be obvious but, well, I embarrassed myself publicly in a webinar with these, so I might as well share them with you.

There are two instances where creating transcripts won’t work using the new Speech-to-Text workflow in Adobe Premiere Pro:

  1. If you turn the volume of the dialog clips all the way down. If YOU can’t hear someone talking, the transcription server can’t hear it either.
  2. If the volume of your sound effects or music is so loud that it drowns out the voice, the transcription server can’t figure it out either.

So, to create the best possible transcripts:

  • Make sure you can clearly hear all dialog.
  • Mute all sound effects tracks.
  • Mute all music tracks.

Once the transcript is completed, you can turn all your tracks back on.

Sheesh. You’d a thought I could figure that out on my own.


Please rate the helpfulness of this tip.

Click on a star to rate it!

… for Codecs & Media

Tip #1829: Compressor Limits Frame Sizes to 4K

Larry Jordan – LarryJordan.com

Compressor limits almost all compressed files to 4K or smaller.

Topic $TipTopic

Vince asks:

“I’ve got a 360 project (filmed on GoPro Max) that is 5376×2688 and need the best quality compression setting to create a 5376×2688 .mp4 (or .m4v) for playback on a pair of Oculus Quest 2 goggles. I can’t find any setting in FCP or Compressor that allows me to custom set the resolution to match. Actually, I can’t get anything larger than 4k, which is killing me and the image quality when viewing on the goggles.”

The short answer is that Compressor limits compression frame sizes to 4K for both H.264 and HEVC codecs.

NOTE: HEVC was specifically designed to support frame sizes larger than 4K, but Compressor does not currently allow it.

Because Vince is interested in high-quality, the workaround is to use the ProRes 422 codec. This supports frame sizes up to 8K, along with non-standard aspect ratios.

NOTE: However, if you import a 4K 3D clip, Compressor won’t upscale it larger than 100%, even into ProRes.


Please rate the helpfulness of this tip.

Click on a star to rate it!

… for Adobe Premiere Pro CC

Tip #1779: Export Caution: Match Source Settings

Larry Jordan – LarryJordan.com

The default Match Source export settings always uses H.264.

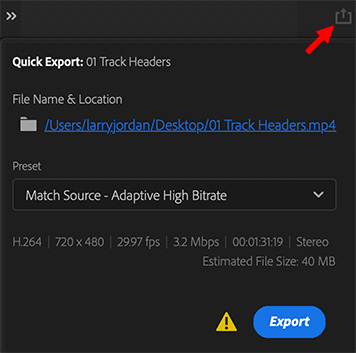
A Match Source Quick Export setting. Note that it uses H.264.

Topic $TipTopic

There’s a potential “gotcha” when using the default Match Source export settings that can trip you up. The screen shot illustrates the Quick Export menu in the top right corner of the Premiere interface and the Match Source settings.

Normally, I export sequences from Premiere using my own export settings. However, while I was exploring the Premiere beta, which revises the entire export process, I discovered a problem with the Match Source setting that affects both the beta and the current shipping version.

Specifically, even though it is supposed to “match the source,” it actually uses the H.264 codec. This is fine for distribution, but NOT fine for any sequences you expect to work with again.

NOTE: In fact, H.264 is the default codec for all export presets.

Instead, when exporting any file you expect to reuse, reedit or recompress, avoid ALL the preset export settings – which all use H.264 – and select an editable codec like ProRes, DNx or GoPro Cineform. The files are bigger, but you’ll avoid image degradation and artifacting.


Please rate the helpfulness of this tip.

Click on a star to rate it!

… for Apple Final Cut Pro X

Tip #1769: Fix for FCP Crashes in Big Sur

Larry Jordan – LarryJordan.com

Most often, frequent crashes means something is out of date.

Topic $TipTopic

David M. reports:

FYI, I updated to Big Sur & FCP 10.5.2. I got continuous crashes on opening FCP until I uninstalled all Core Melt apps.

Everything is now fine. Didn’t lose any work.

Larry adds: Thanks, David, for the heads up.


Please rate the helpfulness of this tip.

Click on a star to rate it!

… for Apple Final Cut Pro X

Tip #1750: Render Neat Video Effects Faster

Larry Jordan – LarryJordan.com

Neat Video renders very slowly. Here’s how to speed it up.

Topic $TipTopic

Neat Video makes an effect that removes video noise, which occurs when shooting in low-light situations. The filter creates amazing results, but takes forever to render.

This workaround was suggested by Brian Galford.

The Neat Video filter will render the entire duration of any clip it is applied to. So the key to faster rendering is to only apply the effect to those portions of a clip that need it.

For example, if you apply the filter to a ten second clip, but five seconds are covered by B-roll, cut the underlying clip containing the effect at the start and end of the shot above it. That way, only the visible part of the clip will render.

As well, if you’ve applied the filter to the entire underlying clip, be sure to remove or disable it from those portions that are covered by another clip.


Please rate the helpfulness of this tip.

Click on a star to rate it!

… for Apple Final Cut Pro X

Tip #1730: Final Cut Pro Bug Workarounds

Larry Jordan – LarryJordan.com

Two workarounds for apparent bugs in Final Cut Pro.

Image detail courtesy of Pexels.com.

Topic $TipTopic

Scott Newell reports on two workarounds for Final Cut Pro.

BROKEN RENDERS

Just wanted to share two FCP X stories with you. I was trying to output (share) a fairly complex video with lots of various video sources and found it stopped at 94% each time. Online searches said it could be a corrupt file somewhere and many suggested trashing preferences. Nothing worked.

So I rendered out a section at a time to see where the problem was. Turned out to be a plugin from Pixel Film Studios near the end and it was in a very dense portion of the timeline.. I’ve used many of their plugins successfully before, but it must have been taxing my system beyond its capabilities. Removed the effect and it rendered without a hitch.

My takeaway (which I suspect is something you already do) is to look at 3rd party plugins first when there is a problem like that.

LARRY ADDS: The two biggest issues that cause renders to fail are corrupt stock media and broken plugins.

MISSING SHORTCUTS

One other question that doesn’t involve plugins. Sometimes when I start a new project and copy and paste from another project to start things going, the enlarge and shrink keyboard shortcuts (CMD+ and CMD-) don’t have any effect. I have to go to the appearance icon in the top right corner of the Timeline and move the timeline resize slider to enable the keystrokes again. Wonder why that is?

Just recently a friend called me to ask why his CMD+ and CMD- key combinations weren’t working and I knew exactly what he was talking about, so I must not be the only one this is happening with.

NOTE: Scott sent me this note before the latest FCP 10.5.3 update. I don’t know whether these were fixed in that version or not.


Please rate the helpfulness of this tip.

Click on a star to rate it!

… for Adobe Premiere Pro CC

Tip #1681: A Cool – But Useless – Feature

Larry Jordan – LarryJordan.com

This used to work great. Now, ah, not so much.

Adding keyframes in the timeline, using this menu, no longer works reliably.

Topic $TipTopic

There’s a long-time feature in Premiere that used to be really useful. Well, at the least, it was useful. But, now, it’s essentially useless.

Most of the time, when we want to create effects, we select the clip in the timeline, then go to Effect Controls and make our adjustments.

But, there’s a hidden feature in Premiere that, theoretically, saves a step.

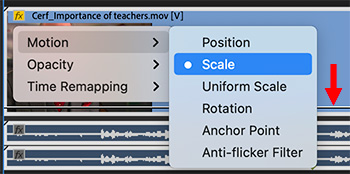
Control-click a clip in the Timeline (see screen shot) and a hidden menu appears. Here, you can select a setting, say “Scale,” and a white keyframe line appears in the clip (see the red arrow).

Again, in theory, we can drag this line up or down, or double-click it to add keyframes, to adjust and animate the scale of the clip.

The problem is that line, there, at the bottom, is positioned for 100% scale. We can drag it to 0, or to a minimum setting of 119%; but nothing in-between. It’s positioned too low to be useful because we can’t drag it marginally lower; except to 0. Useless.

We rarely, if ever, scale clips larger than 100%. But we CONSTANTLY need to scale clips smaller than 100%. At least for scaling, this hidden menu option totally fails.

So, experiment on your own to see which of these features work. But, for now, you are better off ignoring this menu and continue to use Effect Controls.


Please rate the helpfulness of this tip.

Click on a star to rate it!

… for Adobe Premiere Pro CC

Tip #1665: Align Titles in Premiere Pro

Larry Jordan – LarryJordan.com

Select just one text clip in the timeline to use these.

The text alignment tools in the Essential Graphics panel.

Topic $TipTopic

Here are some intriguing icons in the Essential Graphics panel that can simplify aligning text (even though two of them are wrong).

  • After creating a text clip in the Timeline using the Text tool, select the clip.
  • If you haven’t already, switch to the Graphics workspace.
  • Click Edit in the Essential Graphics panel. The icons illustrated in the screen shot appear about 1/3 the way down.
  • Click the left icon to center a clip vertically (even though the icon indicates it centers horizontally).
  • Click the second-from-left icon to center a clip horizontally (even though the icon indicates it centers vertically)
  • The next three icons move a clip to the top, center or bottom of the frame. The problem with using these is that they don’t take Safe Zones into consideration, which means you would need to manually move the text inside Action Safe, at a minimum.

NOTE: The center option in this group is the same as clicking the far left icon.

  • The three icons on the right move a clip to left, center or right side of the frame. Also, like the middle three icons, these icons do not take Safe Zones into consideration, which means you need to move the text inside Action Safe manually.

NOTE: The center option in this group is the same as clicking the second-from-the-left icon.

EXTRA CREDIT

These icons are nice, but because they don’t allow for Safe Zones, I find myself not using them very often.

Also, these won’t work if multiple text clips are selected; which means that you can’t use these to quickly align several clips at once.


Please rate the helpfulness of this tip.

Click on a star to rate it!

… for Visual Effects

Tip #1599: Does Foundry Support M1 Macs?

Larry Jordan – LarryJordan.com

Progress continues, but full compatibility is a ways off.

Image courtesy of Foundry.com.

Topic $TipTopic

Here’s the latest update from Foundry on their support for Big Sur and M1 Macs.

The latest macOS version, Big Sur, is not currently supported across our Foundry product portfolio. Our product teams are testing this macOS release and looking to qualify it as soon as possible. 

Apple’s new processing hardware Apple silicon including the recently released Apple M1 chip, is due to be reviewed by each product and support will be planned based on the individual review results.

Here is the latest status of supported macOS versions across our Foundry products: 

Product macOS Catalina (10.15) macOS Big Sur (11.0) Apple M1 Chips
Nuke family 12.1v1 onwards 13.0v1 onwards Not supported
Modo 13.2v1 onwards 15.0v1 onwards Not supported (in testing)
Colorway 3.1v1 onwards Not supported (in testing) Not supported
Mari 4.6v3 onwards Not supported Not supported
Flix 6.3.6 onwards Not supported Not supported
Katana Katana is not available on macOS.

EXTRA CREDIT

Foundry updated this on April 22, 2021. Link.


Please rate the helpfulness of this tip.

Click on a star to rate it!

… for Apple Final Cut Pro X

Tip #1572: What Is Range Check?

Larry Jordan – LarryJordan.com

Safe video levels are essential for any video not posted to the web.

The Zebra or Herringbone pattern flags shadow or highlight levels that are illegal.

Topic $TipTopic

Range check is a special option in the Viewer > View menu that flags shadow or highlight levels that are “illegal” for the timeline video clip containing the playhead.

If you only post video to the web, you don’t need to worry about video levels, the web will play anything.

However, if you need to submit programs to broadcast, cable, DVD, digital cinema or many streaming services, such as NetFlix, you need to be SURE your video levels are within spec.

There are four options:

  • Off. This is the default setting.
  • Luma. This flags luminance levels that are excessive.
  • Chroma. This flags color levels (mostly saturation) that are excessive.
  • All. This flags all illegal levels.

Excessive luma levels are those above 100% IRE or below 0% IRE (for Rec. 709 media) .

Excessive chroma levels are those that are over-saturated. (Saturation levels will vary by luminance levels.)

EXTRA CREDIT

Range check simply flags problematic footage. You correct this using either one of the color grading tools or Broadcast Safe. (See Tip #1573).


Please rate the helpfulness of this tip.

Click on a star to rate it!