… for Apple Motion

Tip #1784: Function Keys Make Motion Move

Larry Jordan – LarryJordan.com

I use these F-keys in every Motion project.

This preference is off by default. Find it in System Preferences > Keyboard > Keyboard.

Topic $TipTopic

Not all Mac keyboards support Function keys (called: “F-keys”). But, for those that do, Motion has built in F-key shortcuts. Here’s what they do.

  • F1. Show Inspector > Properties
  • F2. Show Inspector > Behaviors
  • F3. Show Inspector > Filters
  • F4. Show Inspector > Selected object
  • F5. Show/Hide Project pane
  • F6. Show/Hide Timeline
  • F7. Show/Hide HUD
  • F8. Toggle Viewer full-screen
  • F9. Show/Hide Background Tasks window
  • F10. Output to VR headset

EXTRA CREDIT

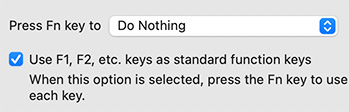
F-keys are not enabled by default. To turn them on go to: System Preferences > Keyboard > Keyboard and check the check box illustrated in the screen shot.

Laptops and some smaller keyboards have an Fn key in the lower left corner. Press this while typing a number to emulate pressing an F-key.


Please rate the helpfulness of this tip.

Click on a star to rate it!

… for Adobe Premiere Pro CC

Tip #1737: A Very Cool – Very Simple – Premiere Pro Shortcut

Larry Jordan – LarryJordan.com

Full-screen playback is one shortcut away.

Topic $TipTopic

Here’s a very cool – and very simple – keyboard shortcut for Premiere playback that I didn’t learn until last week.

To instantly switch to full-screen playback, type Control – ~ (tilde).

Yup. Easy.

NOTE: On most keyboard the tilde key is in the top left corner of an American keyboard, just under the ESC key.


Please rate the helpfulness of this tip.

Click on a star to rate it!

… for Apple Motion

Tip #1703: Make an Element Invisible – FAST!

Larry Jordan – LarryJordan.com

Both menu and shortcut quickly toggle an element’s visibility

To make any element invisible, Control-click it in the Layers panel and uncheck Active.

Topic $TipTopic

By default all elements in the Motion Layers panel are visible. But, sometimes, you want to hide something so you can see what’s below it. Here’s how.

  • Control-click the element you want to temporarily hide in the Layers panel.
  • Deselect Active. (Shortcut: Control + T)
  • Repeat this process to make the element visible again.

EXTRA CREDIT

Any invisible elements will be saved, but not exported.


Please rate the helpfulness of this tip.

Click on a star to rate it!

… for Apple Motion

Tip #1702: Four Dragging Tips to Speed Resizing

Larry Jordan – LarryJordan.com

These keyboard shortcuts make resizing images faster and/or more accurate.

Pressing Shift constrains rotation to 45°; the yellow dot (top) indicates starting position.

Topic $TipTopic

Here are four dragging tips when resizing media in the Motion Viewer that can make image handling faster and easier.

Tip 1 – Rotation

Press the Shift key while dragging the blue rotation dot in the Viewer. This constrains rotation to 45° increments.

Tip 2 – Resizing

Press Shift while dragging a corner blue resizing dot for an image in the Viewer to constrain the aspect ratio to it’s original dimensions.

Tip 3 – Centering

Press Option while dragging a blue resizing dot in the Viewer to scale the image size from the center (you are dragging the opposite edge at the same time, by the same amount).

NOTE: Yes, you can press both Shift and Option while dragging to constrain the aspect ratio and resize from the center.

Tip 4 – Copying

Press Option while dragging an image in the Viewer to make a copy of the original image, then reposition the copy.


Please rate the helpfulness of this tip.

Click on a star to rate it!

… for Apple Final Cut Pro X

Tip #1660: A Highly Useful Keyboard Shortcut

Larry Jordan – LarryJordan.com

This is a very handy trick to help navigate the timeline.

The Hand tool in the Tools menu.

Topic $TipTopic

Here’s a very handy keyboard shortcut to help you move quickly around the Timeline.

You know that the Tools menu has an option for the Hand tool (Shortcut: H). Select it, and you can drag left or right to change your position in the timeline.

NOTE: This is the same as dragging the light gray bar at the bottom of the timeline, but easier to grab.

What you may not know is that if you press and HOLD the H key, you can drag to a new location, then, when you let go, Final Cut returns to the tool that was selected before you pressed H.

This is a very cool timesaver – especially for people like me who don’t edit using a Magic Trackpad.

Thanks and a tip of the hat to Francisco Carrasco, who reminded me of this tip.


Please rate the helpfulness of this tip.

Click on a star to rate it!

… for Apple Final Cut Pro X

Tip #1643: Add and Modify a Hold Frame in FCP

Larry Jordan – LarryJordan.com

Hold frames are a very fast way to add still frames to a project.

The Speed Transition dialog (top) and the “edit hold frame” box (bottom).

Topic $TipTopic

A hold frame is a still frame that is attached to a clip in the Final Cut Pro timeline. Hold frames can be added to any video clip, with any duration you want.

The good news is that hold frames are attached to the clip itself, wherever a clip moves, the hold frame moves with it.

NOTE: Adding a Hold frame pauses the video and puts a gap into the audio. For this reason, hold frames are not recommended for clips with sync sound.

ADD A HOLD FRAME

To add a hold frame, put the playhead where you want to insert a pause, and type Shift + H. (Modify > Retime > Hold)

A 2-second hold frame is inserted into the selected clip at the position of the playhead.

MODIFY A HOLD FRAME

To change the duration of a hold frame, drag the vertical black line (called the “thumb”) at the end of the hold frame left (to shorten it) or right (to lengthen it).

To modify the hold frame itself, double-click the black thumb at the start of the hold frame to display the Speed Transition dialog.

Click Edit and a box appears around the frame that’s current being held. Drag this box left or right to change the frame that’s being held, without deleting either the hold frame or its duration.

To remove a hold frame, select the clip and type Shift + N (Modify > Retime > Normal (100%))


Please rate the helpfulness of this tip.

Click on a star to rate it!

… for Apple Final Cut Pro X

Tip #1640: A Really Fast Still Frame Trick

Larry Jordan – LarryJordan.com

Create still frames fast with these two shortcuts.

Topic $TipTopic

I re-discovered this technique while researching my recent webinar: Clip Speed Effects in Apple Final Cut Pro.

Here’s a very fast way to create a still frame from any video clip in the Browser and edit it as a connected clip in the Final Cut timeline.

  • In the Timeline, put the playhead where you want to insert the still frame.
  • In the Browser, put the playhead (or skimmer) on the frame you want to insert into the timeline.
  • Type Option + F

EXTRA CREDIT

To create a still frame of the current frame under the playhead in the timeline:

  • Make sure the timeline is active
  • Type Shift + F
  • Type Option + F

If the clip edits into the Primary Storyline, undo, deselect the clip and try again. Done.


Please rate the helpfulness of this tip.

Click on a star to rate it!

… for Apple Final Cut Pro X

Tip #1542: More Hidden Uses of the Tilde Key

Larry Jordan – LarryJordan.com

The Tilde key simplifies moving images in the Primary Storyline.

Topic $TipTopic

In Tip #1514, I illustrated how the Tilde key allows moving clips in the Primary Storyline without moving the clips attached to it.

After reading this, Stefan Sonnekus shared another use of the Tilde key:

The tilde key also works when deleting clips from the primary storyline.

Usually any video/audio clips connected to a clip you delete, will be deleted as well, but if you hold down the tilde key when you press Delete, the connected clips will remain in place in relation to the primary storyline. The clips to the right (i.e. coming after the clip you’ve deleted) on the primary storyline will then move to the left to fill the gap and the connected clip(s) will then be connected to the clip(s) that have filled the position of the clip(s) deleted from the primary storyline.


Please rate the helpfulness of this tip.

Click on a star to rate it!

… for Apple Final Cut Pro X

Tip #1517: Absolute vs. Relative Audio Levels

Larry Jordan – LarryJordan.com

Generally, we adjust clip volumes relatively and monitor them absolutely.

Topic $TipTopic

There are two ways to adjust the volume of any audio clip: Absolute and Relative. Here’s what these terms mean and how they work.

An absolute audio level adjustment sets audio levels regardless of the audio volume of that clip before the adjustment. For example, setting one or more clips to -6 dB. If one clip is at -4 dB and a second clip is at 0 dB before the change, they will both be at -6 dB after the change.

A relative audio level adjustment sets audio levels based upon the audio levels before the adjustment. For example, raising the level of one or more clips by 4 dB. If one clip is at -4 dB and a second clip is at 0 dB before the change, the first clip will be at 0 dB and the second clip will be a +4 dB after the change.

NOTE: Audio meters always show absolute levels, the precise volume of all active clips, regardless of the dB setting of their individual clip volume.

KEYBOARD SHORTCUTS

  • To make an absolute adjustment, first, select the clips you want to adjust, then type Control + Option + L and enter the audio level you want to assign.
  • To make a relative audio adjustment, select the clips you want to adjust, then type Control + [minus ] / [ plus ] to decrease/increase audio levels in 1 dB increments.

Please rate the helpfulness of this tip.

Click on a star to rate it!

… for Apple Final Cut Pro X

Tip #1515: A Faster Shortcut to Audio Levels

Larry Jordan – LarryJordan.com

Use the Volume slider in Audio Inspector to adjust multiple clips at once.

A composite showing the Volume slider in the Inspector and selected clips in the timeline.

Topic $TipTopic

Normally, we adjust clip volumes by dragging the volume line in a timeline clip up or down. But there’s a faster way.

Select all the clips you want to adjust in the timeline. Then, in the Audio Inspector, drag the Volume slider. This makes an absolute audio adjustment, setting all selected clips to the same level.

NOTE: An “absolute” audio adjustment sets all clips to the same level, regardless of the level at which the clip was originally set.

This is much faster – and more accurate – than changing each clip individually.


Please rate the helpfulness of this tip.

Click on a star to rate it!