50 tutorials to create specific effects in After Effects.
(Image courtesy of Pexels.com.)
This list, written by Nousheen Aquil, first appeared in JotForm Blog.
This post presents a round-up of Adobe After Effects video tutorials for visual effects and motion graphics-related work. After Effects continues to grow in popularity for motion graphics. With After Effects, you have many choices in how to generate dynamic and expressive motion graphics with truly stunning visual effects — very easily and quickly.
What makes this list different is that, rather than show tools, these tutorials show how to create specific effects.
I won’t list all 50 here – rather click the link above and watch the ones of interest to you.
Please rate the helpfulness of this tip.
Click on a star to rate it!
https://www.theinsidetips.com/wp-content/uploads/2019/09/Tips-Logo-700x150.jpg00Larry Jordanhttps://www.theinsidetips.com/wp-content/uploads/2019/09/Tips-Logo-700x150.jpgLarry Jordan2020-09-30 01:30:002020-09-30 01:30:00Tip #1053: 50 Ways to Create Different Effects
Six video tutorials to improve your motion tracking results.
The Mocha Pro logo.
The team at ToolFarm, a leading third-party reseller of After Effects plugins and visual effects tools, published a blog showcasing video tutorials to improve working with Mocha Pro. Here’s a summary.
Mocha Pro, published by BorisFX, works as a standalone app or plug-in for several hosts and works pretty much the same between hosts, so if you see a tutorial for a software that you don’t use, know that it will translate easily to your host.
The tutorials, all presented by Mary Poplin, include:
Mocha Keyboard Shortcuts
Shape-Based Tracking
More Shape-Tracking Tricks & Tips
Advanced Tracking in Adobe After Effects
How to Avoid Reflections & Shadows
How to Correct Tracking Drift
Please rate the helpfulness of this tip.
Click on a star to rate it!
https://www.theinsidetips.com/wp-content/uploads/2019/09/Tips-Logo-700x150.jpg00Larry Jordanhttps://www.theinsidetips.com/wp-content/uploads/2019/09/Tips-Logo-700x150.jpgLarry Jordan2020-09-30 01:30:002020-09-26 10:51:31Tip #1051: 6 Mocha Pro Tutorials
Creative teams don’ t need to be together to be successful. If they communicate.
The Oxcart Assembly logo.
Recently, Frame.io published a blog detailing how a new team of creatives – Oxcart Assembly – collaborated to create the identity package for NASA’s Launch America. As Frame describes it: This “covers the creation of NASA’s new Launch America brand by a coast-to-coast team of visionaries who enjoy pushing the limits of what’s possible—and how they overcame the boundaries of time and space by using Frame.io.”
This detailed blog covers how the team met, how they pitched NASA and won the project, how they were able to winnow 60 years of NASA video to fit into 60 seconds, and their creative approach to the project.
This is a fun article to read, with plenty of illustrations and inside insight.
Please rate the helpfulness of this tip.
Click on a star to rate it!
https://www.theinsidetips.com/wp-content/uploads/2019/09/Tips-Logo-700x150.jpg00Larry Jordanhttps://www.theinsidetips.com/wp-content/uploads/2019/09/Tips-Logo-700x150.jpgLarry Jordan2020-09-30 01:30:002020-09-30 01:30:00Tip #1034: 60 Years of NASA – in 60 Seconds
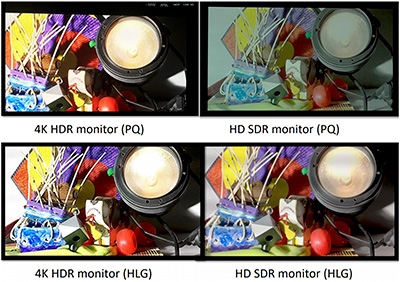
HLG looks better on SDR than PQ. But PQ looks better on HDR monitors.
HLG looks better on SDR monitors, but PQ has more detail in the highlights.
Tip #1043 compared the grayscale differences between HDR HLG and SDR. This tip illustrates the differences between watching HLG and PQ on an SDR monitor.
NOTE: The screen shot and the information in this article are taken from a Venera Technologies article.
To display the digital images on the screen, display devices need to convert the pixel values to corresponding light values. This process is usually non-linear and is called EOTF (Electro-Optical Transfer Function).
While SDR uses Rec. 709, HDR defines two additional transfer functions to handle this issue – Perceptual Quantizer (PQ) and Hybrid Log-Gamma (HLG). HDR PQ is an absolute, display-referred signal while HDR HLG is a relative, scene-referred signal. This means that HLG-enabled display devices automatically adapts the light levels based on the content and their own display capabilities while PQ enabled display devices need to implement tone mapping to adapt the light levels.
Under ideal conditions, dynamic PQ based transformation will achieve the best quality results at the cost of compatibility with existing display systems.
As you can see from the screen shot, HLG images look better on SDR monitors than PQ images. However, while PQ based transforms promise to display the best quality results on HDR enabled monitors, in comparison to HLG, PQ requires proper tone mapping by the display device.
EXTRA CREDIT
As you may be able to see in the screenshot, PQ offers more detail in the highlights than HLG.
Please rate the helpfulness of this tip.
Click on a star to rate it!
https://www.theinsidetips.com/wp-content/uploads/2019/09/Tips-Logo-700x150.jpg00Larry Jordanhttps://www.theinsidetips.com/wp-content/uploads/2019/09/Tips-Logo-700x150.jpgLarry Jordan2020-09-29 01:30:002020-09-26 10:39:52Tip #1049: HDR HLG vs PQ on SDR Monitors
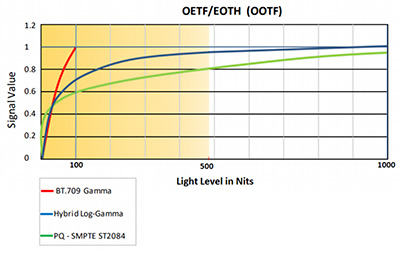
Shadow detail is important to perception that highlights – as both SDR and HDR reflect.
In both SDR and HDR, 50% of all grayscale values are the shadows.
In earlier tips (#1043 and #1049) we compared differences in grayscale values between SDR and HDR. What I discovered during this research is how important shadow detail is for both SDR and HDR.
NOTE: The screen shot and the information in this article are taken from a Venera Technologies article.
Human beings are more sensitive to changes in darker regions compared to changes in brighter regions. This property is exploited in HDR systems providing more granularity (detail) in darker regions compared to brighter regions. The screenshot depicts that the light level range in darker regions are represented by a larger signal value range compared to the brighter regions – meaning more detail in the shadows.
While grayscale values are more evenly distributed for Rec. 709-based displays, they become less granular for HDR displays in the brighter regions. In the case of HLG, more than half of signal values are represented for light levels between 0-60 Nits while the remaining signal values span 60-1000 Nits. Similarly, in the case of PQ-based displays, approximately half of the signal values are represented for light levels between 0-40 Nits while the remaining half of the signal values are represented in a range of 40-1000 Nits.
In other words, for both HDR and SDR, half the total signal range is reserved for shadow values of less than 50 IRE; while, for HDR, the remaining highlight values are spread up to 10,000 IRE (Nits)!
Please rate the helpfulness of this tip.
Click on a star to rate it!
https://www.theinsidetips.com/wp-content/uploads/2019/09/Tips-Logo-700x150.jpg00Larry Jordanhttps://www.theinsidetips.com/wp-content/uploads/2019/09/Tips-Logo-700x150.jpgLarry Jordan2020-09-29 01:30:002020-09-29 15:09:47Tip #1046: For HDR, Shadows are More Important
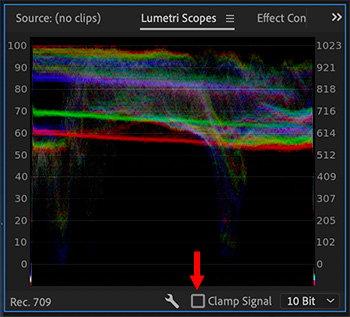
Clamp scopes when doing creative work, unclamp when evaluating images technically.
The Clamp Signal checkbox in the Lumetri Waveform Monitor.
The Lumetri video scopes have a “Clamp Signal” checkbox. As I was researching my recent webinar on “New Features in Adobe Premiere Pro,” I talked with Adobe about this.
What the Clamp Signal checkbox does, when turned on, is compress, or clamp, any grayscale levels over 100 IRE or below 0 IRE that are displayed in the scopes. This means all grayscale values fall between 0 – 100 IRE.
NOTE: These excess values are called “super-white” or “super-black.” Both are illegal values for broadcast, DVD or digital cinema.
This clamping does NOT affect any clips in the timeline or browser display; or media being exported.
In general, when doing creative work, turn clamping on. When evaluating your final project technically, turn clamping off, then make sure no values are above 100 or below 0.
EXTRA CREDIT
If your color grade is done, and you still have illegal levels, apply Video Effects > Color Correction > Video Limiter to clean them up.
Here’s an older tutorial that explains what the limiter does.
Please rate the helpfulness of this tip.
Click on a star to rate it!
https://www.theinsidetips.com/wp-content/uploads/2019/09/Tips-Logo-700x150.jpg00Larry Jordanhttps://www.theinsidetips.com/wp-content/uploads/2019/09/Tips-Logo-700x150.jpgLarry Jordan2020-09-29 01:30:002020-09-29 01:30:00Tip #1044: What Does “Clamp Signal” Do?
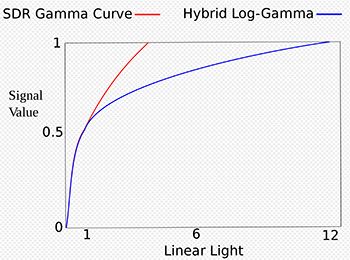
HDR HLG matches SDR shadows and midtones, but adds more highlights.
This chart compares grayscale values between SDR and HDR HLG media.
As I was researching my recent webinar on “New Features in Adobe Premiere Pro,” I came across an interesting graph that compares HDR HLG grayscale values with SDR.
We are all familiar with the grayscale values in SDR (Standard Dynamic Range) media. It’s the Rec. 709 HD footage we work with on a daily basis.
While HDR consists of more than simply brighter pixels, grayscale is the relevant concept here. HDR has two formats: HLG and PQ. HLG (Hybrid Log Gamma) is optimized for broadcast, while PQ is optimized for digital display. Both Final Cut and Premiere support HLG media. But, what does it mean to say “optimized for broadcast?” That’s where this chart comes in.
SDR grayscale values are essentially linear, a “straight line” from 0 IRE (pure black) to 100 IRE (pure white). This range of 100 IRE values is what the entire broadcast signal path is designed to support.
HDR HLG mirrors the linear SDR grayscale values from 0 to 75 IRE – though there is some variation between standards in different countries – then expresses highlights as log values, rather than linear for the top 25% of highlights.
This allows HDR HLG to pack much brighter highlights than SDR, yet still fit within a 100 IRE range. However, there’s a trade-off. While HDR HLG is compatible with broadcast, HDR PQ has more highlight detail. Both HDR formats are much brighter than SDR.
EXTRA CREDIT
If you are creating an HDR project, it is important to know what format your distributor supports BEFORE you do the color grade, because grading HLG and PQ is not the same and you can not switch between them.
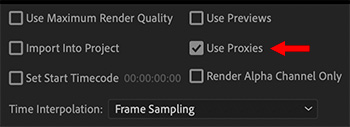
For now, use proxies, but avoid using proxy export.
The “Use Proxies” option in Premiere. My advice? Don’t use it.
New in the 14.4. update to Adobe Premiere Pro is the ability to export proxy files, instead of high-resolution camera masters. The only problem is, this doesn’t work.
While Premiere has supported proxies for a while, new with this release is the ability to export proxy media. Prior, regardless of whether proxies were active or not, it would always export high-resolution media.
While exporting proxy files is a note-worthy feature, this feature does not work in the 14.4 release. After working with this for three days, and talking with Adobe, I have never gotten proxies to export. Instead, regardless of whether proxies are active or not, Premiere always exports high-resolution media.
For now, don’t use this function. Adobe acknowledges that their whole proxy workflow needs more work. I expect to see improvements to proxies in future releases.
EXTRA CREDIT
Compounding this problem, another bug in working with proxies is that if you create a custom proxy ingest setting – say to burn a watermark into the proxy media, Premiere will reject the custom setting due to enabling “Match frame size and frame rate.” However, even when these settings are turned off, Premiere still won’t accept a custom proxy ingest setting.
And, if you create proxies outside of Premiere using Adobe Media Encoder, Premiere will refuse to link to them because AME changes the audio channel mapping, which Premiere needs to link the files.
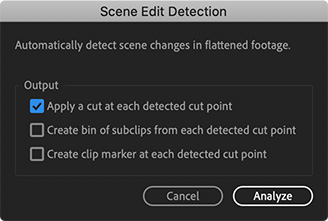
Scene Detection works reliably provided you don’t unlink audio from video.
Scene detection options in Adobe Premiere Pro v. 14.4.
There are two significant bugs in the new automatic scene detection feature in the 14.4 update to Adobe Premiere Pro.
Scene detection reviews a clip, then adds cuts where the scene changes. This is a big help when you need to deconstruct an already-edited piece, or need to chop up DV or HDV footage where multiple takes are contained in a single clip.
NOTE: Scene detection can also create subclips or add clip markers, if that is your preference.
However, in preparing my recent webinar on the “New Features in Adobe Premiere Pro” I discovered two significant bugs in this process.
First, if you unlink audio from video for the clip you want to process, scene detection will fail more than 90% of the time. (If the clip is not unlinked, scene detection works reliably.)
Second, if you don’t want the audio cut, Adobe says you can merge the audio back into a single clip after scene detection cuts a clip. However, when the audio segments are selected in the timeline, the Merge option is disabled.
EXTRA CREDIT
The best option, if you want to cut video and not audio, is to leave the audio and video clips linked, use scene detection to cut the clip, then, delete all the audio segment except the first one, then roll trim the first clip back to its original length.
Please rate the helpfulness of this tip.
Click on a star to rate it!
https://www.theinsidetips.com/wp-content/uploads/2019/09/Tips-Logo-700x150.jpg00Larry Jordanhttps://www.theinsidetips.com/wp-content/uploads/2019/09/Tips-Logo-700x150.jpgLarry Jordan2020-09-29 01:30:002020-09-29 01:30:00Tip #1035: Bugs in Automatic Scene Detection
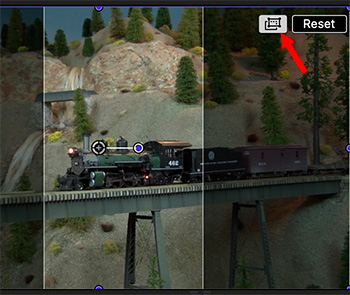
Smart Conform allows you to see the portion of an image being trimmed – and adjust it.
The white button displays the hidden portions of an image.
Smart Conform is new with the 10.4.9 update, which is a quick way to reframe existing clips for the different aspect ratios of social media.
NOTE: Here’s a tutorial that covers this in detail.
However, there’s a very cool button that makes Smart Conform much easier to use. (See screen shot.)
After you trim a clip using Smart Conform, look in the top right corner of the Viewer. When you click the white button indicated by the red arrow, Final Cut displays a dimmed version of the entire image which allows you to see what will be cut from the frame.
Using the Transform > Position settings in the Video Inspector, you can adjust the X position to move the image horizontally. Or keyframe the X position if you need framing to change during playback.
Please rate the helpfulness of this tip.
Click on a star to rate it!
https://www.theinsidetips.com/wp-content/uploads/2019/09/Tips-Logo-700x150.jpg00Larry Jordanhttps://www.theinsidetips.com/wp-content/uploads/2019/09/Tips-Logo-700x150.jpgLarry Jordan2020-09-28 01:30:002020-09-28 01:30:00Tip #1041: New! See What You Are Missing
We may request cookies to be set on your device. We use cookies to let us know when you visit our websites, how you interact with us, to enrich your user experience, and to customize your relationship with our website.
Click on the different category headings to find out more. You can also change some of your preferences. Note that blocking some types of cookies may impact your experience on our websites and the services we are able to offer.
Essential Website Cookies
These cookies are strictly necessary to provide you with services available through our website and to use some of its features.
Because these cookies are strictly necessary to deliver the website, refuseing them will have impact how our site functions. You always can block or delete cookies by changing your browser settings and force blocking all cookies on this website. But this will always prompt you to accept/refuse cookies when revisiting our site.
We fully respect if you want to refuse cookies but to avoid asking you again and again kindly allow us to store a cookie for that. You are free to opt out any time or opt in for other cookies to get a better experience. If you refuse cookies we will remove all set cookies in our domain.
We provide you with a list of stored cookies on your computer in our domain so you can check what we stored. Due to security reasons we are not able to show or modify cookies from other domains. You can check these in your browser security settings.
Google Analytics Cookies
These cookies collect information that is used either in aggregate form to help us understand how our website is being used or how effective our marketing campaigns are, or to help us customize our website and application for you in order to enhance your experience.
If you do not want that we track your visit to our site you can disable tracking in your browser here:
Other external services
We also use different external services like Google Webfonts, Google Maps, and external Video providers. Since these providers may collect personal data like your IP address we allow you to block them here. Please be aware that this might heavily reduce the functionality and appearance of our site. Changes will take effect once you reload the page.
Google Webfont Settings:
Google Map Settings:
Google reCaptcha Settings:
Vimeo and Youtube video embeds:
Other cookies
The following cookies are also needed - You can choose if you want to allow them:
Privacy Policy
You can read about our cookies and privacy settings in detail on our Privacy Policy Page.