… for Random Weirdness

Tip #421: Improve Your Filmmaking Creativity

Larry Jordan – LarryJordan.com

It isn’t your gear, it’s your mind.

Creativity means allowing your mind to wander.

Topic $TipTopic

This article first appeared in TolTips.com. This is an excerpt.

It’s not your gear, but your creativity that will set you apart. Consider these ideas:

  1. Let your mind drift. Boredom is often associated with a loss of productivity but it actually allows the mind to drift, and opens up new forms of input and understanding. Ideas usually don’t come up when your mind is busy.
  2. Follow other creators. Use them to find inspiration. let yourself be influenced, but not copy, story-telling, editing techniques, framing…
  3. Do some research. The more you know about your theme, the higher the chance of finding a nice angle to tell your story.
  4. Challenge yourself. Creativity is the ability to create something unusual. Don’t rest on your laurels. Challenge yourself, go out of your comfort zone.
  5. Be open-minded. Concepts are meant to change through their development. So, remember that it’s better to waste a few hours on a silly idea than waste a potential great idea.

Please rate the helpfulness of this tip.

Click on a star to rate it!

… for Random Weirdness

Tip #420: Shoot Better Vertical Video

Larry Jordan – LarryJordan.com

Vertical video is becoming an ever-more popular deliverable.

Topic $TipTopic

This article, written by Rubidium Wu, first appeared in PremiumBeat.com. This is an excerpt.

“Vertical” and “Cinematic” are two words that don’t belong together. But, all too often, we need to convert a 16:9 masterpiece into a 9:16 deliverable. How?

You have three options:

  1. The Post Method. In post-production, the video editor creates a 608 x 1080 center cut of the final production. The problem is that the framing feels claustrophobic and much of the image gets lost.
  2. Flip the Camera. A better solution is to flip the camera 90° and record a second take. This provides better framing, but requires more storage and more time spent editing, since you now have two separate programs to cut. This also assumes you get the same performance from your actors for each version.
  3. Stacked cameras. If you don’t have time for re-takes, you’ll need two cameras operating at the same time.

    If you don’t want to (or can’t) do additional takes, you’ll need to record horizontal and vertical versions simultaneously. This could mean having a second camera right next to your A camera that’s showing vertically, or to attach another camera to the main camera and roll on both at the same time.

    The best practice is to add another camera person to do the operating, and to sync the second camera via timecode so that the editor can edit both as one.

    Since clients are often reluctant to foot the bill for the extra manpower, attaching a camera to the side of the A camera’s cage works pretty well, if the operator doesn’t have to focus it during a shot and can keep the settings unified.

There’s no perfect solution, but at least you have options because vertical video will be with us for a long, long time.


Please rate the helpfulness of this tip.

Click on a star to rate it!

… for Random Weirdness

Tip #419: Shooting Exteriors at Night

Larry Jordan – LarryJordan.com

Think outside the box for night lighting

Shiny streets at night. (Image courtesy of Pexels.com)

Topic $TipTopic

This article, written by Noam Kroll, first appeared in PremiumBeat.com. This is an excerpt.

The nighttime exterior shot is one of the greatest challenges for filmmakers on a budget. Nighttime exteriors typically require a ton of powerful lights (and generators) to illuminate your scene, which naturally poses a problem if your budget is limited. This is especially the case for wide shots where there is such an expansive area that needs to be lit.

That said, one of the best and most effective tricks of the trade in this type of situation is very simple: water. For years filmmakers have been using water on streets, sidewalks, asphalts, etc. to create a more reflective surface. By evenly spraying the concrete surfaces in your shot, you’re able to brighten up your scene drastically.

Many filmmakers prefer the look of shiny streets at night.


Please rate the helpfulness of this tip.

Click on a star to rate it!

… for Apple Motion

Tip #410: Solo or Lock Layers in Motion

Larry Jordan – LarryJordan.com

Solo or lock elements in Motion

Topic $TipTopic

This article first appeared as an Apple KnowledgeBase article. This is an excerpt.

To solo an object:

You can “solo” a layer or group to hide all other layers and groups in the project. This technique can be useful to isolate a single layer or group in the canvas to animate or manipulate it without interfering with other objects in your composition.

  • In the Layers list in Motion, select layers or groups to solo.
  • Choose Object > Solo (or press Control-S).

NOTE: You can also Control-click an object in the Layers list, then choose Solo from the shortcut menu.

All other layers or groups are deactivated, and only the soloed object is visible in the canvas. When the selected item is soloed, the solo menu item displays a checkmark.

EXTRA CREDIT

Locked objects cannot be modified or moved, and their parameters cannot be altered or animated. However, animation and behaviors previously applied to a layer or group still play. Locking a group also locks all layers and groups nested in it.

To lock an object, or group, click the Lock icon on the right side of the element you want to lock.


Please rate the helpfulness of this tip.

Click on a star to rate it!

… for Apple Motion

Tip #402: Enable or Disable Layers in Motion

Larry Jordan – LarryJordan.com

Disable a layer to make it invisible.

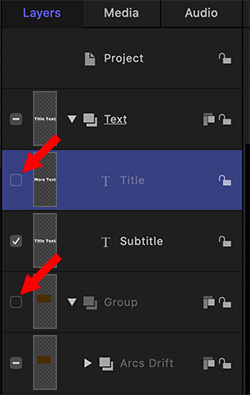
A disabled element (top) and group (bottom), both indicated by red arrows.

Topic $TipTopic

This article first appeared as an Apple KnowledgeBase article. This is an excerpt.

In the Layers list, you can enable or disable layers or groups to make them visible or invisible in the canvas without removing them from your composition. For example, if a large image layer obstructs other layers you want to adjust in the canvas, you can temporarily disable the offending layer. Similarly, you can disable effects objects—filters, behaviors, masks, and so on—to temporarily remove their effect on layers and groups.

Enable or disable objects:

When you disable an image layer or group, it becomes invisible in the canvas. When you disable an effects object (such as a behavior or filter), its effect is disabled.

Do one of the following:

  • In Motion, deselect the activation checkbox to the left of an object in the Layers list; indicated by red arrows in the screen shot.
  • Select an object, then choose Object > Active (or press Control-T).
  • Control-click an object, then choose Active from the shortcut menu.

When disabled, objects are dimmed in the Layers list. Disabled layers are hidden in the canvas; disabled effects objects no longer modify the group or layer they’re applied to. Disabled layer do not export.

NOTE: If you disable layers in a group, the enclosing group’s checkbox displays a dash instead of a checkmark, indicating that some layers are not visible.


Please rate the helpfulness of this tip.

Click on a star to rate it!

… for Apple Motion

Tip #401: Define a Play Range in Motion

Larry Jordan – LarryJordan.com

Play ranges allow you to concentrate on a section of your project.

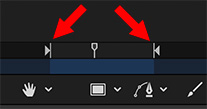
A modified play range in Apple Motion.

Topic $TipTopic

This article first appeared as an Apple KnowledgeBase article. This is an excerpt.

Ordinarily, clicking the Play button plays your project from the current position of the playhead to the last frame. However, you can change the play range of your project by modifying the In and Out points in the Timeline ruler or by using Menu commands. You might do this to focus on a specific section as you fine-tune your project or make other changes.

To customize the In or Out in Motion, do one of the following:

  • In the ruler, drag the In marker from the left edge of the timeline ruler to the frame where you want to set the new In. (Or, drag the Out marker from the right side of the timeline to a new position.) As you drag, the playhead moves with your pointer. When you release the mouse button, the playhead snaps back to its previous position.
  • In the timeline ruler, move the playhead to the frame where you want to set the In point, then choose Mark > Mark Play Range In. (Or, Mark > Mark Play Range Out.)
  • In the timeline ruler, move the playhead to the frame where you want to set the In point, then press Option-Cmd-I. (Or, press Option-Cmd-O).

EXTRA CREDIT

To reset the In and Out:

  • Choose Mark > Reset Play Range.
  • Press Option-X.

The In and Out points reset themselves to the beginning and end of the project.


Please rate the helpfulness of this tip.

Click on a star to rate it!

… for Visual Effects

Tip #418: What is an Anchor Point?

Larry Jordan – LarryJordan.com

The anchor point determines rotation and scaling.

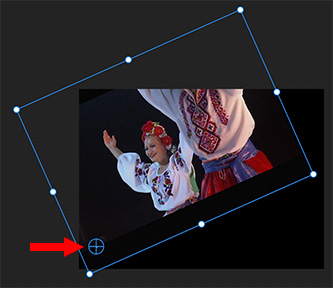
A repositioned anchor point in Adobe Premiere Pro CC.

Topic $TipTopic

When it comes to altering the position of an image, both Premiere and Final Cut allow us to adjust the “anchor point.” But what does it do?

The anchor point is that spot around which an image rotates or scales.

By default, it is in the center of the frame, allowing us to rotate or scale from the center. However, you can achieve some interesting effects by moving it.

In Premiere:

  • Select the clip you want to adjust. (Anchor points are adjusted on a clip-by-clip basis.)
  • Click the word Motion in Effect Controls, then drag the plus sign in a circle in the Program Monitor to where you want to reposition the anchor point. (See the screen shot.)

In Final Cut Pro X:

  • Select the clip you want to adjust. (Like Premiere, anchor points are adjusted on a clip-by-clip basis.)
  • While you can’t adjust the anchor point by dragging, you can change its position in the Video inspector > Transform > Anchor.

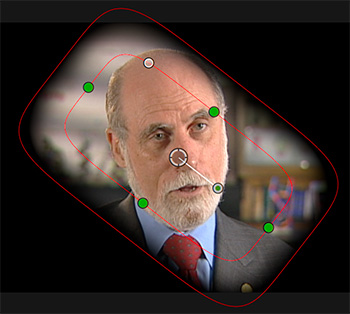
Finally, adjust rotation or scale and watch what happens.


Please rate the helpfulness of this tip.

Click on a star to rate it!

… for Visual Effects

Tip #413: Mask Multiple Clips with an Adjustment Layer

Larry Jordan – LarryJordan.com

Adjustment layer masks can apply to one or more clips.

Masking applied to an adjustment layer in Final Cut Pro X.

Topic $TipTopic

Both Adobe Premiere Pro and Apple Final Cut Pro X support adjustment layers; though you’ll need to create one first for Final Cut. This is a technique you can use in both.

NOTE: This tutorial explains how to create an adjustment layer for FCP X.

If you want to mask a single clip, Draw Mask in FCP X, or the masking tools in the Effect Controls panel (Premiere) work great. But, what if you want to mask multiple clips?

Well, you could create a mask in one clip, then copy and paste it to multiple clips. That works, until you need to make a change. Adjusting multiple clips is a pain in the neck.

Here’s the better way: Use an adjustment layer.

In Premiere:

  • Open the sequence you want to mask.
  • Choose File > New > Adjustment layer and match the settings in your sequence.
  • Add the adjustment layer to the top of your timeline, then select it.
  • Use the masking tools in the Effect Controls panel to create the shape and effect you want.

In FCP X:

  • After you create an adjustment layer, you’ll find it in the Titles browser. Drag it so it is on top of all other clips in the timeline.
  • Apply Effects > Masks > Draw Mask to the adjustment layer.
  • Create the shape and effect you want.

In both software, once the mask is applied to the adjustment layer, all clips under it will be masked. If you need to make changes, you only need to change the adjustment layer.

This is a huge timesaver.


Please rate the helpfulness of this tip.

Click on a star to rate it!

… for Visual Effects

Tip #403: Blue or Green: Which Keys Better?

Larry Jordan – LarryJordan.com

Green and blue background yield different results.

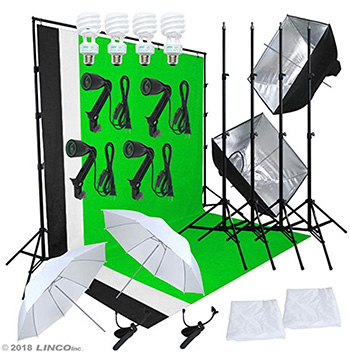
Typical green-screen background and lighting.

Topic $TipTopic

This article, written by Charles Yeager, first appeared in PremiumBeat.com. This is an excerpt.

Chroma key compositing is the actual technique of layering two images together based on color hues. The solid color background essentially acts like a matte for your footage. Later, in post-production, you can remove the solid color background to make it transparent, allowing for compositing.

We use green and blue backgrounds because they are the furthest colors from human skin tones. But the two colors don’t give the same results. In an EXCELLENT article, Charles Yeager explains when to use green and when to use blue backgrounds. Here are the highlights:

Green Screens Pros:

  • Results in a cleaner key because digital cameras pick up more information
  • Requires less lighting
  • High luminance is good for daytime scenes
  • Uncommon color in clothing

Green Screen Cons:

  • Color spill can be too heavy, especially on fine details and edges (or blonde hair)
  • High luminance is not great for dark or night scenes

Blue Screen Pros:

  • Less color spill is great for subjects with fine details and edges
  • Lower luminance is good for dark or night scenes

Blue Screen Cons:

  • Requires more lighting, which can be expensive
  • Common clothing color, making it difficult to key in post

Please rate the helpfulness of this tip.

Click on a star to rate it!

… for Codecs & Media

Tip #416: Closed Caption Formats for Social Media

Larry Jordan – LarryJordan.com

As you might expect, there’s no one subtitle format that works everywhere.

Topic $TipTopic

Erin Myers, at Rev.com, summarized the closed caption formats used by social media. Here’s her article. This is an excerpt.

Closed caption file formats vary depending on which site you’re using to host your videos and which platform you use to obtain the closed caption transcripts.

Adobe Premiere supports:

  • Scenarist (.scc)
  • MacCaption (.mcc)
  • XML (.xml)
  • Spruce Subtitle File (.STL).

Apple Final Cut Pro X supports:

  • iTunes Timed Text (.iTT)
  • SubRip (.srt)
  • SCC (CEA-608 format)

YouTube recommends Scenarist (.scc) format. But is compatible with:

  • SubRip (.srt)
  • WebVTT (.vtt)
  • DFXP/TTML (.dxfp)
  • Scenarist (.scc)
  • SAMI (.sami)

Vimeo recommends WebVTT (.vtt) but is compatible with:

  • SubRip (.srt)
  • DXFP/TTML (.dxfp)
  • Scenarist (.scc)
  • SAMI (.SAMI)

Facebook recommends the SubRip (.srt) format.

Netflix has two recommended formats. The EMA Closed Captions Working Group has identified Scenarist (.scc) as a preferred format due to its status as the de facto standard for CEA-608 and CEA-708 data.  SMPTE-TT is also recommended as, under the applicable laws, it is considered safe if captions are compliant. It is also compatible with:

  • SubRip (.srt)
  • Scenarist (.scc)
  • Timed Text (.ttml)
  • DXFP (.dxfp)
  • WebVTT (.vtt)
  • Cheetah CAP (.cap)
  • MacCaption (.mcc)
  • Quicktime Subtitle (.qt.txt)
  • Spruce Subtitle File (.stl).
  • XML (.xml)

Amazon Video Direct requires closed captions on all new videos uploaded to the service, but has not recommended a favorite. It supports:

  • Scenarist (.scc)
  • SMPTE-TT (.xml)
  • EBU-TT (.xml)
  • DFXP Full/TTML (.dfxp)
  • iTunes Timed Text (.iTT)

iTunes asks for a Scenarist-formatted file (with an .scc extension), or a QuickTime file with a closed captioning track. Compatible formats:

  • Scenarist (.scc)
  • DFXP Full/TTML (.dfxp)
  • iTunes Timed Text (.iTT)

Please rate the helpfulness of this tip.

Click on a star to rate it!