… for Adobe Premiere Pro CC

Tip #1837: Trimming Captions

Larry Jordan – LarryJordan.com

Captions should only be trimmed using the red Roll tool.

The Text > Create Captions button (top) and captions in the Timeline (bottom).

Topic $TipTopic

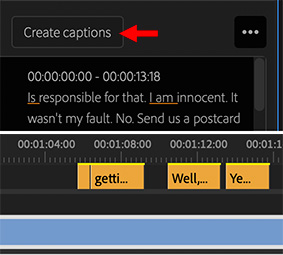
Once you create a transcript using the new Speech-to-Text feature in Adobe Premiere Pro, click the Create Captions button in the new Text panel to create captions.

The key to remember when trimming captions is to always use the red “Roll Trim” tool. This adjusts the In or the Out of the selected caption without changing the timing of any downstream captions.

If you use the yellow “Ripple Trim” tool, you’ll adjust the In or the Out of the selected caption AND shift the position of all downstream captions.

Since, most of the time, you create captions when the edit is complete, shifting the position of captions means that they will no longer sync to the dialog.


Please rate the helpfulness of this tip.

Click on a star to rate it!

… for Random Weirdness

Tip #1756: Tips for Keeping a Camera Cool

Larry Jordan – LarryJordan.com

Hot cameras are noisy. Here’s how to keep yours cool.

Image detail courtesy of Pexels.com.

Topic $TipTopic

This article, written by Lewis McGregor, first appeared in PremiumBeat.com. This is a summary.

Since the introduction of the RED ONE MX, camera cooling has continued to improve. However, because camera cooling has improved doesn’t mean modern cameras aren’t prone to overheating. Additionally, even when cameras can keep themselves cool, it’s usually at the cost of fans being ramped up to an audible level.

Here are a few methods to keep your camera cool on a hot summer’s day.

  • Gel Packs. Running straight from what I used with my RED ONE, gel packs are still handy to lower the temperature of a camera. You can pick up gel packs (usually a set of two) for around $10. While a gel pack will stay cold for at least one to two hours when pressed against the skin, you can expect this to be considerably less when used against a hot camera.
  • Ice Packs. Due to their size and weight, they aren’t ideal for placing on top of a camera. And, given they’re filled with tap water then frozen, it’s not something that you want near your camera to begin with.
  • Courtesy Flags and Other Shade Tools. While it sounds majestic, a courtesy flag is nothing more than a regular grip flag. However, this isn’t intended to be used to shape light or negative fill. Instead, it’s used to create shade for the crew who cannot move into the shade while working. You can also get a flag setup to keep the camera out of line for direct sunlight.
  • White Shoulder Case. Larger and heavier lenses are commonly painted white by the manufacturer to reflect sunlight to keep the lens cool. Using that methodology, some case and bag manufacturers—such as Porta Brace—have created white shoulder cases.
  • Pop-up Canopy Tent. These are portable tents that can be set up within minutes. And, while they may initially look costly, you can pick up the smaller models, as seen in the image below, for less than $50.

EXTRA CREDIT

This article has more details, illustrations and links to more tips to keeping your gear cool and in working order.


Please rate the helpfulness of this tip.

Click on a star to rate it!

… for Random Weirdness

Tip #1758: Night Shoots & the BMD Cinema Camera 6K

Larry Jordan – LarryJordan.com

Shooting at night requires a good camera and great lighting.

Image detail courtesy of NoFilmSchool.com & Charles Haine.

Topic $TipTopic

This article first appeared in NoFilmSchool.com. This is a summary.

If you’re a filmmaker wanting to shoot characters at night who also are in motion, you’re going to run into changing light temperatures and light sources, and you need a camera that’s just as flexible and shoots RAW. You also need something small, that can be affordably stabilized, and will shoot great footage in low light.

In this collaboration between Blackmagic Design and No Film School, Charles Haine worked with the Blackmagic Pocket Cinema Camera 6K Pro on a night shoot. Charles was especially interested in working with the new higher ISO setting. That’s because 3200 ISO is useful for night shoots along with night walk and talks.

This article provides sample footage, technical setups, and more.


Please rate the helpfulness of this tip.

Click on a star to rate it!

… for Visual Effects

Tip #1761: Boris FX Offers Three New Tutorials

Larry Jordan – LarryJordan.com

Three free tutorials covering a panoply of effects software.

Image courtesy of BorisFX.com

Topic $TipTopic

The team at Boris FX recently released three new free video tutorials covering Particle Illusion, Sapphire’s Builder Effect and Mocha Pro Silhouette.

Combine 3D Particles & Text in After Effects

John Dickinson shows how Continuum 2021.5’s new Particle Illusion features allow you to easily integrate 3D particles with After Effects 3D text. Includes AE project file to follow along.

Here’s the link.

Stylized Text Effects Using Sapphire Builder Effect.

Ben Brownlee jumps into Sapphire’s Builder Effect to share an insider tip. Use the Quick Text Effect preset (new to 2021) to transform simple boring text to striking. 

Here’s the link.

LIVE STREAM: Mocha Pro + Silhouette for Nuke Compositors

Dan Smith, CraftyApes senior compositor and author of NUKE Codex: Nodes within Nodes, joins the Boris FX team to show how he uses Mocha Pro and Silhouette to supercharge his compositing workflow inside Nuke. (Live Stream – July 7)

Here’s the link.


Please rate the helpfulness of this tip.

Click on a star to rate it!

… for Adobe Premiere Pro CC

Tip #1753: New Quick Export (Premiere beta)

Larry Jordan – LarryJordan.com

Quick Export simplifies compressing and exporting sequences.

The new Quick Export menu in the beta version of Adobe Premiere Pro.

Topic $TipTopic

In the latest beta version of Adobe Premiere, Quick Export was updated to support creating new export presets.

In the current version of Premiere, Quick Export allows you to quickly select a compression preset and export the selected sequence. But it doesn’t allow you to easily create new presets.

The beta version does.

  • Click the Quick Export icon (top red arrow) in the top right corner of Premiere.
  • In the Preset menu, select More presets (lower red arrow). This displays a list of almost 100 compression presets you can use to export your sequence.
  • Click the Star icon to the left of the preset name, then click OK to add it to this list.

EXTRA CREDIT

Currently, all Match Source presets create H.264 files. The only way to create an uncompressed file is to create a custom preset using the beta version of Premiere.

This webinar – New Features in Adobe Premiere Pro (beta) – shows how that’s done.


Please rate the helpfulness of this tip.

Click on a star to rate it!

… for Adobe Premiere Pro CC

Tip #1755: The Slip Tool is Under-rated

Larry Jordan – LarryJordan.com

The Slip tool adjusts the content of a shot, without changing location or duration.

The Program Monitor showing the In (left) and Out (right) frames during a Slip edit.

Topic $TipTopic

One of the most helpful tools in Premiere Pro is the Slip tool – yet it is often overlooked when working with B-roll. Here’s what it does.

The Slip tool adjusts the content of a shot, without affecting its location or duration.

Imagine you just added a B-roll clip to the timeline. You trimmed the In and Out so it precisely fits within the time you have. But, though this is the right duration, is it really the best content?

Most often, it isn’t.

Select the Slip tool (shortcut: Y), click in the middle of the B-roll clip and drag. (This is called a “Slip Trim.”)

Two images immediately appear in the Program Monitor: the In and Out frames of the clip. As you drag, these frames will change, allowing you to precisely adjust the contents of the shot.

I find myself using the Slip tool all the time to make sure the B-roll I just edited into the timeline has the right visuals for my sequence.


Please rate the helpfulness of this tip.

Click on a star to rate it!

… for Codecs & Media

Tip #1764: Vimeo Guide to Embedding Videos

Larry Jordan – LarryJordan.com

Embedding video is better than linking. This guide shows how.

Image courtesy of Vimeo.com.

Topic $TipTopic

Vimeo recently published a guide, written by Martha Kendall, to embedding videos for a variety of websites. Here’s how to get this free report.

Titled: “How to Embed Videos: Tutorials for Websites From WordPress to Wix,” Kendall writes: “Embedding your videos is a simple way to enhance SEO, save bandwidth, and ensure swoon-worthy playback. So, we put together a guide to help you embed across a slew of sites like YouTube, Wix, Shopify, and so much more.”

“At this point, we’re all probably aware of the power of video for marketing — especially when it comes to ecommerce sites. What you might not know, however, is how to get video onto your site in a way that extends average site duration, boosting conversions in the process.

If that’s the case for you, then you’ve come to the right place. This guide has all the answers you’ll need for learning how to embed video on your site.”

Here’s the link.


Please rate the helpfulness of this tip.

Click on a star to rate it!

… for Apple Final Cut Pro X

Tip #1751: Create Selects with Keywords

Larry Jordan – LarryJordan.com

Keywords are a fast, highly-flexible way to organize clips.

The Keyword Editor in Final Cut Pro.

Topic $TipTopic

In the old days, we would create a timeline, then add clips to it based upon the shots we liked. This worked, but it wasn’t very efficient.

The reason it wasn’t efficient was that these timelines containing “selects” didn’t tell us anything about the contents of the clips. Suddenly, our selects morphed into multiple timelines, renaming clip segments… like Topsy, it could quickly get out of control.

Instead, FCP offers keywords.

In the Browser, set an In and an Out marking a clip range that you like, then assign one or more keywords describing that section. For example: Scene, actor, interior/exterior, angle, content… whatever is important to you.

NOTE: To open the Keyword Editor either click the key icon in the top left corner of Final Cut, or type Cmd + K.

Enter as many keywords as you like, separated by commas. (See screen shot).

To view all the clips containing a specific keyword, twirl down the Event containing the media you want to search and click the name of the keyword. Only those segments containing that keyword are displayed in the Browser.

EXTRA CREDIT

To reveal all clips, again, click the name of the Event.

For more powerful searches, use the Search Filter. Here’s a tutorial from my website that illustrates this in more detail.


Please rate the helpfulness of this tip.

Click on a star to rate it!

… for Apple Motion

Tip #1748: Use HDR Media in an HD Motion Project

Larry Jordan – LarryJordan.com

The “secret sauce” is HDR Tools.

Using HDR HLG media in an HD project, the Levels filter (top), HDR Tools (middle) and the corrected image.

Topic $TipTopic

Apple Motion supports HDR media, both for HDR and HD projects. Here’s how to use HDR media in an HD (Rec. 709) project.

The secret is HDR Tools.

By default, all Motion projects are Rec. 709 (HD). To change this:

  • Add your video into a Motion project.
  • Select the video in the Layers pane and choose Filters > Color > HDR Tools.

NOTE: Your video will not look perfect after applying this filter, but it should look better.

  • In Inspector > Filters > HDR Tools, select the conversion that most closely resembles your footage using the Mode menu. In my example, I’m working with HLG footage and converting it to Rec. 709.
  • Again, with the video selected in the Layers pane, choose Filters > Color > Levels. Adjust the Levels so that your video looks good in the Viewer.

NOTE: These adjustments are why I wish Motion provided video scopes so we could set levels properly.

Notice that HDR Tools is applied first, then the Levels filter is added.

The lower image in the screen shot shows an HLG HDR image with HDR Tools applied, then Levels were adjusted to create the finished gray scale.

Here’s an Apple KnowledgeBase article on using HDR Tools.


Please rate the helpfulness of this tip.

Click on a star to rate it!

… for Apple Motion

Tip #1749: When to Use HDR Tools in Apple Motion

Larry Jordan – LarryJordan.com

HDR Tools is only necessary when your HDR media does not match your project.

HDR Tools applied to a clip, illustrating the Mode menu contents.

Topic $TipTopic

HDR Tools is a filter that exists for both Final Cut Pro and Motion that converts HDR media into different formats. For example (see screen shot), you will need to apply Filters > Color > HDR Tools when:

  • You import HDR media into a Rec. 709 project.
  • You import HDR HLG media into a HDR PQ project.
  • You import HDR PQ media into an HDR HLG project.

NOTE: By default, HDR Tools is set for HDR to Rec. 709. While that sounds benign, it is not a good option. You will always get better quality by selecting the specific format of your HDR media (HLG or PQ).

The screen shot illustrates the options in the Mode menu.

EXTRA CREDIT

If you don’t know the format of your HDR media, BE SURE!! to find out before you start editing. The differences between HLG and PQ are significant.


Please rate the helpfulness of this tip.

Click on a star to rate it!