Sometimes, the best way to learn is to take apart something that already works.
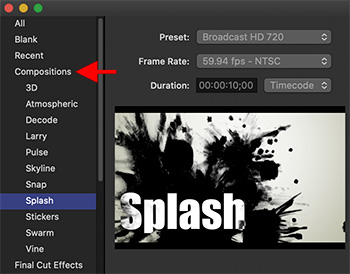
A mash-up of the Motion Project Browser, highlighting “Splash.”
If you are like me, you start Motion and skip right past the Project Browser to create a new project and start designing.
However, the next time you start Motion, take a look at the categories on the left of the Project Broswer (that’s the window that opens when you first start Motion, indicated by the red arrow in the screen shot).
Compositions are a collection of lower thirds, infographics (menus) and opening titles that can jump start your thinking when you need to create something for your next project.
For example, opening Compositions > Splash > Open displays a 12-second animated opening where all you need to do is add text. However, since this is a Motion project, you can also customize any of the settings, colors or elements that you like.
Take a look at these and you’ll learn a lot about how Motion works, as well as giving you plenty of ideas for your next project.
Some very cool stuff.
Please rate the helpfulness of this tip.
Click on a star to rate it!
https://www.theinsidetips.com/wp-content/uploads/2019/09/Tips-Logo-700x150.jpg00Larry Jordanhttps://www.theinsidetips.com/wp-content/uploads/2019/09/Tips-Logo-700x150.jpgLarry Jordan2020-12-31 01:30:002020-12-31 01:30:00Tip #1295: Motion Compositions are a Good Start
It is fascinating to see what readers find interesting!
During this last year, The Inside Tips published 975 tips and techniques covering six subject categories:
Adobe Premiere
Apple Final Cut Pro
Apple Motion
Codecs & Media
Random Media Weirdness
Visual Effects
Here are three “Top Ten Tips Lists:” The first shows the most popular tips covering Apple Motion. The second list shows the Top Ten most read tips across all categories. The third list shows the highest rated tips across all categories sorted by votes.
NOTE: Each tip was rated 5 out of 5. They are sorted by the number of votes each tip received, with most votes listed first.
Please rate the helpfulness of this tip.
Click on a star to rate it!
https://www.theinsidetips.com/wp-content/uploads/2019/09/Tips-Logo-700x150.jpg00Larry Jordanhttps://www.theinsidetips.com/wp-content/uploads/2019/09/Tips-Logo-700x150.jpgLarry Jordan2020-12-31 01:30:002020-12-27 10:34:24Tip #1292: Top Ten Tips of 2020 for Apple Motion
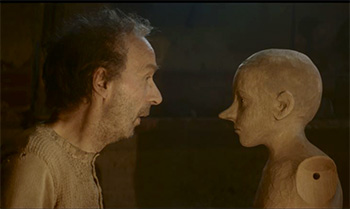
Note that motion capture, more than pure design, was the foundation for these chararacters.
(Image courtesy of VFXVoice.com)
This article, written by Ian Failes, first appeared in VFXVoice.com. This is a summary.
Among the many creatures and aliens showcased in director Luc Besson’s Valerian and the City of a Thousand Planets are members of the Pearl, a beautiful race of humanoid-like creatures who live in a picturesque beach setting.
The Pearl were completely synthetic creations by Weta Digital, which generated the characters from performances by actors with motion-capture equipment for their face and bodies.
VFX Voice visited Weta Digital in Wellington to find out more from the studio’s Visual Effects Supervisor, Martin Hill, as he runs down some of the main challenges his team faced in making the Pearl. Here are his comments:
Luc didn’t want to go completely human for the faces – otherwise he’d have put makeup on them and just [filmed] them, of course. He wanted to be able to make them abstract enough from their selves that although we could still read their emotions and read their personalities and read their characters, they were still very much not of this world. They were very alien faces. We spent quite a lot of time working at how we can alter their features and still carry their personality across in terms of the eyes.
One of the great things about the performance capture that we did, particularly the stuff on the set, was, as Luc was filming it, he was doing it as both capture and filming – composing the shot. The terrific thing about that is he’s getting the performance he wants. We could rely on the motion capture very heavily as the performance. Essentially, that ‘template’ is what Luc would expect back. That was a really great help for us when it came to giving shots the first-look animation. Nothing was unexpected. The animation would look pretty much exactly like the live template. Obviously, there was finesse and touches we added because the proportions are a little bit different.
EXTRA CREDIT
The article goes into more detail on how these creatures were created, along with video, images and links.
Please rate the helpfulness of this tip.
Click on a star to rate it!
https://www.theinsidetips.com/wp-content/uploads/2019/09/Tips-Logo-700x150.jpg00Larry Jordanhttps://www.theinsidetips.com/wp-content/uploads/2019/09/Tips-Logo-700x150.jpgLarry Jordan2020-12-30 01:30:002020-12-30 01:30:00Tip #1297: Super Alien Models of Valerian
This article, written by Ian Failes, first appeared in VFXVoice.com. This is a summary.
Matteo Garrone’s Pinocchio, an Italian-made re-telling of the classic tale by Carlo Collodi, is a film that draws upon both practical and digital effects to tell its story of the central puppet character wanting to become a real boy.
Behind the majority of the digital visual effects work was One Of Us, based in London, which augmented several scenes that made use of on-set makeup and prosthetics, as well as delivering a number of fully-CG elements that had to stay within the fairy-tale realm of the story.
Here, One Of Us Visual Effects Supervisor Theo Demiris breaks down a number of the studio’s characters and shots from the film.
“Pinocchio as a character was entirely filmed in-camera made possible by some incredible prosthetics developed by Mark Coulier and his team. Our intervention consisted mainly of cleaning up creases and imperfections, usually around the hands and neck area.”
Donkey underwater: “We knew from the very beginning that this was going to be entirely a VFX shot. This moment was all about hitting the emotional beats of the story, and we very quickly realized that this also meant that it had to be a very long shot, 1,000 frames to be exact. The donkey had to lose its breath and then very slowly be enveloped in a shimmering school of fish.
“Once we blocked the Donkey animation, we started working on the environment and the behavior of the fish. The environment had to feel Mediterranean – highly detailed but murky and poetic. The fish had to behave beautifully but also realistically. For that, Matt Noris, one of our Senior FX Artists, put together a crowd simulation that was flexible and easy to art-direct. Once we had all the ingredients out from CG, Guillaume Menard, our Comp Supervisor, put it together himself and introduced a lot of real-life elements in the environment.”
“The most notable of effect in terms of work was the character of the Tuna. Not only was it a big fish, but also had to interact with the surrounding water and performances. For this, the actor was in prosthetics on the face with the rest his body hidden away underwater. We then kept only the very front of his performance and attached a CG body behind him. To do so seamlessly we had to track the head and attach the body while reverse-engineering his head movements and adjusting the animation to make them feel as if they were coming from the body rather than the other way around. It had, after all, to feel as if the body was floating and driving the movements of the head.”
EXTRA CREDIT
There’s a lot more to his discussion, along with images illustrating some of their VFX work in the article linked above.
Please rate the helpfulness of this tip.
Click on a star to rate it!
https://www.theinsidetips.com/wp-content/uploads/2019/09/Tips-Logo-700x150.jpg00Larry Jordanhttps://www.theinsidetips.com/wp-content/uploads/2019/09/Tips-Logo-700x150.jpgLarry Jordan2020-12-30 01:30:002020-12-30 01:30:00Tip #1296: The Fairy-Tale Effects in Pinocchio
It is fascinating to see what readers find interesting!
During this last year, The Inside Tips published 975 tips and techniques covering six subject categories:
Adobe Premiere
Apple Final Cut Pro
Apple Motion
Codecs & Media
Random Media Weirdness
Visual Effects
Here are three “Top Ten Tips Lists:” The first shows the most popular tips covering Visual Effects. The second list shows the Top Ten most read tips across all categories. The third list shows the highest rated tips across all categories sorted by votes.
NOTE: Each tip was rated 5 out of 5. They are sorted by the number of votes each tip received, with most votes listed first.
Please rate the helpfulness of this tip.
Click on a star to rate it!
https://www.theinsidetips.com/wp-content/uploads/2019/09/Tips-Logo-700x150.jpg00Larry Jordanhttps://www.theinsidetips.com/wp-content/uploads/2019/09/Tips-Logo-700x150.jpgLarry Jordan2020-12-30 01:30:002020-12-27 10:36:25Tip #1291: Top Ten Tips of 2020 for Visual Effects
It is fascinating to see what readers find interesting!
During this last year, The Inside Tips published 975 tips and techniques covering six subject categories:
Adobe Premiere
Apple Final Cut Pro
Apple Motion
Codecs & Media
Random Media Weirdness
Visual Effects
Here are three “Top Ten Tips Lists:” The first shows the most popular tips covering Adobe Premiere Pro. The second list shows the Top Ten most read tips across all categories. The third list shows the highest rated tips across all categories sorted by votes.
TOP 10 INSIDE TIPS FOR 2020
FOR ADOBE PREMIERE PRO
NOTE: Each tip was rated 5 out of 5. They are sorted by the number of votes each tip received, with most votes listed first.
Please rate the helpfulness of this tip.
Click on a star to rate it!
https://www.theinsidetips.com/wp-content/uploads/2019/09/Tips-Logo-700x150.jpg00Larry Jordanhttps://www.theinsidetips.com/wp-content/uploads/2019/09/Tips-Logo-700x150.jpgLarry Jordan2020-12-29 01:30:002020-12-27 10:38:28Tip #1290: Top Ten Tips of 2020 for Adobe Premiere Pro
It is fascinating to see what readers find interesting!
During this last year, The Inside Tips published 975 tips and techniques covering six subject categories:
Adobe Premiere
Apple Final Cut Pro
Apple Motion
Codecs & Media
Random Media Weirdness
Visual Effects
Here are three “Top Ten Tips Lists:” The first shows the most popular tips covering Codecs & Media. The second list shows the Top Ten most read tips across all categories. The third list shows the highest rated tips across all categories sorted by votes.
NOTE: Each tip was rated 5 out of 5. They are sorted by the number of votes each tip received, with most votes listed first.
Please rate the helpfulness of this tip.
Click on a star to rate it!
https://www.theinsidetips.com/wp-content/uploads/2019/09/Tips-Logo-700x150.jpg00Larry Jordanhttps://www.theinsidetips.com/wp-content/uploads/2019/09/Tips-Logo-700x150.jpgLarry Jordan2020-12-29 01:30:002020-12-27 10:40:32Tip #1289: Top Ten Tips of 2020 for Codecs & Media
Latency is directly tied to spinning storage media – the traditional hard drive – and determines how quickly you can access your data. Latency is the average time for the data being accessed to rotate into position under the drive’s magnetic head, after a completed seek.
As PC Tech Guide.com writes:
Disk RPM is a critical component of hard drive performance because it directly impacts the latency and the disk transfer rate. The faster the disk spins, the more data passes under the magnetic heads that read the data; the slower the RPM, the higher the mechanical latencies. Hard drives only spin at one constant speed, and for some time most fast EIDE hard disks spin at 5,400 rpm, while a fast SCSI drive is capable of 7,200 rpm.
Mechanical latencies, measured in milliseconds, include both seek time and rotational latency. Seek Time defines the amount of time it takes a hard drive’s read/write head to find the physical location of a piece of data on the disk. Latency is the average time for the sector being accessed to rotate into position under a head, after a completed seek. It is easily calculated from the spindle speed, being the time for half a rotation.
A drive’s average access time is the interval between the time a request for data is made by the system and the time the data is available from the drive. Access time includes the actual seek time, rotational latency, and command processing overhead time.
EXTRA CREDIT
What makes SSDs so fast is that they don’t spin or have magnetic drive heads. This means that terms like latency and seek time no longer apply. Here’s the full PCTechGuide.com article to learn more.
Please rate the helpfulness of this tip.
Click on a star to rate it!
https://www.theinsidetips.com/wp-content/uploads/2019/09/Tips-Logo-700x150.jpg00Larry Jordanhttps://www.theinsidetips.com/wp-content/uploads/2019/09/Tips-Logo-700x150.jpgLarry Jordan2020-12-29 01:30:002021-01-01 15:00:28Tip #1287: What is Latency
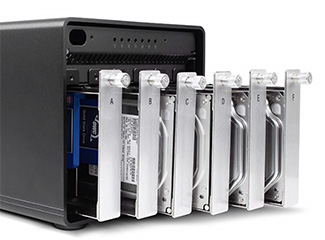
Optimizing RAIDs for SSD drives will improve performance.
(Image courtesy of OWC.)
RAIDs (Redundant Array of Independent Disks/Drives/Devices) consist of a number of hard drives or SSDs grouped together into a single unit so that they appear to the computer as a single device. Because there is more than one hard drive in a RAID, they offer greater performance and storage.
As we continue shifting storage from spinning media, which holds a LOT, to SSDs, which are FAR faster and more flexible, we need to rethink how RAIDs are configured. This configuration is done using “levels.” There are different levels of RAIDs, identified by numbers:
NOTE: Another benefit to SSD-based RAIDs, is that there is no latency. Because there is no mechanical movement, data can be retrieved much more quickly.
RAID 0 – Fast, inexpensive, no data redundancy. Requires a minimum of two hard drives inside the RAID enclosure. The more drives you add, the faster the performance, as performance and storage capacity are the sum of all drives in the RAID. However, if you lose one drive, you’ve lost ALL your data. Most often used when speed combined with low cost are paramount.
RAID 1 – Complete data redundancy. Generally only uses two hard drives inside the RAID enclosure. Often called “mirroring,” each drive is a complete copy of the other. Most often used for backing up servers or when on-set for DIT media work. Has the speed and capacity of the slowest single drive in the system.
RAID 3 – Medium-fast, data redundancy. Requires a minimum of three drives, as one drive is reserved solely for parity data. Should one drive die, your data is safe. This technology is no longer in common use, replaced by the faster performance of RAID 4 or 5 systems.
RAID 4 – Very-fast, data redundancy. Similar to RAID 3, requires a minimum of three drives, as one drive is reserved solely for parity data. Should one drive die, your data is safe. This is the preferred RAID format for SSD drives because of how the data is stored on the drives. When compared to a RAID 5, RAID 4 with SSDs is about 25% faster on reads.
RAID 5 – Very fast, data redundancy. Requires a minimum of three drives and shares parity data across all drives. Most often found with four or more drives inside. If one drive goes down, your data is safe. This is the preferred choice for RAIDs containing spinning media (traditional hard disks). Used for both locally-attached storage and servers.
RAID 6 – Fast, extra data redundancy. Requires a minimum of four drives. This version protects your data in the event two hard drives die at the same time. More expensive than RAID 5, but, generally, the same physical size. Like the RAID 5 this is most often used connected to just one computer. Not as fast as a RAID 5.
RAID 10 (or 1+0) – VERY fast, totally redundant. Requires a minimum of four drives, but is more often created by combining two matched RAID 0’s into a RAID 1. This provides the speed equivalent of a RAID 0, with the data redundancy of RAID 1. As RAIDs continue to drop in price, this can be a less-expensive way to create systems that rival the performance of a RAID 50.
RAID 50 – VERY fast, data redundancy. Generally the domain of very large RAIDs, this format combines the speed of RAID 0 with the redundancy of RAID 5 by dividing the RAID into sections, where you can lose a drive in each section without losing data. These systems generally cost more than $10,000 and contain at least twelve drives. Generally used in network and server situations where multiple users need to access the same data.
RAID 60 – VERY fast, extra data redundancy. Generally the domain of very large RAIDs, this format combines the speed of RAID 0 with the redundancy of RAID 6 by dividing the RAID into sections, where you can lose two drives in each section without losing data. These systems generally cost more than $10,000 and contain at least twelve drives. Generally used in network and server situations where multiple users need to access the same data.
EXTRA CREDIT
RAID 4 is the preferred option for SSD-based RAIDs.
Please rate the helpfulness of this tip.
Click on a star to rate it!
https://www.theinsidetips.com/wp-content/uploads/2019/09/Tips-Logo-700x150.jpg00Larry Jordanhttps://www.theinsidetips.com/wp-content/uploads/2019/09/Tips-Logo-700x150.jpgLarry Jordan2020-12-29 01:30:002020-12-29 01:30:00Tip #1286: Optimize RAIDs for SSDs
Frame sizes will continue to increase, here’s how they benefit current projects.
We are in the middle of determining the “optimum” frame size for video projects as frame sizes continue to scale up. New projects are consistently shooting in 4k frame sizes, with cameras pushing up to 8K frame sizes and beyond.
First, while it could be argued that we can’t actually SEE 4K in most situations, that hasn’t stopped distributors from requesting it. However, even if we are creating HD projects, there is a value in shooting larger frame sizes. Recently, Jason Boone wrote a blog about the benefits of scaling larger frame sizes to fit smaller projects.
Reframe a shot. 4K provides so many extra pixels to choose from, you can convert a wide shot into a close-up. However, cutting into the frame won’t change depth of field, so the image won’t look the same as if you had zoomed in.
Use the same take multiple times. Using the same take for both wide shots and close-ups makes it seem as though you have two cameras. The benefit is that where talent is looking change. The disadvantage is that background and depth of field won’t change either.
Create camera moves. Using keyframes you can create movement where there was none in the original shot. However, like moves on a still, elements won’t change position as they would if you used a dolly on set.
Stabilize your footage. This is powerful. Stabilization always zooms into a shot. By having lots of extra pixels to work with, the image won’t lose detail or sharpness.
Adjust the image for graphics. There’s nothing worse than graphics you can’t read. 4K gives us extra pixels for scaling and repositioning.
4K may not be visible to the eye, but it can be a BIG benefit in post. And the same holds true for larger frame sizes yet – provided your storage is fast and large enough to hold it!
We may request cookies to be set on your device. We use cookies to let us know when you visit our websites, how you interact with us, to enrich your user experience, and to customize your relationship with our website.
Click on the different category headings to find out more. You can also change some of your preferences. Note that blocking some types of cookies may impact your experience on our websites and the services we are able to offer.
Essential Website Cookies
These cookies are strictly necessary to provide you with services available through our website and to use some of its features.
Because these cookies are strictly necessary to deliver the website, refuseing them will have impact how our site functions. You always can block or delete cookies by changing your browser settings and force blocking all cookies on this website. But this will always prompt you to accept/refuse cookies when revisiting our site.
We fully respect if you want to refuse cookies but to avoid asking you again and again kindly allow us to store a cookie for that. You are free to opt out any time or opt in for other cookies to get a better experience. If you refuse cookies we will remove all set cookies in our domain.
We provide you with a list of stored cookies on your computer in our domain so you can check what we stored. Due to security reasons we are not able to show or modify cookies from other domains. You can check these in your browser security settings.
Google Analytics Cookies
These cookies collect information that is used either in aggregate form to help us understand how our website is being used or how effective our marketing campaigns are, or to help us customize our website and application for you in order to enhance your experience.
If you do not want that we track your visit to our site you can disable tracking in your browser here:
Other external services
We also use different external services like Google Webfonts, Google Maps, and external Video providers. Since these providers may collect personal data like your IP address we allow you to block them here. Please be aware that this might heavily reduce the functionality and appearance of our site. Changes will take effect once you reload the page.
Google Webfont Settings:
Google Map Settings:
Google reCaptcha Settings:
Vimeo and Youtube video embeds:
Other cookies
The following cookies are also needed - You can choose if you want to allow them:
Privacy Policy
You can read about our cookies and privacy settings in detail on our Privacy Policy Page.