… for Codecs & Media

Tip #578: Media Codec Issues on Windows

Larry Jordan – LarryJordan.com

Windows Media Player has its own challenges in finding and playing codecs.

Topic $TipTopic

Windows Media Player includes some of the most popular codecs, like MP3, Windows Media Audio, and Windows Media Video. However, it doesn’t include the codecs required for Blu‑ray Disc files, FLAC files, or FLV files. If something isn’t working in Windows Media Player, you might not have the right codec on your PC. The easiest way to fix this problem is to go online and search for the codec you need.

How can I find out which codecs are installed on my PC?

  1. On the Help menu in Windows Media Player, select About Windows Media Player. If you don’t see the Help menu, select Organize > Layout > Show menu bar.
  2. In the About Windows Media Player dialog box, select Technical Support Information. Your web browser will open a page that includes a lot of detailed info about the related binary files, codecs, filters, plug-ins, and services installed on your PC. This info should help you troubleshoot problems.

How do I tell which codec was used to compress a file and what format a file is in?

There isn’t a way to determine with absolute certainty the codec used to compress a file, but the following are your best options:

  • To determine what codec was used with a specific file, play the file in the Player, if possible. While the file is playing, right-click the file in the library, and then select Properties. On the File tab, look for the Audio and Video codec sections.
  • Use a non-Microsoft codec identification tool. To find one, search for “codec identification tool” on the web. You’ll find several tools as well as useful related info.

You might be able to tell the format of a file by looking at the file name extension (such as .wma, .wmv, .mp3, or .avi). However, there are limits to this approach. Many programs create files with custom file extensions. And it’s possible for anyone to rename a file without changing the file’s format. A file with an .mpg or .dvr-ms extension, for example, is usually just an AVI file that’s been compressed by using some version of an MPEG video codec.


Please rate the helpfulness of this tip.

Click on a star to rate it!

… for Codecs & Media

Tip #577: VoIP Audio is Not High-Quality

Larry Jordan – LarryJordan.com

Codecs are also why our phones work.

Topic $TipTopic

We’ve all heard of codecs. These convert audio, or video, from analog into digital signals and back.

Just as codecs are the heart of digital visual media, they are also at the heart of VoIP, which stands for Voice over IP. This technology is what allows you to connect a telephone to the Internet and have it actually work.

An audio codec works its magic by sampling the audio signal several thousand times per second. For instance, a WAV codec samples the audio at 64,000 times a second. It converts each tiny sample into digitized data and compresses it for transmission. When the 64,000 samples are reassembled, the pieces of audio missing between each sample are so small that to the human ear, it sounds like one continuous second of audio signal.

What I learned recently is that the codecs used for VoIP don’t sample at 64,000 samples per second. Rather, they sample at 8,000 samples per second. According to the Nyquist theorem, if you divide the sample rate by 2, that yields the maximum frequency response for that sample rate. This means that the maximum high frequency carried by most VoIP systems is 4,000 Hz. This is well below the frequency range of many consonants, such as “S” and “T.”

EXTRA CREDIT

In case you were wondering, codecs use advanced algorithms to help sample, sort, compress and packetize audio data. The CS-ACELP algorithm (CS-ACELP = conjugate-structure algebraic-code-excited linear prediction) is one of the most prevalent algorithms in VoIP. CS-ACELP organizes and streamlines the available bandwidth. Annex B is an aspect of CS-ACELP that creates the transmission rule, which basically states “if no one is talking, don’t send any data.” The efficiency created by this rule is one of the greatest ways in which packet switching is superior to circuit switching. It’s Annex B in the CS-ACELP algorithm that’s responsible for that aspect of the VoIP call.

And, no, that won’t be on the quiz.


Please rate the helpfulness of this tip.

Click on a star to rate it!

… for Adobe Premiere Pro CC

Tip #574: The Power of Master Clips

Larry Jordan – LarryJordan.com

Changes to a Master clip affect all its clips in the timeline.

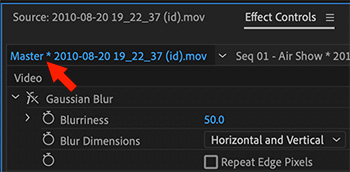
A blur applied to a Master clip in Premiere.

Topic $TipTopic

This article first appeared in MotionArray.com. This is an excerpt.

If you’re like most video editors, you chop little bits out of your main clips to add to your timeline. Sometimes, you end up using a few different bits out of the same file in various places on your main video. What usually happens then is that you make changes to each separate piece on your timeline. 

But here’s the beauty of Master Clip effects. You can make changes to the full original media clip, then when you drag a clip out of it onto your timeline, the changes travel with it. This is a huge time saver, as it means that you really only have to apply the effect to the original file instead of making multiple little edits on bits of pieces of the same file!

  • Simply double-click your video file in the Project Manager to load it into the Source monitor.
  • Next, drag the effects you want to apply from the Effects panel into the Source Monitor.
  • Switch to the Effect Controls panel and adjust as you normally would. You can watch your changes in the Program Monitor, if you select a clip in the timeline that is derived from that Master clip.

The changes will be applied across your project, to whichever clips come from that file – even if they are already edited into the timeline. Quick and easy! 

EXTRA CREDIT

To remove effects applied to a master clip, right-click the file name in the Project panel and choose Disable Masterclip Effects.


Please rate the helpfulness of this tip.

Click on a star to rate it!

… for Adobe Premiere Pro CC

Tip #567: YouTube Compression Settings for Premiere Pro

Premiere’s YouTube presets are good – provided you first check H.264.

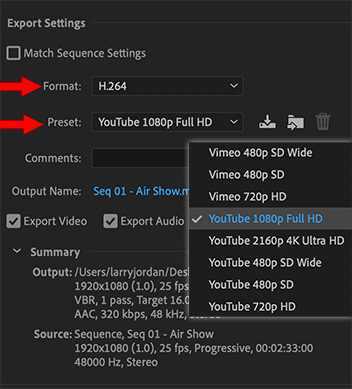
Key compression settings for YouTube in Premiere Pro CC’s Export Settings screen.

Topic $TipTopic

In Tip #561 I shared YouTube’s optimized compression settings. Here’s how they translate into Adobe Premiere Pro CC.

Select the compression frame size that matches the size of your project. There’s no benefit to making the compressed frame size smaller, and scaling it larger will only make it blurry.

Premiere’s settings closely match YouTube’s recommendations. On the Export Settings screen:

  • Set Format to H.264
  • Pick the YouTube preset that matches the sequence frame size. In general, you’ll only need 720p, 1080p or 2160p.
  • Make sure the box to match frame rate is checked.

The audio compression settings are fine for both stereo and mono.


Please rate the helpfulness of this tip.

Click on a star to rate it!

… for Adobe Premiere Pro CC

Tip #566: Vintage Software, NLEs and Mac OS

Robert Withers – http://cinesouvenir.com

The best option for FCP 7 or Premiere CS6 is an older Mac Pro with older OS.

Topic $TipTopic

I decided to keep a vintage MacBook Pro running Mac OS 10.8.5 (Mountain Lion) so I can access FCP 7 and a vintage project edited in the first Premiere Pro CC (2013) It is too late to buy Premiere CS6, the last pre-rent Premiere; now a Creative Suite on Ebay sells for $2,000.

A friend is editing a experimental documentary on FCP 7 on a vintage machine, similar to what Bong Joon-ho did Parasite in 2019.

There’s one function that doesn’t work, which is the Project Manager, but I understand many have had problems with this in other versions.

On my 2018 MacBook Air Premiere Pro doesn’t really run but DaVinci Resolve 15 seems to require much fewer computer resources. It loads in a third of the time of Premiere and I can do basic cuts-only editing of pieces up to about 40 minutes.

I would like to get an iMac but B&H can’t tell you what OS is installed and I don’t want to test Catalina. I understand if you get a machine that was designed to run Mojave you can reinstall it from a drive.

Larry adds: Robert, you might consider getting an older Mac Pro – say around 2012 – which may come with an older OS and will run FCP 7/Premiere Pro CS6 perfectly. Option 2 is to convert your FCP 7 project to Resolve and edit it there. That would be done with a XML transfer.


Please rate the helpfulness of this tip.

Click on a star to rate it!

… for Codecs & Media

Tip #565: Frame Rate Does Not Create Motion Blur

Motion blur is based on shutter speed, not frame rate.

Topic $TipTopic

A frequent email from filmmakers asks about how to change their project’s frame rate to make it more “cinematic.” Specifically, they are looking to convert to 24 fps. The problem is that changing the frame rate will only make a video look worse.

Motion blur, which is a slight blurring of the edges of a moving object, is caused by something moving while the shutter is open. If the shutter speed is slow, meaning the shutter is open for a longer time, the motion blur is exaggerated. If the shutter speed is fast, the motion blur is minimized.

Changing the frame rate after an image is recorded won’t affect motion blur. Motion blur is determined at the moment the original image is recorded.

Changing the frame rate after a clip is recorded can only be done by removing or adding frames. For example, changing the frame rate from 30 fps to 24 fps means that every fifth frame of the original media will be removed. There’s no other way to do this, you can’t “reallocate” frames to match a different frame rate; you can only drop or add them.

In the case of dropping frames, this means that the video will have a slight “stutter” every five frames, which will mess with any kind of smooth camera move.

The moral of this story is: shoot the frame rate you need to deliver and don’t change frame rates after the fact.

EXTRA CREDIT

The web supports any frame rate you can upload, unlike broadcast or cable. There’s no benefit to converting frame rates.


Please rate the helpfulness of this tip.

Click on a star to rate it!

… for Apple Final Cut Pro X

Tip #576: Retime Audio to Match Dialog

Allen Rowell

Retime clips to match the pace of dialog.

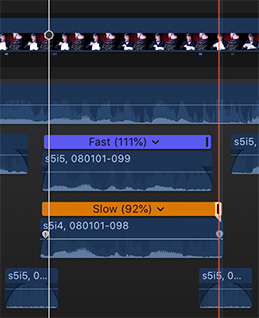
Screenshot showing two alternate audio takes, running at two different speeds.

Topic $TipTopic

You can retime audio to match dialogue to a video clip that was recorded at a different time as shown in this example. The audio recorded with the video clip that I wanted to use had problems that the audio recorded with the reverse angle did not have. I had two good takes of the audio from which to choose but, while the actor’s delivery was pretty consistent, the pacing varied so that words came out faster or slower from one take to the next.

In the screenshot you can see the target clip in the timeline with the two alternate takes as connected clips underneath. By retiming these clips (Cmd-R), and dragging on the retime handles, I made the waveforms line up. The first take was sped up to 111% and the second take was slowed down to 92%.

Then, I played back the edit using Cmd-V and the Audio Inspector to turn off clips and isolate the audio that I wanted to hear under the video that I wanted to use.

Because FCP X does not pitch shift the audio, the result was delightfully usable.


Please rate the helpfulness of this tip.

Click on a star to rate it!

… for Apple Final Cut Pro X

Tip #568: YouTube Compression Settings for Compressor

Larry Jordan – LarryJordan.com

Compressor’s settings need tweaks for best YouTube compression.

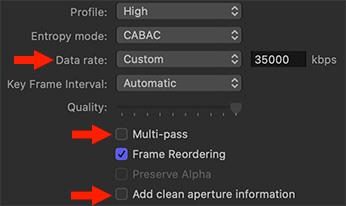
Compressor’s video compression settings panel. Red arrows indicate areas to change.

Topic $TipTopic

In Tip #561 I shared YouTube’s optimized compression settings. Apple Compressor’s YouTube settings change based upon the frame size of the source media. While close, they need some tweaks for best results.

VIDEO SETTINGS

Match the size of your compressed frame to the source frame. There’s no reason to make it smaller and making it larger will only make it blurry.

Select the setting that matches your project frame size from Video Sharing Services. Then, in the Video tab:

  • Turn OFF Multi-pass
  • Turn OFF Add clean aperture information
  • If compressing for 4K, change the Data Rate to Custom, 35000.
  • 1080p and 720p video data rate settings are fine.

AUDIO SETTINGS

  • If compressing stereo, set the Bit Rate to 320 kbps.
  • If compressing mono, set the Bit Rate to 160 kbps.

Please rate the helpfulness of this tip.

Click on a star to rate it!

… for Apple Final Cut Pro X

Tip #549: What Is Optical Flow?

Larry Jordan – LarryJordan.com

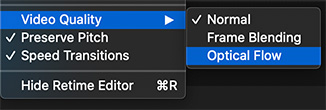
Use Optical Flow for clips slower than 10%.

The video quality options in Final Cut Pro X’s Retime menu.

Topic $TipTopic

Optical Flow is a way to generate artificial frames to smooth extremely slow motion video. The ideal way to create extreme slomo is to shoot at a high frame rate, then slow it down. But, if you are editing after production is complete and no high-frame rate video was shot, you need to go to Plan B.

Optical Flow is Plan B.

When slowing a clip, you’ll get the best results by picking a speed percentage which divides evenly into 200. For example, 50, 33, 25, 20, 10, 5 and so on.

There are three choices for image quality:

  • Normal. Use this for speeds of 50% or faster, including fast motion/timelapse.
  • Frame Blending. Use this for speeds between 10 and 50%. This quickly dissoves between each slowed frame.
  • Optical Flow. This creates frames, what animators call “tweens” for very slow motion. Use this for speeds slower than 10%.

The problem is that optical flow often doesn’t work. By that I mean it generates strange artifacts, especially between foreground and background.

Over the years, I’ve found very few clips where optical flow works reliably. I tend to prefer frame blending with speeds at 20% or faster.

For extreme slow motion, the best option – and most reliable – is to shoot a high frame rate.

EXTRA CREDIT

To apply Optical Flow, slow a clip using the Retime menu, then choose Optical Flow from Video Quality.


Please rate the helpfulness of this tip.

Click on a star to rate it!

… for Apple Final Cut Pro X

Tip #531: How to Delete Render Files in FCP X

Larry Jordan – LarryJordan.com

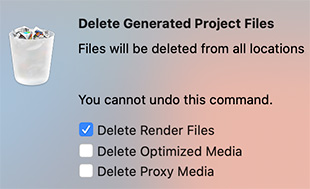
Any deleted generated media can easily be rebuilt.

This message shows the three categories of media that can be deleted at any time.

Topic $TipTopic

Final Cut generates a lot of files, even for small projects. While all these files are necessary during your edit, they are not necessary afterwards. When you need to recover storage space, here’s what you need to do.

There are three types of generated media that can be deleted:

  • Render files
  • Optimized media
  • Proxy files

NOTE: If, by chance, you delete the wrong thing, Final Cut will automatically rebuild it from existing files. This is a good reason to never trash camera native files until your edit is complete.

There are three areas from which you can delete generated media:

  • Library
  • Event
  • Project

Select the area you want delete files from in either the Library List or the Browser, then choose File > Delete Generated [ ] Files. (Where the brackets are will appear “Library,” “Project,” or “Event,” depending upon what you selected.)

FCP X will warn you that this action can not be reversed, which is true, but misleading. While you can’t undo the deletion, you can create new optimized or proxy media from File > Transcode Media.

And FCP X will create new render files whenever they are needed in your edit.

IMPORTANT NOTE! Do not delete the master files from your camera if you plan to delete optimized media later. Optimized media files are derived from the camera master files. Deleting both would be a very bad idea.

EXTRA CREDIT

While you can do this during an edit, you don’t save a lot, as Final Cut will rebuild whatever files it needs from what you deleted. The big benefit comes when you are archiving a project. Deleting generated media reduces the size of your archives.


Please rate the helpfulness of this tip.

Click on a star to rate it!