The Inside Tips are taking a hiatus for the month of August. We’ll be back the first week of September with more Inside Tips.
Thanks for your readership and comments. Enjoy the rest of your summer.
Feel free to contribute some tips of your own here.
Please rate the helpfulness of this tip.
Click on a star to rate it!
https://www.theinsidetips.com/wp-content/uploads/2019/09/Tips-Logo-700x150.jpg00Larry Jordanhttps://www.theinsidetips.com/wp-content/uploads/2019/09/Tips-Logo-700x150.jpgLarry Jordan2021-08-05 01:30:002021-08-05 01:30:00Tip #1835: The Inside Tips Take a Hiatus
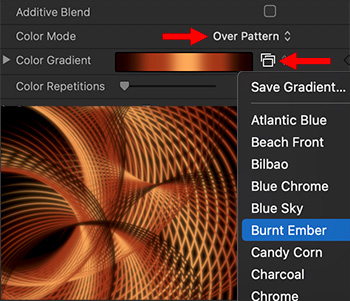
Replicators can create fascinating effects, once you change the default settings.
Inspector > Color Pattern settings (red arrows) and the Arcs effect (color insert).
One of the less understood effects in Motion are Replicators. These create animated patterns over time. The problem is that when you look at them, they are pretty ugly. That’s because the default settings are set to: “Bland.”
Here’s an example.
Go to Library > Replicators and drag Arcs 3 into the Viewer.
Twirl down the main Group.
Twirl down the Arcs 3 group.
Select the Arcs element.
Go to Inspector > Properties and change Color to Over Pattern.
Click the small rectangles icon (red arrow in screen shot) to reveal a menu and choose any color pattern. My pattern was Burnt Ember.
Select the group containing the replicator and apply Filters > Blur > Soft Focus
You just created a nice animated background for text or video inserts.
EXTRA CREDIT
For extra interest:
Rotate the group containing the replicator.
Enlarge the group containing the replicator so it fills more of the frame
Experiment with other blurs.
Please rate the helpfulness of this tip.
Click on a star to rate it!
https://www.theinsidetips.com/wp-content/uploads/2019/09/Tips-Logo-700x150.jpg00Larry Jordanhttps://www.theinsidetips.com/wp-content/uploads/2019/09/Tips-Logo-700x150.jpgLarry Jordan2021-08-05 01:30:002021-08-05 01:30:00Tip #1840: Don’t Accept the Defaults
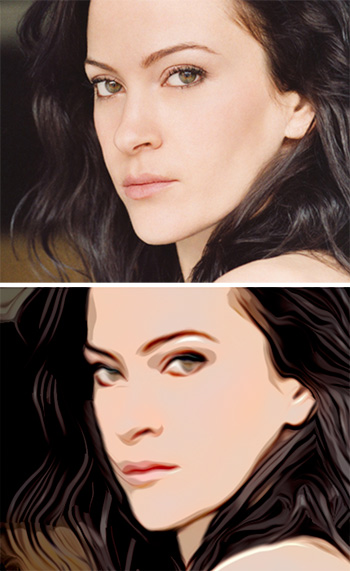
Often, combining filters looks better than a single filter alone.
The source image (top) and the finished comic look.
The Comic filter in Motion converts a photo into a “comic book look.” And, while it isn’t bad, it can be better. Here’s how to enhance sharpness without losing the comic touch.
The top image in the screen shot illustrates the source image. Import the source into Motion, then select it in the Layers panel.
Add Filters > Stylize > Color Emboss to the image. This creates a high contrast edge to the color areas in the image.
NOTE: This especially helps with hair and eye detail.
Now apply Filters > Stylize > Comic. Because of the enhanced edging, your comic book look will be sharper and more detailed, without losing the comic look.
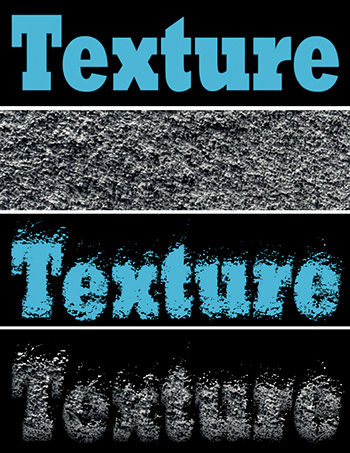
A bump map is used to apply texture to an image, based upon input from a second image.
To apply it:
Create some text
Import a texture image, something with variations in grayscale
Select the text and apply Distortion > Bump map
Drag the icon for the texture image into the image well in Inspector > Filters
Uncheck the texture image in the Layers panel to make it invisible.
Adjust the filter settings in Inspector > Filters
For added impact, select the text element in the Layers panel and apply Inspector > Properties > Blend Mode > Stencil Alpha.
In the screen shot:
The top image is the source text, created in Motion with a cyan color applied.
The next image is the source texture (i.e. differences in grayscale).
The third image is that text with Distortion > Bump map applied. The texture image was unchecked in the Layers panel to make it invisible, then dragged into the image well for the bump map filter in the Inspector.
The bottom image adds a Stencil Alpha blend mode to the text, so that it is textured using the bump map, then filled with the texture using the blend mode.
Bump maps provide more image distortion (and texture) than a blend mode alone.
EXTRA CREDIT
Finding the right texture to use for a bump map is tricky. You want something with differences in grayscale, but not too much. Allow time to experiment.
Tip #1821 illustrates the Reflections filter, which, to my eye, provides better results than the Bump map filter.
Please rate the helpfulness of this tip.
Click on a star to rate it!
https://www.theinsidetips.com/wp-content/uploads/2019/09/Tips-Logo-700x150.jpg00Larry Jordanhttps://www.theinsidetips.com/wp-content/uploads/2019/09/Tips-Logo-700x150.jpgLarry Jordan2021-07-29 01:30:002021-07-23 17:25:21Tip #1820: Use Bump Maps to Create Texture
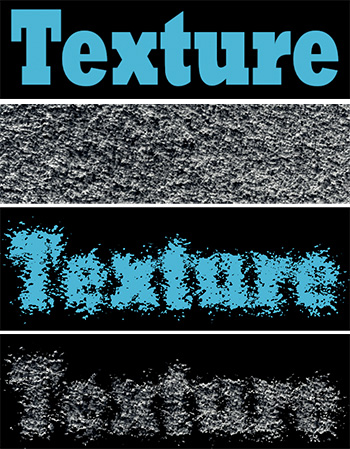
The Refraction filter provides more control and better results than a Bump map.
Top to bottom: Source text, source texture, Refraction filter applied, Stencil Alpha blend mode added.
Bump maps add texture to text or an image based upon grayscale values in a source texture. While Distortion > Bump Map is one way to achieve this (see Tip #1820), the Distortion > Refraction filter offers more control in the settings and, to my eye, a smoother result.
To apply it:
Create some text
Import a texture image, something with variations in grayscale
Select the text and apply Distortion > Refraction
Drag the icon for the texture image into the image well in Inspector > Filters
Uncheck the texture image in the Layers panel to make it invisible.
Adjust the filter settings in Inspector > Filters
For added impact, select the text element in the Layers panel and apply Inspector > Properties > Blend Mode > Stencil Alpha.
Adjust the settings for the Refraction filter – there are more options here than with the Bump
EXTRA CREDIT
The screen shot illustrates this process. From the top down:
Source image
Source text image
Refraction filter applied
Refraction filter and Stencil Alpha blend mode applied.
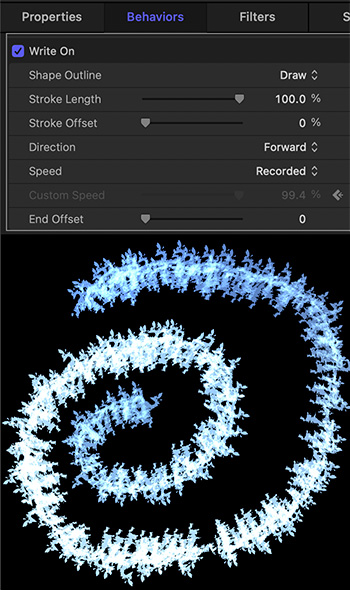
The Write-on behavior is added to every Paint Brush stroke.
Write-on behavior settings (top) and sample effect using the Heavy Frost Shape Style (bottom).
Whenever you draw with the Paint Brush tool, the Write-on behavior is added to it. This automatically animates the Paint Brush to exactly replicate your drawing motions.
But, if you are, ah, drawing-challenged like me, this may not be a good thing. Fortunately, the Write-on behavior is fully editable.
EDIT THE POINTS
Select the Write-on behavior in the Layers panel.
Then, from the Arrow tool menu, select Edit Points. This tool selects, moves, modifies, locks or deletes keyframes in the Write-on animation.
CHANGE THE SPEED
Select the Write-on behavior in the Layers panel.
Adjust its duration by dragging its edges in the mini-Timeline.
CHANGE ITS BEHAVIOR
Select the Write-on behavior in the Layers panel.
In Inspector > Behavior > Write-on you can:
Have the line draw itself on
Erase itself
Draw then erase itself
Start in a different location, using Offset
Change its direction
Change its speed
EXTRA CREDIT
While the Write-on behavior can be applied to any line drawn by the Paint Brush or Pen tool, it is applied automatically to the Paint Brush tool.
This is one behavior that, the more you experiment, the more uses you can find for it.
Please rate the helpfulness of this tip.
Click on a star to rate it!
https://www.theinsidetips.com/wp-content/uploads/2019/09/Tips-Logo-700x150.jpg00Larry Jordanhttps://www.theinsidetips.com/wp-content/uploads/2019/09/Tips-Logo-700x150.jpgLarry Jordan2021-07-29 01:30:002021-07-23 17:22:14Tip #1822: Hidden Feature of the Paint Brush Tool
Final Cut Generators are the most flexible Motion template.
The Final Cut Generator logo in Apple Motion.
A Final Cut Generator is the most flexible of the four Final Cut templates in Motion. While Effects, Transitions, and Titles have very specific functions, a Generator can be anything.
Use Generators to create animated backgrounds, bulleted text, visual effects… anything.
Final Cut Effects are always applied to a clip. Titles are always superimposed over the clip below it. Transitions blend between clips. Generators are standalone media clips which can be used in conjunction with other clips, or stand on their own.
If you have a specific use in mind, select Effect, Title or Transition. If you aren’t sure, Generators provide the widest variety of options.
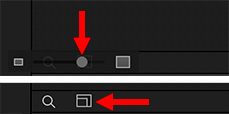
This hidden control changes the height of elements in the Layers panel.
Enable Layer sizing by clicking the rectangle icon (bottom) when the Timeline is open.
There’s a very useful setting in Motion that only appears when the Timeline is open – even though it has nothing to do with the Timeline!
When the Timeline is displayed (F6 toggles it open or closed), a magnifying glass and rectangle icon appear immediately above it.
Click the rectangle icon (bottom red arrow in screen shot) to reveal a new control (top red arrow).
As you drag this control left or right, the size of the layers in the Layers panel will increase or decrease.
What’s interesting, to me, is that the Timeline needs to be open for this Layers panel control to become visible.
Please rate the helpfulness of this tip.
Click on a star to rate it!
https://www.theinsidetips.com/wp-content/uploads/2019/09/Tips-Logo-700x150.jpg00Larry Jordanhttps://www.theinsidetips.com/wp-content/uploads/2019/09/Tips-Logo-700x150.jpgLarry Jordan2021-07-22 01:30:002021-07-22 01:30:00Tip #1802: Change the Height of Layer Elements
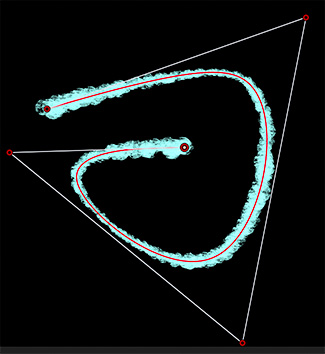
A B-spline curve, with a cyan-colored chalk style. Control points are the red dots.
I was reading several technical articles about when to use B-spline curves. While they make good points, here’s the key thing you need to know.
A B-spline is always a smooth curve. Unlike a Bezier curve, which can have corners or curves, B-splines are always smoothly curving from beginning to end.
This means that if you have problems drawing smooth curves, as I do, B-splines come to your rescue.
To draw one:
Click the small arrow next to the Pen tool and choose B-spline.
Then, start clicking in the Viewer. As you do, a curve is instantly created.
Drag a red control point to change the shape of the curve. The shape will change, but it will ALWAYS be a smooth curve.
Click the starting point to create a closed curve, otherwise, you’ll create an open curve by default.
EXTRA CREDIT
Open the HUD, assign the curve a width, then click the Shape Style icon at the bottom of the HUD to assign a style to the border. This image uses Traditional > Chalk Easy with the border set to a cyan color.
NOTE: For shape styles to appear, the border width needs to be enabled and greater than 0.
This concept is the same for B-spline masks: always a smooth curve.
Please rate the helpfulness of this tip.
Click on a star to rate it!
https://www.theinsidetips.com/wp-content/uploads/2019/09/Tips-Logo-700x150.jpg00Larry Jordanhttps://www.theinsidetips.com/wp-content/uploads/2019/09/Tips-Logo-700x150.jpgLarry Jordan2021-07-22 01:30:002021-07-22 01:30:00Tip #1803: Why Use B-Spline Curves?
We may request cookies to be set on your device. We use cookies to let us know when you visit our websites, how you interact with us, to enrich your user experience, and to customize your relationship with our website.
Click on the different category headings to find out more. You can also change some of your preferences. Note that blocking some types of cookies may impact your experience on our websites and the services we are able to offer.
Essential Website Cookies
These cookies are strictly necessary to provide you with services available through our website and to use some of its features.
Because these cookies are strictly necessary to deliver the website, refuseing them will have impact how our site functions. You always can block or delete cookies by changing your browser settings and force blocking all cookies on this website. But this will always prompt you to accept/refuse cookies when revisiting our site.
We fully respect if you want to refuse cookies but to avoid asking you again and again kindly allow us to store a cookie for that. You are free to opt out any time or opt in for other cookies to get a better experience. If you refuse cookies we will remove all set cookies in our domain.
We provide you with a list of stored cookies on your computer in our domain so you can check what we stored. Due to security reasons we are not able to show or modify cookies from other domains. You can check these in your browser security settings.
Google Analytics Cookies
These cookies collect information that is used either in aggregate form to help us understand how our website is being used or how effective our marketing campaigns are, or to help us customize our website and application for you in order to enhance your experience.
If you do not want that we track your visit to our site you can disable tracking in your browser here:
Other external services
We also use different external services like Google Webfonts, Google Maps, and external Video providers. Since these providers may collect personal data like your IP address we allow you to block them here. Please be aware that this might heavily reduce the functionality and appearance of our site. Changes will take effect once you reload the page.
Google Webfont Settings:
Google Map Settings:
Google reCaptcha Settings:
Vimeo and Youtube video embeds:
Other cookies
The following cookies are also needed - You can choose if you want to allow them:
Privacy Policy
You can read about our cookies and privacy settings in detail on our Privacy Policy Page.