… for Random Weirdness

Tip #128: 9 Hidden Mac Keyboard Symbols

Larry Jordan – https://LarryJordan.com

The Option key is your passport to hidden symbols.

Topic $TipTopic

We all know about emoji, but there are useful symbols hidden all over your keyboard. Most of these can be found using the Option key; some with Shift + Option. Here are some of the most useful.

Type This Get This What This Is
Option + [ ] “ ” Curved Quotes
Option + g © Copyright symbol
Option + r ® Registered trademark
Option + 2 Trademark symbol
Option + 8 Bullet symbol
Shift + Option + 8 ° Degree symbol
Option + 3 £ British pound
Shift + Option + 2 Euro
Shift + Option + = ± Plus/Minus symbol

When you have a few free minutes, press Option, then Shift + Option and press different keys. You’ll find a wealth of symbols scattered all over your keyboard.


Please rate the helpfulness of this tip.

Click on a star to rate it!

… for Adobe Premiere Pro CC

Tip #051: Pick Your Favorite (Shortcuts)

Larry Jordan – https://LarryJordan.com

Don’t like the shortcuts available? Pick something different!

Tip Screen Shot

Topic $TipTopic

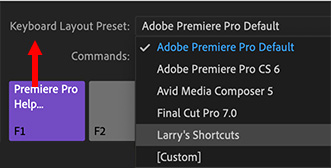
If you are migrating to Premiere from other NLE software you don’t need to give up your favorite keyboard shortcuts. In fact, Premiere comes pre-installed with four different sets to choose from:

  • Premiere Pro Default
  • Premiere Pro CS6
  • Avid Media Composer
  • Final Cut Pro 7

To select switch between sets, open Keyboard Shortcuts (under the Premiere menu on Macs, or the Edit menu on Windows).

Then, in the top left corner, select the set you want to use in Keyboard Layout Preset.

Instantly, you are back home again.


Please rate the helpfulness of this tip.

Click on a star to rate it!

… for Apple Final Cut Pro X

Tip #090: A Faster Way to Create Audio Fades

Larry Jordan – https://LarryJordan.com

Apply fades using a keyboard shortcut.

Tip Screen Shot

Topic $TipTopic

You probably know that you can add an audio fade to either the beginning or the end of an audio clip by dragging the small white “audio fade dot” at the edges of an audio clip.

What you may NOT know, though, is that there is a much faster way to add fades, but it isn’t enabled by default.

Here’s how:

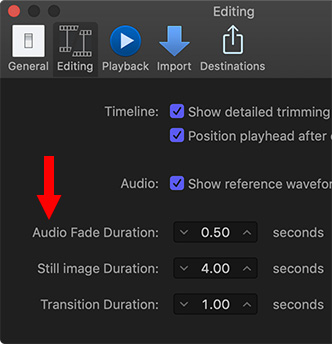
  • Go to Preferences > Editing and enter the Audio Fade Duration you want to use as a default setting.
  • Next, go to Commands > Customize, make sure you are in the Default command set (upper left corner), then  search for “Audio Fades”
  • Set Apply Audio Fades to the shortcut you want to use. (In my case, I set this to Option + A.)

Now, whenever you want to quickly apply an audio fade, select the clips you want to apply the fade to, then type Option + A. Poof! – fades appear at the end of all selected clips.

EXTRA CREDIT

These fades are fully adjustable by dragging the fade dot. All you are doing with this shortcut is applying a standard audio fade quickly.


Please rate the helpfulness of this tip.

Click on a star to rate it!

… for Apple Final Cut Pro X

Tip #058: You Can’t Have Too Many Great Shortcuts

Larry Jordan – https://LarryJordan.com

Sometimes one shortcut just isn’t enough…

Tip Screen Shot

Topic $TipTopic

One of the frustrations in using different software multiple times during the day is that I often get confused as to which keyboard shortcuts work with which software; especially shortcuts which are essential to operating the program.

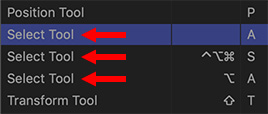
NOTE: I can’t tell you how many times I type “V” in Final Cut or “A” in Premiere and wonder why the Arrow tool is not selected. Sigh…

Premiere has long had the ability to create multiple shortcuts for the same command. What you may not know is that Final Cut does too!

NOTE: There’s no limit on the number of shortcuts you can assign to the same command.

Here’s how.

Open Final Cut Pro X > Commands > Customize.

In the top left corner, if you haven’t done this already, duplicate the Default command set. Why? Because Apple does not allow you to make changes to the default shortcuts shipped with the program.

Click whichever modifier keys you want to use at the top of the screen, then look for a gray key. Gray means that no shortcut is assigned to that key for those modifiers.

Drag the command you want from the Command list at the bottom and drop it on top of the key you want to assign it to.

Poof! Instant duplicate.

NOTE: You also use this same procedure to create a shortcut for any command that doesn’t have a shortcut assigned. Since FCP X has more than 400 menues without a shortcut, you can practice this technique a LOT!


Please rate the helpfulness of this tip.

Click on a star to rate it!

… for Adobe Premiere Pro CC

Tip #045: Preview Faster

Larry Jordan – https://LarryJordan.com

In this case, it’s OK – and fast! – to “play around.”

Tip Screen Shot

Topic $TipTopic

This is a very fast way to preview a transition.

Using the arrow keys, position the playhead on the transition you want to preview.

Press Shift + K.

Instantly, the playhead backs up a few seconds, plays through the position of the playhead, then stops a few seconds afterward.

EXTRA CREDIT

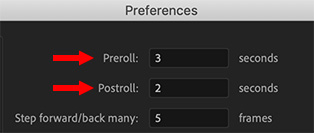
You can set how far back or forward the playhead moves with this shortcut using Preferences > Playback:

  • Preroll. Sets how far back the playhead starts.
  • Postroll. Sets how for past the playhead position the playback ends.

By increasing these durations you can use this technique to preview short segments, not just transitions.


Please rate the helpfulness of this tip.

Click on a star to rate it!

… for Apple Final Cut Pro X

Tip #024: Trim Clips Without the Mouse

Larry Jordan – https://LarryJordan.com

The faster you trim, the faster you edit.

Tip Screen Shot

Topic $TipTopic

Trimming by using the mouse to drag the edges of clips is easy. But there’s another way that I find is both faster and more accurate: using the keyboard.

OPTION 1

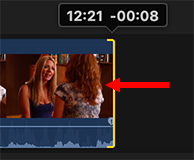
Using the Arrow tool, select either the In or the Out of clip. (Or use the Trim tool to select both In and Out.)

  • Comma trims the selected edit point one frame left
  • Shift + comma trims the selected edit point ten frames left
  •  

  • Period trims the selected edit point one frame right
  • Shift + period trims the selected edit point ten frames right

OPTION 2

Again, select either the In, Out or both.

Using either the numeric keypad or the numbers on your keyboard, type the number of frames you want the edit point to move.

Type [plus] followed by a number to shift the edit point right. Type [minus] followed by a number to shift the edit point left.

OPTION 3

You can use this same keyboard technique to move entire clips, but you first need to select the Position tool.


Please rate the helpfulness of this tip.

Click on a star to rate it!