… for Apple Final Cut Pro X

Tip #1826: What is Range Check?

Larry Jordan – LarryJordan.com

Range Check flags excessive white levels or chroma (color) saturation.

The View menu, top right corner of the Final Cut Viewer, showing Range Check options.

Topic $TipTopic

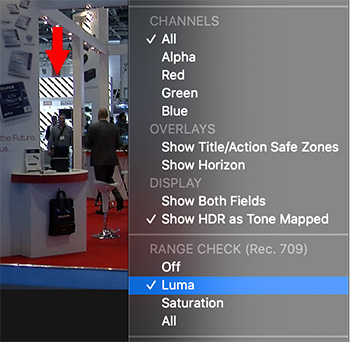
Have you ever wondered what “Range Check” does in the View menu? It’s actually really useful – it flags excessive white and chroma (color) saturation levels. Here’s what you need to know.

If you are posting media to the web, virtually any gray-scale or chroma value will be fine. The web is very forgiving.

But, not so broadcast, cable or digital cinema. Here, because of technical constraints, white levels can not exceed 100% and chroma levels can’t exceed certain amounts of saturation for SDR (Standard Dynamic Range) media.

What Range Check does is flag – using a moving series of red lines (red arrow in screen shot). These indicate areas in the frame that exceed white level limits (Luma), excessive saturation (Chroma) or both (All).

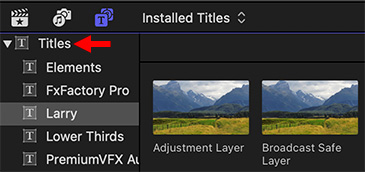
To fix this problem, either adjust your color grading or apply Effects > Color > Broadcast Safe.

EXTRA CREDIT

Tip #1827 explains how to use the Broadcast Safe filter.


Please rate the helpfulness of this tip.

Click on a star to rate it!

… for Apple Final Cut Pro X

Tip #1827: Using the Broadcast Safe Filter

Larry Jordan – LarryJordan.com

The Broadcast Safe filter clamps excessive levels to keep your video in spec.

The Broadcast Safe filter is in Effects > Color (top). Pick the color space that matches your project (bottom).

Topic $TipTopic

Tip #1826 explained the value of Range Check. Range Check is a fast way to flag excessive video levels. But, how do you fix video levels that are out of range? Answer: The Broadcast Safe Filter.

Here’s how to fix errant video levels.

  • Go to Effects > Color and apply the Broadcast Safe filter to the clip with excessive levels (see top image in screen shot).

NOTE: You can create an adjustment layer, see Tip #1828 to apply this filter to a range of clips.

  • In the Video Inspector, select the color space of your project. (See the lower image in the screen shot.)

Excessive white or black levels are instantly clamped to 100 or 0 IRE. Clamping means you’ll lose detail in the brightest and darkest portions of the image. Most of the time, clamping will be fine.

However, for those times where that detail is important (the bright white lace of a wedding dress, for example) you’ll need to adjust video levels manually using the Color Board or Color Wheels.


Please rate the helpfulness of this tip.

Click on a star to rate it!

… for Apple Final Cut Pro X

Tip #1828: Adjustment Layers Can Do Magic

Larry Jordan – LarryJordan.com

Adjustment layers save time and simplify effects.

Adjustment layers are a special form of title.

Topic $TipTopic

An adjustment layer is a custom title template which changes all clips below it in the timeline. For example, add an adjustment layer to change all clips below it to black-and-white, or apply the broadcast safe filter to your entire project, or apply the same color grade to multiple clips.

The benefit to an adjustment layer is that you can change the effect settings in the layer, without needing to adjust each individual clip. Or, remove an effect from multiple clips simply by removing the adjustment layer.

Premiere and Photoshop support adjustment layers natively. Final Cut does not. But… you can create one!

Here’s an article on my website that explains how to create an adjustment layer (you’ll need Motion). It’s a special form of a Title effect.

Another benefit – besides speed and flexibility – to creating an adjustment layer template is that you can “bake” in custom effects into the adjustment layer, as my article illustrates. This can save a significant amount of time during an edit.


Please rate the helpfulness of this tip.

Click on a star to rate it!

… for Apple Final Cut Pro X

Tip #1831: The Inside Tips Take a Hiatus

Larry Jordan – LarryJordan.com

The Inside Tips will return in September.

Photo credit: Jonas Ferlin, Pexels.com

Topic $TipTopic

The Inside Tips are taking a hiatus for the month of August. We’ll be back the first week of September with more Inside Tips.

Thanks for your readership and comments. Enjoy the rest of your summer.

Feel free to contribute some tips of your own here.


Please rate the helpfulness of this tip.

Click on a star to rate it!

… for Apple Final Cut Pro X

Tip #1801: Apply Effects to Multiple Clips – Fast!

Larry Jordan – LarryJordan.com

The Timeline Index is a very powerful, yet underused tool.

Timeline Index (top red arrow), Clips text button (middle red arrow) and Video button (bottom red arrow).

Topic $TipTopic

There is a very fast way to apply the same effect to multiple clips scattered throughout a timeline. But, it isn’t very obvious. Here’s how it works.

After editing your clips into the Timeline:

  • Open the Timeline Index (Shortcut: Shift + Cmd + 2)
  • Click the Clips text button (middle red arrow in the screen shot).
  • Click the Video text button (bottom red arrow).
  • To select a single clip, click the clip name.
  • To select a range of clips, click the first, then Shift-click the last.
  • To select a discontinuous group of clips, click the first, then Command-click the remaining clips.
  • Each time you select a clip name it is also selected in the Timeline.
  • To apply an effect to all selected clips, find it in the Effects Browser, then double-click it.

EXTRA CREDIT

If you drag the effect onto a clip, it will only be applied to the clip you dragged it onto.


Please rate the helpfulness of this tip.

Click on a star to rate it!

… for Apple Final Cut Pro X

Tip #1807: Create Your Own “Edit Checklist”

Larry Jordan – LarryJordan.com

Instantly view either completed or still-to-do tasks.

The marker dialog (top) and the Timeline Index (bottom).

Topic $TipTopic

Final Cut Pro supports creating a personal “To-Do” list during your edit – that’s dynamic and built directly into the Timeline. Here’s how.

As you edit clips into the Timeline:

  • Create a marker (Shortcut: M) anywhere you want to leave yourself a note about a task.
  • Double-click a timeline marker to open it and enter a description (top screen shot).
  • Click the middle icon at the top of the Marker dialog (top red arrow). This converts a marker into a To-Do marker.

NOTE: To mark a task as complete, check the Completed checkbox.

  • Open the Timeline Index (Shortcut: Shift + Cmd + 2)
  • Click the Tags text button (middle red arrow).
  • To view all To-do markers, click the icon indicated by the left lower red arrow.
  • To view all completed markers, click the icon indicated by the right lower red arrow.

EXTRA CREDIT

You can also check a To-Do marker as completed by clicking the marker icon in the Timeline Index list.

To jump to a marker, click its name, not the icon, in the Timeline Index.

To remove one or more markers, select them in the Timeline Index and press the Delete key.


Please rate the helpfulness of this tip.

Click on a star to rate it!

… for Apple Final Cut Pro X

Tip #1808: A Fast Way to View Captions in Final Cut

Larry Jordan – LarryJordan.com

The Timeline Index Captions pane is new – and a fast way to check captions.

The Timeline Index > Captions pane.

Topic $TipTopic

Here’s a fast way to see all the captions in your Final Cut Pro project, along with an equally fast way to correct them.

Here’s how this works:

  • Open the Timeline Index (Shortcut: Shift + Cmd + 2).
  • Click the Captions text button (lower red arrow in screen shot).
  • All captions in your project are displayed, along with their starting and ending timecode.

NOTE: This would be a good time to point out that the Timeline Index would be even more helpful if it could float outside the main FCP interface; say, to a second monitor….

  • To select a caption and jump the playhead to it, click the caption icon or name once.
  • To edit a caption, double-click it.
  • To change the position of a caption, use the same editing techniques you use for clips in the Timeline.

EXTRA CREDIT

While you can create multiple caption tracks for the same project, you can only have one caption track active at a time.

If you have multiple captions, say for different languages, go to Timeline Index > Roles and activate the caption track you need by checking it.


Please rate the helpfulness of this tip.

Click on a star to rate it!

… for Apple Final Cut Pro X

Tip #1790: Multi-camera Screen Recording Tips

Larry Jordan – LarryJordan.com

Mulitple images don’t require multicam.

Source timecode for three clips: two video and one audio. The gray clip indicated it’s disabled (V).

Topic $TipTopic

Recently, I’ve started recording my webinars using two sources: my screen and a camera pointed at my face. Why? Because I wanted to give myself a new editing challenge… and it’s good to see the person speaking. Here’s what I learned in editing these.

Telestream Screenflow is software I’ve used for years to record my webinars. It provides high-quality (ProRes 4444), is color accurate and easily exports to Final Cut for editing. (No, I don’t edit in Screenflow.)

Screenflow now has the ability to record both the screen and a webcam at the same time. So, while I don’t use my webcam for my live events, I do include video of myself in the download versions of my training. Telestream exports my video already scaled and positioned where I need it.

Here are three tips that I’ve learned in editing this extra camera:

  1. The camera is consistently recorded 2 frames out of sync with the audio. This is easy to fix by sliding the camera clip two frames earlier. To make sure I don’t move it back I monitor the timecode of all clips in the timeline using Window > Source Timecode (see screen shot).
  2. Because both clips need to be visible at the same time, I don’t create a multicam clip, but, instead, stack the clips vertically. Then, I enable or disable my on-screen video as needed.
  3. Because the video is from my webcam, I do all color correction for this clip before I start editing. That way, I don’t need to color grade each individual clip when editing is complete.

I like the results and it doesn’t add that much more time to the edit.


Please rate the helpfulness of this tip.

Click on a star to rate it!

… for Apple Final Cut Pro X

Tip #1794: Two Shortcuts to Create Still Frames

Larry Jordan – LarryJordan.com

Still frames, unlike Hold frames, create separate media that can be easily moved.

A still frame, applied as a connected clip.

Topic $TipTopic

Every week, as I edit my webinars, I need to create still frames to hide an edit or cover a mistake. A Hold frame won’t work because I need separate media to adjust its position in the timeline. Here’s how to do this using just two keyboard shortcuts.

  • Put the timeline playhead on the frame you want to use for the still frame.
  • Type Shift + F. This creates a match frame between the clip in the timeline with the master clip in the Browser. Specifically, it moves the playhead in the Browser to match the frame in the timeline.
  • Type Option + F. This edits the frame under the playhead in the Browser as a connected clip at the position of the playhead in the timeline.

I use this technique in virtually every project I edit.


Please rate the helpfulness of this tip.

Click on a star to rate it!

… for Apple Final Cut Pro X

Tip #1795: Hidden Timeline Secrets

Larry Jordan – LarryJordan.com

Don’t duplicate projects! Always create snapshots.

New timeline options in Final Cut Pro.

Topic $TipTopic

One of the new timeline features Apple added recently to Final Cut is invisible, unless you know where to look. Here’s where it is and what it does.

  • Click the small white arrow to the right of the project name at the top center of the timeline (indicated by the red arrow in the screen shot).

Five choices present themselves:

  • Duplicate project. I strongly recommend you NOT use this. It causes problems with compound and multicam clips. Instead, Control-click the project name in the Browser and choose Shapshot Project.
  • Reveal Project in Browser. This displays the project in the Browser. (This is a good way to then use Snapshot.)
  • Project Properties. Another way to change the settings applied to a project.
  • Close [project name]. This closes the project in the timeline, but does not close the Library
  • Close Other Timelines. Final Cut supports multiple timelines open at once, though it only displays one at a time. Closing unneeded timelines frees up RAM.

Please rate the helpfulness of this tip.

Click on a star to rate it!