… for Visual Effects

Tip #1741: Project Breakdown: TEDxREAL

Larry Jordan – LarryJordan.com

TEDxREAL explores reality through the work of 10 VFX studios.

Image montage courtesy of Motionographer.com.

Topic $TipTopic

This article, written by Scott Geersen, first appeared in Motionographer.com. This is a summary.

TEDx: REAL is a visual exploration of the nature of reality, as seen through the hopes, fears, and dreams of a mother-to-be who imagines the possibility of a better world for her child. It’s part exquisite corpse – in that it’s filled with unique, surreal moments – but doesn’t quite adhere to the rules of that convention because it’s much, much more collaborative. In total, we curated work from ten studios, including ourselves, and pieced it all together for the final product.

The TEDx briefs are always just one word, and it’s up to us to interpret them. For 2020, the theme was “REAL,” which is a very broad theme to work with.

We realised that REAL couldn’t be pinned down to one neat explanation, and a single-styled expression could never do the topic justice. What’s REAL can be so fluid and personal, but ultimately, a shared experience. So, we leaned into the multifaceted nature of reality and decided collaboration would demonstrate this perfectly. I guess we could have pursued a multi-style approach ourselves, but we just felt it was more authentic to include different points of view, and it gave us all a more global presence – in keeping with our ongoing strategy of positioning TEDx as an event with global impact.

The studios they showcased are:

  • BEMO
  • Nerdo
  • Spillt
  • Mighty Nice
  • Post Office Studios
  • Bullpen
  • Oddfellows
  • Mixcode
  • State
  • Substance

Here’s the link to their results. This includes work samples and additional interviews.


Please rate the helpfulness of this tip.

Click on a star to rate it!

… for Visual Effects

Tip #1739: Is the Traditional VFX Pipeline Dead?

Larry Jordan – LarryJordan.com

Foundry explores the new VFX pipeline in “The Found Lederhosen.”

Image courtesy of Foundry.com.

Topic $TipTopic

This article first appeared in Foundry.com. This is a summary.

The Hollywood Professional Association (HPA) Retreat has just marked its 26th year with a virtual 9-day event exploring today’s most transformative technologies. Exploring the challenges and opportunities of cloud-based distributed workflows was a main aim of the HPA Retreat’s 2021 Supersession — a production that Foundry was excited to be involved in.

Diving deeper into the The Found Lederhosen project, Matt Mazerolle, Foundry’s Director of Product, New Technology, weighs in: “The aim was to explore the next level of remote work—distributed production pipelines. You have crews shooting all over the world, with 200 artists working remote during a variety of COVID lockdowns. Everything’s in the cloud, and you’re connecting different vendors into that data through cloud platforms. So in the case of The Found Lederhosen, there are six geographical locations where there are shots being done. At each location, all the data is being put into AWS, Azure and Google Cloud. Different vendors are then connecting different platforms to work on that data, in order to realize the film.”

The result was a production made up of novel workflows that tease at what the next stage of distributed production could look like, heralding a future for the industry that more closely aligns with the MovieLabs 2030 Vision for the Evolution of Media Creation. Here’s a link.

EXTRA CREDIT

The article – linked above – includes illustrations and links that explore this subject in more detail.


Please rate the helpfulness of this tip.

Click on a star to rate it!

… for Visual Effects

Tip #1738: Boris FX Releases Continuum 2021.5

Larry Jordan – LarryJordan.com

This free upgrade significantly expands creative options.

Image courtesy of Boris FX.com

Topic $TipTopic

Boris FX released Continuum 2021.5. The new release delivers more 3D power to Particle Illusion, brand new cinematic effects & presets, and time-saving workflows.

Plugin host support includes Adobe After Effects and Premiere Pro, Avid Media Composer, and OFX hosts Blackmagic DaVinci Resolve, Foundry Nuke, and VEGAS Pro. (FCP X and Motion coming soon)

This is a free update to customers on a current subscription or a valid upgrade & support plan.

New in Particle Illusion:

  • Node View: Select any particle node in the tree and corresponding parameters instantly display in the control panel
  • 3D Emitter Shapes, Forces, Deflectors, and Emission: From flat 2D to true 3D
  • Deep Integration with After Effects: Emitters can trace AE native live text and mask layers and emitters can attach to host native lights and 3D layers
  • Emitter Presets: Stunning drag and drop presets added to the included Emitter Library

New in Cinematographer Toolkit:

  • 9 GPU-accelerated, HDR-compliant cinematic effects: BCC+Multi-Star, BCC+Vignette, BCC+FilmGrunge, BCC+TwoStrip, BCC+Flashing, BCC+Composite, BCC+F-Stop, BCC+Fluorescent, and BCC+Haze
  • 200+ drag and drop presets designed by the pros
  • Avid infrastructure controls added to all BCC+ filters: Apply to Title Matte Option, Safe Levels Option, and True Bypass Switch

Learn more here.


Please rate the helpfulness of this tip.

Click on a star to rate it!

… for Codecs & Media

Tip #1734: Use Color Indexing for Animation

Larry Jordan – LarryJordan.com

Indexed colors are best for animation, not photos.

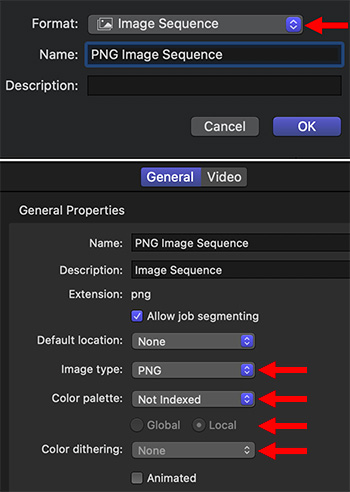
Create an Image Sequence (top), color indexing settings (bottom)

Topic $TipTopic

(I discovered this tip while researching my recent PowerUP webinar illustrating New Features in Apple Compressor & Final Cut Pro.)

This new feature in Apple Compressor is specifically targeted at folks creating graphical animation. It reduces image file size without compressing the media. It’s called “Indexed Colors.”

What this does is, rather than storing the full range of colors in a file, it only stores the actual colors used. This can reduce file size 80-90% per frame without compression!

To create this:

  • Create a new compression setting and format it as an Image Sequence (see top screen shot).
  • Select the Image Sequence in the Settings sidebar.
  • In the General tab of the Inspector (lower screen shot), change Image Type to PNG or GIF.

NOTE: PNG is uncompressed, GIF is compressed.

  • Select the number of colors in the image in the Color palette menu. (The fewer colors, the smaller the file.)

NOTE: “Not indexed” uses all available colors.

  • Global shares the same color pallette across all frames. Local uses a new color palette for each frame. Local is faster, but global will yield more consistent results.
  • Color dithering: If you have more colors than you are indexing, turn on Color dithering. (Sierra 2 may produce a smoother image.) If the number of colors in the image equals the index number, set this to None.
  • Animated: Available when Image type is set to PNG or GIF, exports a single, animated file containing all frames (rather than a collection of individual files for each frame).
  • Playback: Available when Animated is selected. Playback specifies how many times the animated GIF or PNG loops during playback. Select Continuously, or enter the number of times you want the animated image to play. (Not all web browsers will recognize this option.)
  • Create unique output directory: Available when Animated is not selected. Select this checkbox to create a folder to hold the output files; the files saved will be named “frame-0,” “frame-1,” “frame-2,” and so on.
  • Add leading zeros to frame numbers: Available when Animated is not selected. Select this checkbox to have Compressor add leading zeros to output filenames (“filename-000000,” “filename-000001,” “filename-000002,” and so on).

Please rate the helpfulness of this tip.

Click on a star to rate it!

… for Adobe Premiere Pro CC

Tip #1743: Adobe Cleans Up the Header Bar

Larry Jordan – LarryJordan.com

Adobe’s on-going interface cleanup continues in the Header Bar.

New Premiere Pro header bar. Left side on top, right side on the bottom.

Topic $TipTopic In the beta release of Adobe Premiere Pro last week, Adobe cleaned up the Header Bar. While the big news surrounds the new import and export workflows, the newly-cleaned-up look of the Header Bar is also worth mentioning.

NOTE: Beta software, by definition, is unstable and likely to change. You can install the beta version without losing access to the current release of Premiere. However, use beta software only for exploration and experimentation; because there is always the possibility of losing your work due to a software bug.

THE HEADER BAR

Starting with the initial Creative Cloud release several years ago, Adobe began the process of cleaning up the Premiere interface. Because, frankly, there were so many icons, controls and widgets it was almost impossible to figure out what you needed to tweak to accomplish even simple tasks.

The latest beta release continues that trend. Once you create a new project – or open an existing one – you’ll see a lot fewer icons at the top of the interface.

Adobe calls this the Header Bar and it now divides into two sections. On the left (at the top of the screen shot) are:

  • Home. This brings you back to the opening screen where you can choose which project to open or create.
  • Import. This opens a new approach to importing media and creating a new project.

NOTE: You can by-pass this window by clicking Create in the lower right corner.

  • Edit. This opens the editing window with the familiar Premiere interface.
  • Export. This opens a new approach to exporting projects.

NOTE: I’ll cover both import and export workflows in future tips.

On the right (lower portion of the screen shot) are icons to:

  • Quick Export. This expands on the Quick Export option in the current release version of Premiere.
  • New Features. This, not surprisingly, displays a “What’s New in Premiere” screen.
  • Feedback. This speeds sending feedback to Adobe during the beta process.
  • Workspaces. Rather than listing all workspaces across the top of the screen, they are now consolidated into this menu. Their function is the same, however.
  • Maximize video output. This displays video in the current timeline full screen.

Adobe concludes: “We’ll be rolling out these new experiences on a timeline starting with this public Beta to ensure that our customers can provide feedback, explore the changes and continue to use Premiere Pro to its fullest potential. These changes are additive and not a replacement to current workflows. We understand how important muscle-memory is and we don’t want to disrupt your flow in any way.”

Here’s a link to Adobe’s blog with more details on all the changes.


Please rate the helpfulness of this tip.

Click on a star to rate it!

… for Adobe Premiere Pro CC

Tip #1742: Premiere Beta Showcases New Interface

Larry Jordan – LarryJordan.com

Adobe begins modernizing Premiere Pro for today’s media.

Image courtesy of Adobe Systems.

Topic $TipTopic

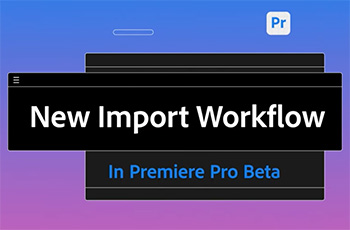
Last week, Adobe released a significant update to Premiere Pro as a beta release. This is the first step in a multi-step process to overhaul and refresh the Premiere interface.

NOTE: Beta software, by definition, is unstable and likely to change. You can install the beta version without losing access to the current release of Premiere. However, use beta software only for exploration and experimentation; because there is always the possibility of losing your work due to a software bug.

Adobe writes: “Our new vision for Premiere Pro starts with refreshed import and export experiences, as well as a streamlined header bar — making workflows easier to learn, more efficient and more enjoyable. We want Premiere Pro to become a more intuitive, yet powerful editing tool that is ready to meet the demands of tomorrow while also helping today’s creators to meet the demands of delivering high-quality content at quick turnarounds and optimizing content for multiple social platforms.

“This interface refresh is a journey that has been a long time coming. It’s a nuanced challenge to take a thirty-year-old app and modernize it for new types of video content (like social video which simply didn’t exist when Premiere Pro was first built), while respecting the needs and demands of traditional post-production. We knew we had to get it right, so we brought together a cross-functional team from product design, research, engineering and customer experience, who collected data and worked closely with our customers on their wants and needs to ensure the new experience is as beautiful as it is functional.”

The changes in this version focus on three areas:

  • Streamlining the header bar and workspaces
  • Improve the import process
  • Improve the export process

Adobe concludes: “We’ll be rolling out these new experiences on a timeline starting with this public Beta to ensure that our customers can provide feedback, explore the changes and continue to use Premiere Pro to its fullest potential. These changes are additive and not a replacement to current workflows. We understand how important muscle-memory is and we don’t want to disrupt your flow in any way.”

Here’s a link to Adobe’s blog with more details.


Please rate the helpfulness of this tip.

Click on a star to rate it!

… for Adobe Premiere Pro CC

Tip #1737: A Very Cool – Very Simple – Premiere Pro Shortcut

Larry Jordan – LarryJordan.com

Full-screen playback is one shortcut away.

Topic $TipTopic

Here’s a very cool – and very simple – keyboard shortcut for Premiere playback that I didn’t learn until last week.

To instantly switch to full-screen playback, type Control – ~ (tilde).

Yup. Easy.

NOTE: On most keyboard the tilde key is in the top left corner of an American keyboard, just under the ESC key.


Please rate the helpfulness of this tip.

Click on a star to rate it!

… for Codecs & Media

Tip #1736: Streaming Media – Not as Big As Thought

Larry Jordan – LarryJordan.com

Finally, the streaming world has ratings.

The Nielsen logo.

Topic $TipTopic

This article, written by Dave Morgan, first appeared in MediaPost.com. This is a summary.

Last week, Nielsen unveiled the first true independent measurement of cross-platform viewing on TV, The Gauge, a panel-based, representative tracker of what 300+ million Americans are watching each month, broken out by linear TV (broadcast and cable), streaming and other (video games, DVDs, etc.).

Nielsen revealed that broadcast and cable still account for 64% of total TV viewing, with streaming only representing 26% of viewing — and Netflix, the dominant streamer, only at 6%.

No one described the disconnect between perception and reality better than CNN’s Brian Stelter, who said: “Streaming might take up three fourths of the media world’s attention, but right now it’s only one fourth of viewership time. Streaming might eventually cannibalize everything, but that day is a long way away.”

Incredibly, one of the stats in Nielsen’s report hasn’t gotten much attention, but everyone in the ad business hopefully caught it. A big chunk of the streaming viewing was on services with no or few ads: Netflix, Prime Video, Disney+ and Hulu. So, for all of those marketers out there telling their media teams to shift 30% of their TV budgets to streaming video, you’re likely to be disappointed.

The ad inventory just doesn’t exist.

EXTRA CREDIT

The article linked above has more stats and additional detail.


Please rate the helpfulness of this tip.

Click on a star to rate it!

… for Codecs & Media

Tip #1735: Keep Your Movie Data Secret

Larry Jordan – LarryJordan.com

This setting disables metadata pass-through to compressed files.

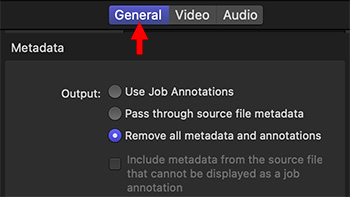
Metadata options are located at the bottom of the General tab (this image is a composite).

Topic $TipTopic

(I discovered this tip while researching my recent PowerUP webinar illustrating New Features in Apple Compressor & Final Cut Pro.)

Your movies tell the world a lot about you – in ways you may not expect.

Both Final Cut Pro and Compressor embed metadata (text labels) into your movies that can be easily read by anyone using QuickTime Player – or other media viewing software.

This includes the name of the person creating the file, descriptions, keywords, Event names and much more. This metadata can be customized – for example, I use it to embed a copyright date.

However, sometimes, you may NOT want this information embedded for security, secrecy or personal reasons. Apple Compressor 4.5.3 features a new function that disables embedding metadata and prevents any that is already embedded in the source media from passing through to the compressed file.

NOTE: This only affects compressed files, source files are not modified.

Here’s how:

  • Select the compression setting applied to a clip.
  • Scroll to the bottom of the General tab.
  • Click the Remove all metadata and annotations radio button.

EXTRA CREDIT

This setting can only be applied to individual compression settings.

To set this as a default for a setting, select a compression setting in the Settings panel, then disable metadata from the General Inspector.


Please rate the helpfulness of this tip.

Click on a star to rate it!

… for Codecs & Media

Tip #1734: Change Starting Timecode in Compressor

Larry Jordan – LarryJordan.com

Changing timecode only affect compressed media.

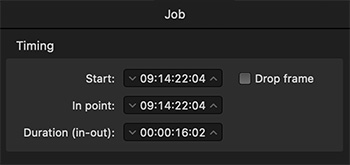
The Timing section of the Job Inspector.

Topic $TipTopic

(I discovered this tip while researching my recent PowerUP webinar illustrating New Features in Apple Compressor & Final Cut Pro.)

Compressor got a surprisingly large number of new features in it’s latest update from Apple. One of which is the ability to change the starting timecode for compressed clips.

NOTE: This does not change the timecode of the source media.

To do this:

  • Select the clip (not the compression setting) in the Compressor Batch panel.
  • Go to the Job section of the Inspector (see screen shot) and change the starting timecode

EXTRA CREDIT

You can also use this section to change the In for the compressed media or its duration, should you not want to compress the entire movie.


Please rate the helpfulness of this tip.

Click on a star to rate it!