… for Adobe Premiere Pro CC

Tip #1445: Change a Sequence Starting Timecode

Larry Jordan – LarryJordan.com

All Premiere sequences start at timecode: 00:00:00:00. This can be changed.

Change starting timecode from the pancake icon, top, then use the dialog to specify options.

Topic $TipTopic

Timecode is an essential element in any video edit. Even if you aren’t paying attention, Premiere uses timecode to properly place and edit every clip, keyframe and edit point in your sequence.

Most of the time, the default starting timecode of 00:00:00:00 (Hours : Minutes : Seconds : Frames) is fine. The web will work with any timecode.

However, there are occasions when a different timecode is needed. The good news is that changing starting timecode is easy and can be done at any time.

Here’s how.

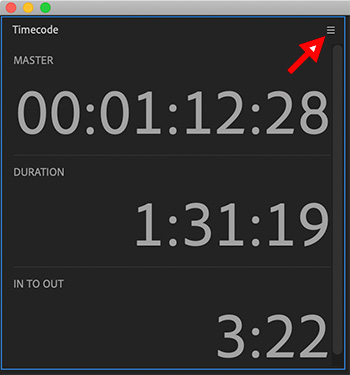
  • Go to the “pancake” menu in the top left corner of the timeline (see screen shot) and select Start Time.

In the popup dialog that appears, you can:

  • Set the starting timecode (just type numbers, Premiere will add punctuation)
  • Click a checkbox to make that timecode the default for future sequences.
  • Or, set timecode for the sequence to match the timecode of the first clip you edit into the sequence.

NOTE: This last option can be handy if you are matching a bunch of clip shot using real time timecode.

  • Click OK and your timecode is changed.

Done.

EXTRA CREDIT

You can also change the starting timecode of a sequence when you export it using File > Export > Media.

Use Set Start Timecode, at the very bottom of export window, to change the starting timecode.


Please rate the helpfulness of this tip.

Click on a star to rate it!

… for Adobe Premiere Pro CC

Tip #1446: Match Captions to Sequence Timecode

Larry Jordan – LarryJordan.com

Caption timecode only matters when exporting a finished sequence.

The Captions options panel, in File > Export > Media.

Topic $TipTopic

JZ recently sent me an email worried that his caption timecode didn’t match the timecode of where the captions were to appear in his Premiere sequence.

Worse, there was no way he could find to change the caption timing.

The answer, as Gandalf once said, is easy once you know it. An SRT caption file is a file like any other video file – except it contains captions. Timecode doesn’t matter when you import, only when you export.

In other words, after you import a caption file:

  • Put the playhead where you want the captions to start in the timeline.
  • Select the caption file in the Project panel.
  • Edit the caption file to the position of the playhead in the timeline.

NOTE: Remember, captions always need to be the top track in your sequence.

Just as you can put a video clip anywhere – regardless of the timecode of that video clip, you can do the same with a caption file. The key is to place the start of the captions in the right spot.

EXPORTING

When it comes time to export the captions, once they are placed in a sequence, choose File > Export > Media.

  • In the Export Settings dialog, click the Captions tab.
  • Set Export Options to Create Sidecar File
  • Set File Format to SubRip Subtitle Format (SRT)

This creates a separate SRT caption file whose timecode matches the sequence.


Please rate the helpfulness of this tip.

Click on a star to rate it!

… for Adobe Premiere Pro CC

Tip #1447: Change Caption Timing

Larry Jordan – LarryJordan.com

Caption timing is adjusted in the timeline, similar to trimming clips.

A caption clip with three trimmed captions inside.

Topic $TipTopic

In Premiere, captions are contained in a caption file. As the screen shot illustrates, multiple captions are stored in the same file.

  • To change the duration of a caption, drag an edge; this is similar to trimming a clip.
  • To change the location of a caption, click in the center and drag the caption.
  • To delete a caption, click it, then press the big Delete key.
  • To add a new caption, double-click the caption file in the timeline to open the Caption panel. Click the Plus button in the lower right corner to add a new caption at the position of the playhead.
  • To correct a typo, use the same Caption panel.

EXTRA CREDIT

You can also use the Caption panel to adjust formatting and alignment.


Please rate the helpfulness of this tip.

Click on a star to rate it!