… for Random Weirdness

Tip #1817: PBS Moves Short Film Festival to VR

Larry Jordan – LarryJordan.com

The broadcaster is using AWS resources to create and deliver the VR experience

Image credit: PBS

Topic $TipTopic

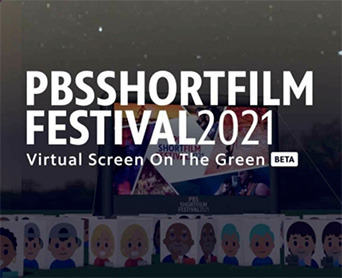
TV Technology reports that PBS has added a virtual twist to its 10th Annual Short Film Festival, enabling audiences to view curated stories by independent filmmakers via the immersive WebXR beta experience “Screen on the Green.”

The festival, running from July 12 to Aug. 31, added the new virtual reality dimension to this year’s event in response to the continued reluctance many people feel about attending large gatherings even as pandemic restrictions begin to ease. Prior to 2020 when many large gatherings and events ceased due to the pandemic, the PBS Annual Short Film Festival was an in-person event held in Washington, D.C.

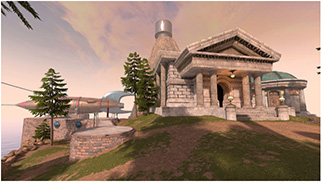
With the help of VR and leveraging several Amazon Web Services (AWS resources), the PBS Innovation Team has recreated the theater experience so audiences of up to 300 at a time can view all 25 films, which play consecutively, on a large, outdoor cinema screen at the center of two different virtual environments—a daytime space with cityscape views and a moonlit outdoor landscape. “Screen on the Green” gives the filmmakers a new platform to reach a wider audience.

Viewers can access the VR experience with compatible headsets, including the Oculus Quest, or via a web browser, AWS said.

Here’s the link to the PBS site.


Please rate the helpfulness of this tip.

Click on a star to rate it!

… for Random Weirdness

Tip #1812: An A.I. Upscaling Shootout

Larry Jordan – LarryJordan.com

Given his examples, I had a very hard time seeing any difference.

Original zoomed 2X (top) vs. Topaz Gigapixel AI (bottom). Image courtesy of Nick Lear.

Topic $TipTopic

This article, written by Nick Lear, first appeared in ProVideoCoalition.com. This is a summary.

One of the burgeoning fields in post-production is Artificial Intelligence (AI) or machine learning. For example, upscaling or “uprezzing” is something most editors do every day without thinking much about it. Drop in a 720p clip into your HD 1080p timeline and scale it up to fill the screen and move on. The issue is that simply scaling the clip looks soft.

NLE’s today default to using a simple zoom for up-scaling because it is fast. But, thanks to AI, there are more options available today than ever before.

When we talk about A.I. there are broadly two types of artificial intelligence. The first, called General A.I. (or AGI), is real intelligence like a human has – think of a robot that can really think for itself. The second is narrow A.I., a.k.a machine learning or pattern recognition or neural networks. It is this that is being leveraged to find those missing pixels.

Here’s his leaderboard in order of quality:

  1. Adobe Camera Raw
  2. Topaz Video Enhance AI
  3. Pixop
  4. Topaz Gigapixel AI
  5. Alchemist
  6. Davinci Resolve Super Scale
  7. After Effects Detail-preserving Upscale

NOTE: While this lists the results in terms of quality, the first few choices are also the hardest to use.

The article provides more details, comparison images and a video showing the results of uprezzing film from 1911 to 4K.

Here’s the link


Please rate the helpfulness of this tip.

Click on a star to rate it!

… for Random Weirdness

Tip #1810: Charlie Kaufman’s 10 Screenwriting Tips

Larry Jordan – LarryJordan.com

Everyone speaks with a unique voice – find yours.

Charlie Kaufman (Image courtesy Screen Plays.)

Topic $TipTopic

This article, written by Jason Hellerman, first appeared in NoFilmSchool.com. This is a summary.

Charlie Kaufman is the screen-writer for I’m Thinking of Ending Things, Antkind, Anomalisa, Adaptation, Synecdoche New York, Eternal Sunshine of the Spotless Mind, Being John Malkovich, and other collaborations with Mark Kermode and Spike Jonze.

He presented a 17-minute video outlining his 10 Screenwriting Tips (see it here).

Here’s his list:

  1. Failure is a badge of honor
  2. Make the story and themes eternal
  3. Make your writing honest and meaningful
  4. Say who you are, and people will recognize themselves in you
  5. Don’t explain themes of your own work, let each individual take their own meaning from it
  6. Leave it ambiguous for the audience, but explain your thoughts to your collaborators
  7. Approach your work like your dreams would and throw away conventional approaches
  8. Add layers to your story, so it will be interesting for multiple viewings
  9. Find your own way into the industry until you get to the work you were meant to do
  10. Find the unique writing process that works only for you

Watch the video to hear how Charlie explains each of these.


Please rate the helpfulness of this tip.

Click on a star to rate it!

… for Apple Motion

Tip #1822: Hidden Feature of the Paint Brush Tool

Larry Jordan – LarryJordan.com

The Write-on behavior is added to every Paint Brush stroke.

Write-on behavior settings (top) and sample effect using the Heavy Frost Shape Style (bottom).

Topic $TipTopic

Whenever you draw with the Paint Brush tool, the Write-on behavior is added to it. This automatically animates the Paint Brush to exactly replicate your drawing motions.

But, if you are, ah, drawing-challenged like me, this may not be a good thing. Fortunately, the Write-on behavior is fully editable.

EDIT THE POINTS

  • Select the Write-on behavior in the Layers panel.
  • Then, from the Arrow tool menu, select Edit Points. This tool selects, moves, modifies, locks or deletes keyframes in the Write-on animation.

CHANGE THE SPEED

  • Select the Write-on behavior in the Layers panel.
  • Adjust its duration by dragging its edges in the mini-Timeline.

CHANGE ITS BEHAVIOR

  • Select the Write-on behavior in the Layers panel.

In Inspector > Behavior > Write-on you can:

  • Have the line draw itself on
  • Erase itself
  • Draw then erase itself
  • Start in a different location, using Offset
  • Change its direction
  • Change its speed

EXTRA CREDIT

While the Write-on behavior can be applied to any line drawn by the Paint Brush or Pen tool, it is applied automatically to the Paint Brush tool.

This is one behavior that, the more you experiment, the more uses you can find for it.


Please rate the helpfulness of this tip.

Click on a star to rate it!

… for Apple Motion

Tip #1821: Refraction Improves on Bump Maps

Larry Jordan – LarryJordan.com

The Refraction filter provides more control and better results than a Bump map.

Top to bottom: Source text, source texture, Refraction filter applied, Stencil Alpha blend mode added.

Topic $TipTopic

Bump maps add texture to text or an image based upon grayscale values in a source texture. While Distortion > Bump Map is one way to achieve this (see Tip #1820), the Distortion > Refraction filter offers more control in the settings and, to my eye, a smoother result.

To apply it:

  • Create some text
  • Import a texture image, something with variations in grayscale
  • Select the text and apply Distortion > Refraction
  • Drag the icon for the texture image into the image well in Inspector > Filters
  • Uncheck the texture image in the Layers panel to make it invisible.
  • Adjust the filter settings in Inspector > Filters

For added impact, select the text element in the Layers panel and apply Inspector > Properties > Blend Mode > Stencil Alpha.

Adjust the settings for the Refraction filter – there are more options here than with the Bump

EXTRA CREDIT

The screen shot illustrates this process. From the top down:

  • Source image
  • Source text image
  • Refraction filter applied
  • Refraction filter and Stencil Alpha blend mode applied.

Please rate the helpfulness of this tip.

Click on a star to rate it!

… for Apple Motion

Tip #1820: Use Bump Maps to Create Texture

Larry Jordan – LarryJordan.com

Bump maps distort & “fracture” images based upon grayscale values.

From top: source image, source texture, bump map applied & stencil alpha blend mode added.

Topic $TipTopic

A bump map is used to apply texture to an image, based upon input from a second image.

To apply it:

  • Create some text
  • Import a texture image, something with variations in grayscale
  • Select the text and apply Distortion > Bump map
  • Drag the icon for the texture image into the image well in Inspector > Filters
  • Uncheck the texture image in the Layers panel to make it invisible.
  • Adjust the filter settings in Inspector > Filters

For added impact, select the text element in the Layers panel and apply Inspector > Properties > Blend Mode > Stencil Alpha.

In the screen shot:

  • The top image is the source text, created in Motion with a cyan color applied.
  • The next image is the source texture (i.e. differences in grayscale).
  • The third image is that text with Distortion > Bump map applied. The texture image was unchecked in the Layers panel to make it invisible, then dragged into the image well for the bump map filter in the Inspector.
  • The bottom image adds a Stencil Alpha blend mode to the text, so that it is textured using the bump map, then filled with the texture using the blend mode.

Bump maps provide more image distortion (and texture) than a blend mode alone.

EXTRA CREDIT

Finding the right texture to use for a bump map is tricky. You want something with differences in grayscale, but not too much. Allow time to experiment.

Tip #1821 illustrates the Reflections filter, which, to my eye, provides better results than the Bump map filter.


Please rate the helpfulness of this tip.

Click on a star to rate it!

… for Visual Effects

Tip #1818: Myst (the Game) Expands into VR

Larry Jordan – LarryJordan.com

Myst launched in 1993, and extended into VR in 2021.

Image credit: Cyan.

Topic $TipTopic

This article, written by Chris McGowan, first appeared in VFXVoice.com. This is a summary.

When Myst debuted on CD-ROM in 1993, it stood apart from other video games at the time. The classic adventure title has no physical violence, there is no time limit, and the player never dies. There is no “game over.” Initially, it isn’t even clear what the game is. The user arrives at a starkly beautiful island world called Myst and must discover the nature of the game through exploration.

Now, in a move that seems long overdue, Cyan Worlds has released a $29.99 VR version of Myst for Oculus Quest headsets.

“The first time I experienced VR was back in the ‘90s. And I’ve known since then that Myst was destined to be experienced that way,” says Rand Miller, CEO of Mead, Washington-based Cyan Worlds. He and his brother Robyn designed and created the original game. “We’ve always felt that Myst in VR was a given, it was just a matter of timing. VR has been around for a while, but it’s taken a long time for it to reach a stage where it strikes the right balance of quality and accessibility. We felt like the time had arrived.”

The VR edition of Myst has new art, audio and interactions. Myst VR also has VR moves like teleporting, snap turns and using a hand to grab or pull or turn. And there is also a new randomized puzzle option. Cyan describes the new version as “fully redesigned and created from the ground up using Unreal Engine.” Miller explains that the original Myst “was our design doc for this new version of Myst, but there were certain changes that were necessary or desirable. From an artistic standpoint of course we wanted it to be Myst, but there were improvements that could be made. Beyond that there were numerous interface elements that needed to be changed to be used comfortably and intuitively in VR.”

Reflecting on the importance of the original Myst nearly thirty years later, Miller observes, “I think it was the idea that games could allow you to explore at your own pace, while uncovering a story in a visually appealing virtual world. In some ways maybe it had just enough elements of a real world to feel real.”

EXTRA CREDIT

The article includes a longer interview, images from Myst and thoughts on converting it from a Hypercard stack to the Unreal Engine.


Please rate the helpfulness of this tip.

Click on a star to rate it!

… for Visual Effects

Tip #1813: Unusual Textures to Capture at the Beach

Larry Jordan – LarryJordan.com

Textures are always useful. And, this summer, why not consider the beach?

Image courtesy of RocketStock.com.

Topic $TipTopic

Bulk up your motion graphics library with one-of-a-kind textures from the natural world using a few tips on what to look for. This article, written by Lewis McGregor, first appeared in RocketStock.com. This is a summary.

I have a disk drive bursting at the seams with textures and images I frequently use within my motion graphics and VFX. I use them for displacement maps, motion backgrounds, composite elements, or simply to give my solid colors some character. You would be surprised at how often a few texture JPEGs can change the dynamic of a tedious animation.

While your first thought may drift towards taking snapshots of sand, let’s take a look at a few not-so-obvious examples.

  • Shipwreck Remains
  • Rusted By Seawater
  • Rock Pools At Low Tide
  • Unique Angles

I find obtaining textures also useful for the off chance I’m working on a matte painting. Creating something that looks alien can be challenging. In fact, it might be one of my pet hates that whenever we see an alien world in film, it usually has the core properties of the earth. However, when you start to compile textures that seemingly look odd to look at, you might be on the way to create something truly alien.

EXTRA CREDIT

The author provides a range of stunning textures and images, as well as extended descriptions. The article is worth reading just for the pictures.


Please rate the helpfulness of this tip.

Click on a star to rate it!

… for Visual Effects

Tip #1809: After Effects Gets a Whole Lot Faster

Larry Jordan – LarryJordan.com

Making After Effects faster is a key goal for Adobe.

Image Credit: Adobe

Topic $TipTopic

Last week, Adobe released a new beta version of After Effects that emphasizes speed. Here are key excerpts from the Adobe press release, written by Sean Jenkin.

Since we released Multi Frame Rendering for export in March, the team has been very busy making more of After Effects faster by using all the cores in your system.

Faster previews & better monitoring

Multi-Frame Rendering for Previews accelerates your creative process by taking advantage of your system’s CPU cores when previewing your compositions. With Dynamic Composition Analysis, After Effects looks at every aspect of your hardware — V-RAM, RAM, cores — and makes intelligent choices on how to render your designs based on your composition and computer configuration.

To super-charge your creativity further, we recently added Speculative Preview which helps you work faster even when you’re not working. While After Effects is idle — like when you’ve stopped to admire your beautiful design, check your email, or get coffee — your composition (and any pre-comps in that comp) will automatically render in the background meaning your designs are ready when you’re ready for them to play back.

Faster exporting & notifications

When it comes to rendering your compositions — especially to H.264 — Multi-Frame Rendering export from Adobe Media Encoder makes the most of your time at work by rendering multiple compositions in the background while you’re still working on others.

A long-requested feature is here at last as well. Render Queue Notifications gives you precious time back in your day, allowing you to confidently walk away from your computer for extended periods of time. After Effects will notify you when your renders are complete via the Creative Cloud app and notifications will display on your phone or smart watch.

Faster effects

After Effects has an insane number of effects and porting them to work on multiple cores was quite the challenge and has taken a lot of time. However, we continue to make progress and you’ll see many daily and weekly updates with more and more effects optimized throughout the Public Beta cycle from now until MAX, 2021.

Here’s a link to learn more.


Please rate the helpfulness of this tip.

Click on a star to rate it!

… for Adobe Premiere Pro CC

Tip #1824: The Productivity Impact of Speech to Text

Larry Jordan – LarryJordan.com

The new integrated speech-to-text workflow in Premiere improves efficiency.

Adobe Premiere Pro logo.

Topic $TipTopic

The Pfeiffer Report was commissioned by Adobe to analyze the efficiency and productivity gains of the Speech to Text feature set in Adobe Premiere Pro.

On average, Speech to Text provided a 187% productivity increase over using online transcriptions based on six individual workflow scenarios that Pfeiffer tested.

Here’s a link to the full report. (Free and no user data required.)


Please rate the helpfulness of this tip.

Click on a star to rate it!