… for Adobe Premiere Pro CC

Tip #007: Magic Markers

Larry Jordan – https://LarryJordan.com

Five Marker Tricks That Help You Get Organized

Tip Screen Shot

Topic $TipTopic

To add a marker, position the playhead in the timeline where you want to locate a marker and type M. This adds a Cue marker at the position of the playhead.

  • Shift + M jumps the playhead to the next marker
  • Shift + Cmd + M (Windows: Shift + Cntrl + M) jumps the playhead to the previous marker.
  • Option + M deletes the selected marker.

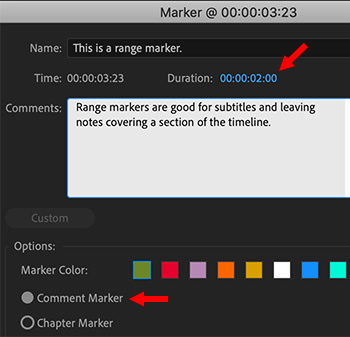
To convert a marker to a range marker, double-click the marker icon, then give it a duration.

Once you create a marker press – / [forward slash] – this selects the marker name in the Marker panel so you can quickly rename the marker. If the Marker panel is not open, press – / – twice.

EXTRA CREDIT

The default marker name can be changed in Preferences > Markers & Metadata


Please rate the helpfulness of this tip.

Click on a star to rate it!

… for Random Weirdness

Tip #071: An Editing Workflow to Boost Efficiency

Larry Jordan – https://LarryJordan.com

Eleven steps to boost your productivity.

Tip Screen Shot

Topic $TipTopic

Workflows exist to help you accomplish a task efficiently. These eleven steps were developed to help editors focus on what needs to be done now – as opposed to what you want to do now.

  1. Plan. The more time you spend planning, the faster the actual edit will go. Specifically think about what you need to deliver, then work everything backward from that.
  2. Gather. Gather all the media you need and put it where you can access it. Once you start editing, try not to move media.
  3. Import & Label. Import media into your project then label it so you can find it.
  4. Build the story. The most time-consuming part is figuring out what order of clips best tells your story.
  5. Organize and trim the story. Once you have the story roughly told, organize your clips to tell it better. Then, trim the edit points so the story flows smoothly from one shot to the next.
  6. Add transitions. Only after you have the story built and organized should you spend time adding transitions.
  7. Add text and effects. Now that the story is complete, polish it with text and effects. This will take all the available time between now and your deadline, which is why you need to build your story first.
  8. Mix the Audio. When the story is told and pictures are locked, its time to mix the audio.
  9. Color grade the story. While the audio mix is going on, color grade the images to create the look you want.
  10. Output the project. When everything is done, create the final version.
  11. Archive the project. Archiving is critical in today’s digital world. We are ALWAYS re-purposing assets. What do you need to keep for the long-term, where are you going to store it and how are you going to pay for it to be stored there?

All too often, we jump right into the sexy part of editing with transitions and effects, only to lose sight of the fact that, first, we need to tell a compelling story.


Please rate the helpfulness of this tip.

Click on a star to rate it!

… for Random Weirdness

Tip #029: Which Files Should Be Copied From a Camera Card?

Larry Jordan – https://LarryJordan.com

“Pick-and-Choose” is the wrong option for best results.

Tip Screen Shot

Topic $TipTopic

All of them.

Select the entire contents of the card, even the folders and files that you don’t recognize, and copy the entire contents of the card into its own folder on your hard disk.

One folder per camera card. Always.

Why? Because, depending upon the codec, different parts of your media are stored in different folders on the card; especially metadata. Copying everything from the card into its own folder on your local storage means that whichever NLE you use for editing is able to assemble all the pieces and track all your data without any problems.


Please rate the helpfulness of this tip.

Click on a star to rate it!