The Inside Tips are taking a hiatus for the month of August. We’ll be back the first week of September with more Inside Tips.
Thanks for your readership and comments. Enjoy the rest of your summer.
Feel free to contribute some tips of your own here.
Please rate the helpfulness of this tip.
Click on a star to rate it!
https://www.theinsidetips.com/wp-content/uploads/2019/09/Tips-Logo-700x150.jpg00Larry Jordanhttps://www.theinsidetips.com/wp-content/uploads/2019/09/Tips-Logo-700x150.jpgLarry Jordan2021-08-03 01:30:002021-08-03 01:30:00Tip #1833: The Inside Tips Take a Hiatus
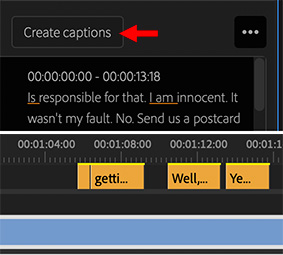
Captions should only be trimmed using the red Roll tool.
The Text > Create Captions button (top) and captions in the Timeline (bottom).
Once you create a transcript using the new Speech-to-Text feature in Adobe Premiere Pro, click the Create Captions button in the new Text panel to create captions.
The key to remember when trimming captions is to always use the red “Roll Trim” tool. This adjusts the In or the Out of the selected caption without changing the timing of any downstream captions.
If you use the yellow “Ripple Trim” tool, you’ll adjust the In or the Out of the selected caption AND shift the position of all downstream captions.
Since, most of the time, you create captions when the edit is complete, shifting the position of captions means that they will no longer sync to the dialog.
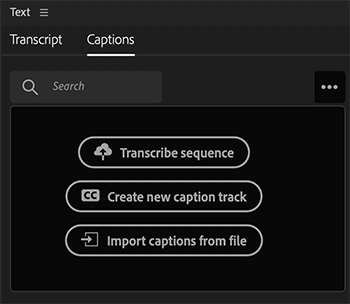
Transcriptive creates a text-based editing system for Adobe Premiere transcripts.
The new Caption panel in Adobe Premiere Pro 2021.
First reported by NewsShooter.com, link, Digital Anarchy has released a new take on its intelligent transcription products called Transcriptive Rough Cutter.
Rough Cutter for Adobe Premiere is built on Digital Anarchy’s Transcriptive AI plug in, and it automatically and instantly creates new video sequences by analyzing text transcripts. The edits in the sequence perfectly match the edits in the transcript so this lets you create an instant rough cut, complete with a timecode associated with each word.
Video editors can edit sequences and clips by simply editing the text of the transcripts it generates. Premiere Pro editors working with a sequence of one or more clips can use the transcript text to literally cut video and create new sequences; text edits in the transcript will be reflected as edits in the video, precisely at the points in the text where words, phrases or even paragraphs were deleted. This creates a new assembly or rough cut that reflects the edits made on the original text.
Transcriptive Rough Cutter can use transcripts from Transcriptive-A.I., Adobe Sensei (A.I.) Captions, human transcripts, and other types of transcription.
In a recent blog post, Jim Tierney, CEO of Digital Anarchy, also detailed how to move transcripts from Adobe Premiere Pro to Transcriptive and back.
“If you want to make use of the Adobe transcriptions anywhere but in the Premiere’s Text panel… it involves several steps (instead of the one-step process it should be).”
“Their new Caption system is in the release version of CC 2021. So if you’re trying to get captions out of Transcriptive and into Premiere, you can do that with any version of CC 2021. Since this is easy, just Export out of Transcriptive and Import in Premiere.”
His blog then details how to get transcriptions out of Premiere for review and editing in Transcriptive, then back into Premiere for actual captioning.
M1 support adds speed, captions available to “All App” subscribers free.
The new Create Transcript dialog window in Adobe Premiere Pro.
Adobe released a significant update to Premiere Pro in July that supported speech-to-text and native M1 Mac support. Here are key details taken from Adobe’s press release.
Available now, Speech to Text in Premiere Pro gives creators all the tools they need to make captioned videos the new standard. With Speech to Text, Premiere Pro is the only NLE offering an integrated and automated workflow for creating transcriptions and captions. Speech to Text is, on average, 5x faster than other captioning workflows and is included at no additional cost for subscribers.
As well, native support for Macs powered by M1 in Premiere Pro, Media Encoder, and Character Animator, accelerates those applications on the latest Macs. New text and graphic capabilities give storytellers more creative tools for titles and captions. Across the release, and in public Beta, there are improvements for collaboration, color, and performance.
Speech to Text
Speech to Text includes support for 13 languages, and early access users around the world have confirmed the impressive accuracy of their transcriptions. When changes are needed, such as correcting the spelling of names, users can easily edit the text in the transcript. When the transcript is ready, Speech to Text automatically creates captions on the Timeline, leveraging the power of Adobe Sensei machine learning to match the pacing of human speech. Once the words are on the Timeline, captions can be customized using the design tools in the Essential Graphics panel.
Speech to Text is included with a Premiere Pro or Creative Cloud all apps subscriptions at no additional cost, enabling Premiere Pro users to increase the value of their video content easily and efficiently.
Premiere Pro on M1-powered Macs
Premiere Pro and the Adobe video apps enable editors and content creators to leverage the latest Mac hardware so they can keep up in a fast-paced world. With native support for M1 on Mac , Premiere Pro runs nearly 80% faster than comparable Intel-based Macs. As users upgrade to M1-powered Macs, Premiere Pro is ready for them. Along with Premiere Pro, the July release includes M1 support for Media Encoder and Character Animator. Premiere Rush and Audition received M1 support in April and May, respectively. And M1 support for After Effects will be introduced in public Beta later this year. After Effects integration features within Premiere Pro, such as Dynamic Link and Motion Graphics templates, have already been optimized for M1-powered Macs.
https://www.theinsidetips.com/wp-content/uploads/2019/09/Tips-Logo-700x150.jpg00Larry Jordanhttps://www.theinsidetips.com/wp-content/uploads/2019/09/Tips-Logo-700x150.jpgLarry Jordan2021-07-27 01:30:002021-07-27 01:30:00Tip #1823: Big New Features in Adobe Premiere
The new integrated speech-to-text workflow in Premiere improves efficiency.
Adobe Premiere Pro logo.
The Pfeiffer Report was commissioned by Adobe to analyze the efficiency and productivity gains of the Speech to Text feature set in Adobe Premiere Pro.
On average, Speech to Text provided a 187% productivity increase over using online transcriptions based on six individual workflow scenarios that Pfeiffer tested.
Here’s a link to the full report. (Free and no user data required.)
Please rate the helpfulness of this tip.
Click on a star to rate it!
https://www.theinsidetips.com/wp-content/uploads/2019/09/Tips-Logo-700x150.jpg00Larry Jordanhttps://www.theinsidetips.com/wp-content/uploads/2019/09/Tips-Logo-700x150.jpgLarry Jordan2021-07-27 01:30:002021-07-27 01:30:00Tip #1824: The Productivity Impact of Speech to Text
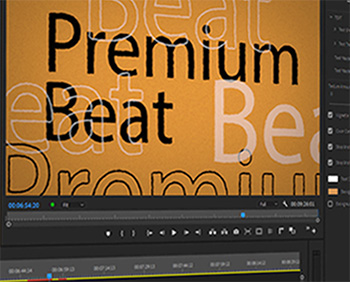
Four YouTube videos filled with hidden tips and tricks.
Image courtesy of PremiumBeat.com
This article, written by Mike Maher, first appeared in PremiumBeat.com. This is a summary.
This article contains links to four YouTube videos showcasing hidden Premiere tips from:
Zach Ramelan
Film Bodega
Peter McKinnon
Cinecom
These cover editing, effects and workflow. The article linked above has more details on each video so you can watch the one that is most relevant to you.
Please rate the helpfulness of this tip.
Click on a star to rate it!
https://www.theinsidetips.com/wp-content/uploads/2019/09/Tips-Logo-700x150.jpg00Larry Jordanhttps://www.theinsidetips.com/wp-content/uploads/2019/09/Tips-Logo-700x150.jpgLarry Jordan2021-07-20 01:30:002021-07-20 01:30:00Tip #1785: 24 Hidden Tips for Premiere Pro
Dozens of effects, transitions and fonts for Premiere Pro
Image courtesy of AEJuice.
Recently, Jacob Syrytsia, co-founder of AEJuice contacted me about their free plug-ins for both After Effects and Premiere Pro. They have hundreds to choose from. Learn more.
AEJuice is a team of motion designers and software engineers that create tools for animation. It was founded in 2015 by Jacob Syrytsia and Mark Duval.
They currently offer a bundle for Premiere Pro consisting of dozens of effects, sound effects, transitions and other elements.
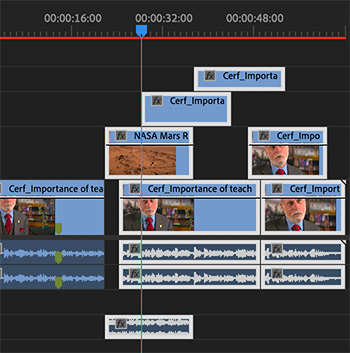
The ability to move clips as a group makes it easier to adjust segment timing.
Selected clips moving using keyboard shortcuts.
Premiere provides a fast and easy way to move multiple clips at the same time: the Track Select Forward tool. Here’s how it works.
From the toolbar, select the Track Select Forward tool. (There’s no assigned keyboard shortcut, but you can add one in Premiere > Keyboard Shortcuts.)
Click in the timeline. All clips that exist at that frame in the timeline are selected, even if it’s only the tail end of a clip.
NOTE: If you find yourself selecting clips that you don’t want to select, move the cursor past the end of the clips you don’t want to select.
Type Cmd + [left / right] arrow to move all selected clips one frame left or right.
Type Shift + Cmd + [left / right] arrow to move 5 frames left or right.
EXTRA CREDIT
In the tool bar, click the small arrow next to the Track Select Forward tool to choose the Track Select Backward tool. It works the same way, except that it selects all clips BEFORE the position you click in the timeline.
Please rate the helpfulness of this tip.
Click on a star to rate it!
https://www.theinsidetips.com/wp-content/uploads/2019/09/Tips-Logo-700x150.jpg00Larry Jordanhttps://www.theinsidetips.com/wp-content/uploads/2019/09/Tips-Logo-700x150.jpgLarry Jordan2021-07-20 01:30:002021-07-20 01:30:00Tip #1796: Move Multiple Clips with One Shortcut
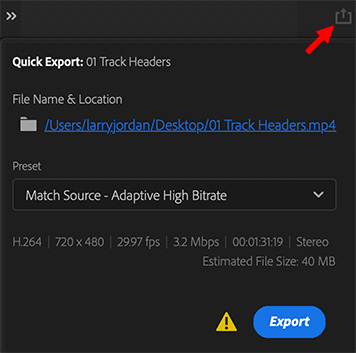
The default Match Source export settings always uses H.264.
A Match Source Quick Export setting. Note that it uses H.264.
There’s a potential “gotcha” when using the default Match Source export settings that can trip you up. The screen shot illustrates the Quick Export menu in the top right corner of the Premiere interface and the Match Source settings.
Normally, I export sequences from Premiere using my own export settings. However, while I was exploring the Premiere beta, which revises the entire export process, I discovered a problem with the Match Source setting that affects both the beta and the current shipping version.
Specifically, even though it is supposed to “match the source,” it actually uses the H.264 codec. This is fine for distribution, but NOT fine for any sequences you expect to work with again.
NOTE: In fact, H.264 is the default codec for all export presets.
Instead, when exporting any file you expect to reuse, reedit or recompress, avoid ALL the preset export settings – which all use H.264 – and select an editable codec like ProRes, DNx or GoPro Cineform. The files are bigger, but you’ll avoid image degradation and artifacting.
We may request cookies to be set on your device. We use cookies to let us know when you visit our websites, how you interact with us, to enrich your user experience, and to customize your relationship with our website.
Click on the different category headings to find out more. You can also change some of your preferences. Note that blocking some types of cookies may impact your experience on our websites and the services we are able to offer.
Essential Website Cookies
These cookies are strictly necessary to provide you with services available through our website and to use some of its features.
Because these cookies are strictly necessary to deliver the website, refuseing them will have impact how our site functions. You always can block or delete cookies by changing your browser settings and force blocking all cookies on this website. But this will always prompt you to accept/refuse cookies when revisiting our site.
We fully respect if you want to refuse cookies but to avoid asking you again and again kindly allow us to store a cookie for that. You are free to opt out any time or opt in for other cookies to get a better experience. If you refuse cookies we will remove all set cookies in our domain.
We provide you with a list of stored cookies on your computer in our domain so you can check what we stored. Due to security reasons we are not able to show or modify cookies from other domains. You can check these in your browser security settings.
Google Analytics Cookies
These cookies collect information that is used either in aggregate form to help us understand how our website is being used or how effective our marketing campaigns are, or to help us customize our website and application for you in order to enhance your experience.
If you do not want that we track your visit to our site you can disable tracking in your browser here:
Other external services
We also use different external services like Google Webfonts, Google Maps, and external Video providers. Since these providers may collect personal data like your IP address we allow you to block them here. Please be aware that this might heavily reduce the functionality and appearance of our site. Changes will take effect once you reload the page.
Google Webfont Settings:
Google Map Settings:
Google reCaptcha Settings:
Vimeo and Youtube video embeds:
Other cookies
The following cookies are also needed - You can choose if you want to allow them:
Privacy Policy
You can read about our cookies and privacy settings in detail on our Privacy Policy Page.