… for Adobe Premiere Pro CC

Tip #049: Customize Monitor Buttons

Larry Jordan – https://LarryJordan.com

Missing your favorite button. It isn’t gone – it’s hiding.

Tip Screen Shot

Topic $TipTopic

One of the goals for the Premiere development team over the last couple of years was cleaning up the interface to make it less cluttered. This meant making buttons disappear.

However, if one of those missing buttons was your favorite, don’t despair – they aren’t lost, just moved to a hidden part of the interface.

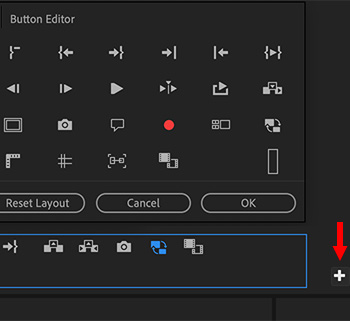
To unlock it, click the Plus icon in the lower right corner of either the Program or Source monitor (they each have an icon). This displays the Button Editor.

Hover over a button to see a description of what it does.

If you want it, drag it from the Button Editor into the button bar below it. (You can shuffle buttons in the button bar however you want.)

When you are done dragging:

  • Click OK to save your new button layout.
  • Click Cancel to remove your changes.
  • Click Reset Layout to restore the layout to its original setting.

EXTRA CREDIT

The Source and Program monitors can each have their own custom button layouts.


Please rate the helpfulness of this tip.

Click on a star to rate it!

… for Adobe Premiere Pro CC

Tip #045: Preview Faster

Larry Jordan – https://LarryJordan.com

In this case, it’s OK – and fast! – to “play around.”

Tip Screen Shot

Topic $TipTopic

This is a very fast way to preview a transition.

Using the arrow keys, position the playhead on the transition you want to preview.

Press Shift + K.

Instantly, the playhead backs up a few seconds, plays through the position of the playhead, then stops a few seconds afterward.

EXTRA CREDIT

You can set how far back or forward the playhead moves with this shortcut using Preferences > Playback:

  • Preroll. Sets how far back the playhead starts.
  • Postroll. Sets how for past the playhead position the playback ends.

By increasing these durations you can use this technique to preview short segments, not just transitions.


Please rate the helpfulness of this tip.

Click on a star to rate it!

… for Adobe Premiere Pro CC

Tip #032: What’s A Cache?

Larry Jordan – https://LarryJordan.com

Cache files are work files that need some periodic attention.

Tip Screen Shot

Topic $TipTopic

Just as when you are working on a math problem and you have a separate piece of paper to help with the intermediate steps, so also does Premiere. These are called “cache files,” or work files, because they are stored (cached) while you are working on your project.

These work files are generally not viewable by us, just as your personal notes may only make sense to you. But they are nonetheless essential.

While necessary, these don’t need to be retained after a project is done. In fact, it’s a good idea to clean all cache files on a regular basis; say, a couple of times a month or so. (If Premiere needs these files again in the future, it will rebuild them. So, there’s no risk of deleting something you actually need.)

Preferences > Media Cache

You can change the location of where cache files are stored. Where possible, I recommend storing them in a different location from your media files. Using your internal storage is often a good place, because these files benefit from the extra speed an internal device provides and you can erase the files when you are done.

Make a point to delete unused files every month or so, to regain storage space. Also, there is never a reason to archive cache files.

On my system, I also automatically delete cache files older than 90 days.

BONUS

I make a point to rename my cache file folder so I know what’s inside. This isn’t necessary, but I find it helpful; for example, “Premiere Cache Files.”


Please rate the helpfulness of this tip.

Click on a star to rate it!

… for Apple Final Cut Pro X

Tip #096: A Faster Way to Rename Keywords

Larry Jordan – https://LarryJordan.com

Renaming a keyword is easy – if you know where to make the change.

Tip Screen Shot

Topic $TipTopic

What happens if you’ve applied keywords to a lot of clips, only to discover that you misspelled one of the keywords. Or want to change a keyword for a different word?

Relax! This is easy.

  • Select the Keyword in the Library List
  • Press Enter to open the name for editing
  • Rename it
  • Press Enter to apply the name

Instantly, every clip with this keyword is updated to the new name.


Please rate the helpfulness of this tip.

Click on a star to rate it!

… for Apple Final Cut Pro X

Tip #084: Find What You Need (Part 2)

Larry Jordan – https://LarryJordan.com

Final Cut supports searches on far more than text.

Tip Screen Shot

Topic $TipTopic

After you open the Search Filter window (see Tip #75) click the Plus icon in the top right corner.

This displays ten different categories you can use to search for specific media, as illustrated in this screen shot.

While all of these are useful, the two that I use the most are:

  • Text
  • Keywords

Text searches on file names, of course. But it also searches for all text entered in the Notes field as well as other metadata fields entered using the Info > Inspector.

NOTE: Metadata entered into clips in the Browser is searchable. Metadata entered into clips in the Timeline is not. So be sure to enter any metadata you want to search for later by applying it to clips in the Browser.

You can combine multiple categories in the same search. For example, Text AND Keywords AND Not used.

Keywords allow us to search for clips which contain, or don’t contain, keywords. Since FCP X now supports an almost unlimited number of keywords, I find myself using this feature frequently.

However, Tip #85 covers an equally important search feature – Boolean selection.


Please rate the helpfulness of this tip.

Click on a star to rate it!

… for Apple Final Cut Pro X

Tip #069: Create a Default Effect

Larry Jordan – https://LarryJordan.com

Your favorite effect is only one (unassigned) keyboard shortcut away.

Tip Screen Shot

Topic $TipTopic

Let’s say that your favorite video effects is a Gaussian Blur. You use it so much that it would save you a lot of time if you could apply that effect with a single keyboard shortcut.

You can and it’s easy.

  • Right-click (or Control-click) the effect you want to make the default and select Make Default Video Effect.
  • Next, select the clip, or clips, to which you want to apply the effect and type Option + E.

Your favorite effect is now exactly one keyboard shortcut away!

EXTRA CREDIT

You can also do the same with any audio effect:

  • Right-click and select Make Default Audio Effect

Now, when you type Option + Cmd + E, the default audio effect is applied to all selected clips.

Cool.


Please rate the helpfulness of this tip.

Click on a star to rate it!

… for Adobe Premiere Pro CC

Tip #064: Secrets of Premiere’s Dock Icon

Larry Jordan – https://LarryJordan.com

Lurking, hidden, in the Dock are helpful options for Premiere.

Tip Screen Shot

Topic $TipTopic

Hidden in the Dock icon for Premiere are several options that you may find useful. There are two ways to access them:

  • Control-click the Dock icon
  • Click and hold the Dock icon

Control-clicking is faster but you need to remember to press the Control key.

Either way, here you’ll find options to:

  • Open Premiere when you first log into your computer
  • Keep its icon in the Dock
  • Hide everything else EXCEPT for Premiere
  • Force quit the application if it starts misbehaving

Nice to know the Dock, too, has it’s secrets.


Please rate the helpfulness of this tip.

Click on a star to rate it!

… for Adobe Premiere Pro CC

Tip #060: Set vs Scale to Timeline

Larry Jordan – https://LarryJordan.com

This setting has a major impact on imported still image scaling and quality.

Tip Screen Shot

Topic $TipTopic

If all your still images precisely match the frame size of your project, all is good. But, when they don’t, this preference makes a big difference.

First, some background. All digital images are bitmapped. This means that, while you can make them smaller with no problem, you can’t scale them larger than 100%. If you do, the image gets increasingly blurry.

So, if you want to preserve image quality, it is critical for you to know when an image exceeds 100% size. The problem is that a default preference setting for Premiere makes this impossible.

Here’s the setting to watch in Preferences > Media: Default Media Scaling.

  • Set to Frame Size. This is the default setting. It automatically scales the imported image to fit in the frame AND sets Effect Controls > Motion > Scale to 100%, regardless of the original size of the image.
  • Scale to Frame Size. This automatically scales the imported image AND adjusts Motion > Scale to reflect the amount of the change.

The second option, which is not the default, allows you to see how much an image was resized and, if you scale it larger, it is easy to see when scaling exceeds 100%. This prevents you from unknowingly damaging image quality.


Please rate the helpfulness of this tip.

Click on a star to rate it!

… for Adobe Premiere Pro CC

Tip #043: Optimize Premiere Preferences for Performance

Larry Jordan – https://LarryJordan.com

Five Settings That Can Speed Your System

Tip Screen Shot

Topic $TipTopic

Most of the time, you alter Premiere’s preference settings to suit your, ah, preferences. However, there are five preferences that also affect performance.

Preferences > Media

  • Growing Files. A growing file is a special media file that can be edited while it is still being recorded; think sports highlights. When checked, every 60 seconds Premiere will check your hard disk for changes. If nothing is changing, all you are doing is slowing down your system. My recommendation is to uncheck this.

Preferences > Memoryy

  • RAM reserved for… Keep this low. On my system, I set this to 4 GB. The remaining RAM is reserved and shared between Adobe apps. Once you quit, this RAM is released back to the OS.
  • Optimize rendering for…. If you have 32 GB RAM or more, change this to Performance.

Preferences > Playback

  • Enable Mercury Transmit. Uncheck this UNLESS you are driving a video, not computer, monitor (say via HTML or 3rd-party interface box). Mercury Transmit is how Premiere outputs video to a video monitor. If all you are using are computer monitors, you can turn this off.

File > New Project Settings

  • Renderer. This determines how Premiere generates render files. On recent Macs set this to Metal; and, shortly, Metal 2. On Windows set this to OpenCL. This enables hardware acceleration for effects, rendering and export.

Please rate the helpfulness of this tip.

Click on a star to rate it!

… for Apple Final Cut Pro X

Tip #087: Get Rid of a Yellow Alert

Larry Jordan – https://LarryJordan.com

Here’s what to do when nothing else works.

Tip Screen Shot

Topic $TipTopic

JR Drew suggested this:

Here’s something to add to your list of “How do I get rid of that annoying little yellow alert on my event when I have checked every piece of media/title/generator/transition, looked inside every compound clip created in the entire library, and they are all present and accounted for???”

I don’t know why this worked for me, but it did:

SHARE (export) the timeline in each file type available (.m4v, .mp4, .mov).

Again, no idea what was probably created during the writing, but it magically made the alert icon disappear.

Larry adds: This sounds like you were experienced bad render files. By exporting into different formats, you repaced the bad versions with good. You probably only need to do this with a couple of different formats to clean out all the bad render files.


Please rate the helpfulness of this tip.

Click on a star to rate it!