… for Apple Final Cut Pro X

Tip #967: Final Cut Adds “Smart Conform”

Larry Jordan – LarryJordan.com

Smart Conform is fast and generally makes good decisions, but adjustments require keyframing.

A Smart Conform of a dancer. Drag image to adjust. Click arrows to reveal background.

Topic $TipTopic

One of the new features in the 10.4.9 update to Final Cut is Smart Conform. This takes an existing clip or clips and “crops” them to fit into a different aspect ratio. Typical examples are taking media shot 16:9, then converting it for a trailer on Instagram at 1:1 or an iPhone at 9:16.

A key point about Smart Conform is that it works at the clip level. Here’s how:

  • Create a project with the frame size you need; for example, Vertical.
  • Copy clips from an existing project into the new project – or – edit new clips into the project.
  • Select the clips you want to reframe and choose Modify > Smart Conform.

NOTE: In order to enable Smart Conform, the frame sizes of project and clips should not match.

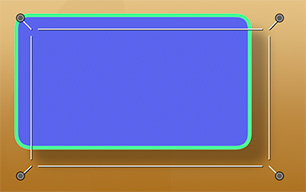
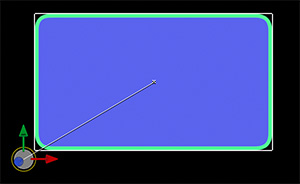
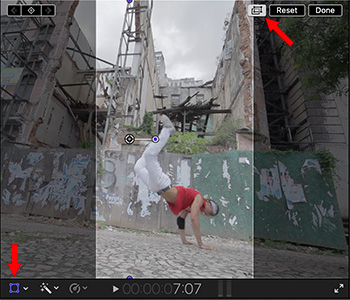
Final Cut intelligently looks at each clip, applies the appropriate Spatial Conform to each clip, then crops the edges to display what it feels is the key content. (Brighter image in the screen shot.)

To see an overlay of the original clip, click the Transform on-screen controls (left arrow), then click the new “dual boxes” icon at the top right of the Viewer (right arrow) and then drag the center box to change the framing.

THOUGHTS

Based on some very quick tests, Smart Conform works quickly and tends to select appropriate framing. However, for objects moving within the edges of the frame, Smart Conform does not track objects during playback. Instead, you need to set keyframes in Transform > Position to compensate. Also, Smart Conform does not work with titles, generators or compound clips.

EXTRA CREDIT

Here’s a tutorial from my website that describes this in more detail.


Please rate the helpfulness of this tip.

Click on a star to rate it!

… for Apple Final Cut Pro X

Tip #966: Fast Fades & Other Secrets

Larry Jordan – LarryJordan.com

Automatic audio crossfades are only one of many new features in the latest update.

Two adjacent clips with an automatic crossfade applied.

Topic $TipTopic

With the latest update to Final Cut Pro X, we can now quickly apply audio crossfades between two or more selected audio clips. Here’s the process:

  • Select two or more clips that you want to crossfade (the audio equivalent of a dissolve) between. These MUST be touching – any gaps and this won’t work.
  • Choose Modify > Audio Fades > Crossfade – or – Type Option + T.

NOTE: This shortcut mimics the video dissolve shortcut of Cmd + T.

Then, if you want to see what FCP did, select the clips with fades and choose Clip > Expand Audio Components. This allows you to see the overlap between clips. In this example, I highlighted the fade dots of each clip. In normal use, you’d only see one.

Final Cut automatically moves the fade dots and trims the ends of each selected edit point to create a crossfade. You can change any of these manually.

By default, each crossfade is 0.10 seconds. You can adjust this default duration for audio cross-fades, go to Final Cut Pro > Preferences > Editing and enter a new value into Crossfade. (I prefer fades between 1/2 and 1 second.)

EXTRA CREDIT

Here’s a tutorial from my website filled with little-known techniques from the latest FCP X update.


Please rate the helpfulness of this tip.

Click on a star to rate it!

… for Apple Final Cut Pro X

Tip #962: Apple Updates Final Cut Pro X

Larry Jordan – LarryJordan.com

The updates add significant new features to FCP X, Motion and Compressor.

The Apple Final Cut Pro X logo.

Topic $TipTopic

Last week, Apple continued the evolutionary growth of Final Cut Pro X releasing its 33rd free update – to version 10.4.9 – along with updates for Motion and Compressor. While none of these features are revolutionary, all are useful and include:

  • Proxy workflow enhancements
  • Automated tools for social media cropping
  • Editorial workflow improvements
  • Motion now supports 3D models in USDZ format, and include 66 new 3D models in the Motion Library
  • Motion adds a new Stroke filter which quickly outlines objects using its alpha channel
  • Compressor now supports custom LUTs

These free updates are accessed through the Mac App Store.

EXTRA CREDIT

The Pro Video codecs were also updated. To upgrade these, go to System Preferences > Software Update. All updates are free.

Here’s a link to learn more.


Please rate the helpfulness of this tip.

Click on a star to rate it!

… for Random Weirdness

Tip #951: 5 Easy Hacks for a Solo Shoot

Larry Jordan – LarryJordan.com

These five tips will help improve your next shoot.

(Image courtesy of Pexels.com.)

Topic $TipTopic

This article, written by Tanner Shinnick, first appeared in PremiumBeat.com. This is an excerpt.

Work smarter, not harder! Tips, tricks, hacks — whatever you call them — these five easy moves will make your next solo video shoot better.

Clients are looking for every opportunity to cut costs and save money. Yet, with customers spending more time online looking at screens, they need more video than ever. And that means there’s money to be made by videographers and filmmakers with the right gear, attitude, and hustle to offer end-to-end, turnkey production capabilities.

  1. Use Camera and Equipment Carts. When you’re working alone, minimizing the amount of equipment you need to carry is absolutely key. As such, gear and camera carts are total game-changers.
  2. Don’t Sleep on B-Roll. When you’re on a solo shoot, the stress may begin to set in and you might think you’re saving time and energy by sacrificing B-roll. Don’t believe it. You’re filming solo, sure, but that doesn’t mean it has to look like you filmed alone.
  3. Choose Zooms Over Primes. Most of the time, I love a solid prime over a zoom. However, man, they sure do slow you down. For solo operators, choosing a zoom over a prime is an absolute must.
  4. Bring Extra Media. Whenever I’m working a solo shoot, I bring enough media to last me the entire day.
  5. Embrace Stock Footage. Stock footage is a smart choice when you need shots that scheduling, headcount, and gear limitations don’t allow for. It’s an even smarter choice when you make the clips part of your plan right from the start of your project.

The article link at the top has more tips, links and a video on solo shooting.


Please rate the helpfulness of this tip.

Click on a star to rate it!

… for Random Weirdness

Tip #950: Blackbird: Fast, Cloud-based Editing

Larry Jordan – LarryJordan.com

Blackbird embodies the shift into remote editing workflows.

The Blackbird logo.

Topic $TipTopic

Recently, I’ve been getting a lot of emails about this software and wanted to share their description with you. The following text is from Blackbird.

Blackbird is the world’s fastest, most powerful professional cloud video editing and publishing platform. Enabling remote editing, Blackbird provides rapid access to video content for the easy creation of clips, highlights and longer form content to multiple devices and platforms.

A fully-featured editor accessed through any browser, easy to learn and needing only limited bandwidth to use, Blackbird powers significant productivity and efficiency benefits for any enterprise organisation working with video.

Blackbird was developed specifically for the browser and thereby supports remote production, Blackbird delivers unbeatable speed, scalability and richness of editing features and video output.

Blackbird is unique. The platform allows you to manage your video like no other solution – enabling lightning-fast video viewing, editing and publishing – anywhere, any time, by anyone.

If you haven’t heard of this application before, here’s the link to learn more.


Please rate the helpfulness of this tip.

Click on a star to rate it!

… for Random Weirdness

Tip #949: 6 Film Funding Tips

Larry Jordan – LarryJordan.com

Funding a film is like getting a startup off the ground.

(Image courtesy of Pexels.com.)

Topic $TipTopic

This article, written by Jarett Holmes, first appeared in RitualMusic.com. This is an excerpt.

Armed with a great script, a talented core team and a vision, the often impossible-seeming hurdle remains: Fundraising. Funding a film is like getting a startup off the ground: Get ready to pick up the phone, put yourself way out of your comfort zone, and ask for the money.

Here are six resources to aid in your film fundraising strategy:

  1. Film Fundraising Reading List. This provides nine links to articles and advice on funding, crowd-funding, budgeting and lawyers.
  2. Your Attorney as an Essential Resource. As soon as possible, find a great attorney. Your entertainment lawyer will guide you through the structuring of your company (which will affect how you raise money), the contracts, shareholders agreements and all other business documents.
  3. Friends and Family Network. The first place to turn when fundraising is to the people that have already invested in you, your friends and family.
  4. Crowdfunding. Crowdfunding is a step away from straight friends and family, but there will be overlap. His article discusses and has links to KickStarter, IndieGogo, and Slated.
  5. Grants & Government Funding. Believe it or not, there are initiative’s for the arts, including filmmaking! The article includes links to PBS and GrantSpace.
  6. Accredited Investors. Once you’ve exhausted your immediate network, you may decide to cast the net out into the sea of accredited investors. These investors are high net worth individuals and will want to know exactly how you expect to show them a return.

Conclusion

Raising money for any project a hustle, no doubt about it. But the advice and links in this article can help you get started in the right direction.


Please rate the helpfulness of this tip.

Click on a star to rate it!

… for Apple Motion

Tip #956: Well… THAT was Obvious

Larry Jordan – LarryJordan.com

The Drop Shadow tool is a fast way to access Inspector settings.

A drop shadow applied to a shape using the Drop Shadow tool.

Topic $TipTopic

Sometimes you overlook something REALLY obvious. I sure did and here’s what it does.

The drop shadow settings in Inspector > Properties can be applied to any selected element. I use them all the time.

However, as I was writing Tip #955 about the Anchor Point tool, I discovered – immediately below it in the Tools palette – the Drop Shadow tool. Wow! Who knew?

This tool applies a 75% opacity drop shadow to whatever object you have selected, then allows you to adjust its position and feathering.

To use it:

  • Select a layer in the Layers panel.
  • Select the Drop Shadow tool. This automatically puts a bounding box around whatever element is selected.
  • Drag the middle of the bounding box to move the shadow to a new location.
  • Drag one of the four corner dots to increase feathering.

NOTE: The four modifier keys have no impact on this setting.

EXTRA CREDIT

  • The color and opacity of the drop shadow can only be changed using the Inspector controls.
  • To modify an existing drop shadow, reselect the layer and the Drop Shadow tool.
  • To remove a drop shadow, go to Inspector > Properties and reset the Drop Shadow parameter settings. (Click the small downward-pointing arrow to the right of the Drop Shadow title.)

Please rate the helpfulness of this tip.

Click on a star to rate it!

… for Apple Motion

Tip #955: Shift the Anchor Point

Larry Jordan – LarryJordan.com

Use the Anchor tool to quickly move the anchor point.

The anchor point was moved to the lower left corner of this rectangle.

Topic $TipTopic

The Anchor Point is that part of an element that determines where it will scale or rotate. By default it is at the dead-center of an element. Here’s how to move it.

  • In the Layers panel, select the element with the anchor point you want to change.
  • In the Tools panel, select the Anchor Point tool (second from the top).
  • Drag the white circle (see screen shot) from the center of the selected element to a new location.

Test the results by rotating the element using the Rotation settings in Inspector > Properties.

NOTE: In this example, I dragged it outside the rounded rectangle, which is perfectly legal though not normal, in order to make the contents of the anchor point more visible.

EXTRA CREDIT

You can also set the anchor point by typing specific number values in Inspector > Properties. However, the Anchor Point tool is much faster, though less precise.


Please rate the helpfulness of this tip.

Click on a star to rate it!

… for Apple Motion

Tip #953: So, What’s the Difference?

Larry Jordan – LarryJordan.com

Project settings determine presets and where they are saved.

The five project choices in the Motion Project Browser.

Topic $TipTopic

When you open the Project Browser to create a new Motion project, you are confronted by five project choices before you can start creating. What’s the difference between them?

All five project presets are identical in terms of what Motion can do. The differences are preset layers when you open a new project and where a project is saved.

  • Motion Project. This has no presets and can be saved anywhere. It can also be converted into a Generator for Final Cut Pro X when you save it.
  • Final Cut Effect. This opens with a drop zone placeholder for the underlying clip when this effect is applied to a clip in the Final Cut timeline. It is always saved into the category of your choice in the Effects browser.
  • Final Cut Generator. There are no presets. It is always saved into the category of your choice in the Generators browser.
  • Final Cut Transition. This opens with two drop zone placeholders; one for the outgoing clip and one for the incoming clip; but no applied transition between them. It is always saved into the category of your choice in the Transitions browser.
  • Final Cut Title. This opens with a drop zone placeholder for the background clip when this effect is applied to a clip in the Final Cut timeline. There is also a default text layer, placed as a lower-third, which can be formatted and moved as necessary. It is always saved into the category of your choice in the Titles browser.

Please rate the helpfulness of this tip.

Click on a star to rate it!

… for Visual Effects

Tip #961: An Overview of Mocha Pro

Larry Jordan – LarryJordan.com

With over 200 tutorials to choose from, learning Mocha is easy.

The Mocha logo.

Topic $TipTopic

Mocha Pro is is the world’s most powerful planar tracking tool for VFX and post-production. Featuring GPU-accelerated tracking and object removal, advanced masking with edge-snapping, stabilization, lens calibration, 3D camera solver, stereo 360/VR support, and more.

It does a lot, but figuring out how to use it can be a challenge.

That’s where these Mocha Pro tutorials, from BorisFX, can help. Whether you are running Mocha in Nuke, After Effects, Flame, or experimenting with the free trial, these tutorials will improve your skills.

There are almost 200 to choose from – all free.

MOCHA PRO


Please rate the helpfulness of this tip.

Click on a star to rate it!