Completely rewritten app now available via free public beta.
Image courtesy of BorisFX.com.
Boris FX released a free public beta for Continuum for Final Cut Pro Editors.
They completely redesigned Continuum FCP 2021 to deliver an easy-to-use and lightning-fast workflow. Boris FX invites you to take it for a spin by joining our free public beta program!
https://www.theinsidetips.com/wp-content/uploads/2019/09/Tips-Logo-700x150.jpg00Larry Jordanhttps://www.theinsidetips.com/wp-content/uploads/2019/09/Tips-Logo-700x150.jpgLarry Jordan2021-03-31 01:30:002021-03-31 01:30:00Tip #1530: Boris FX Continuum Public Beta for FCP
Real-time VFX has been making massive leaps in the past few years, including virtual production, face-swapping, digi-doubles and more. With the pandemic, that trend has accelerated exponentially. This week, the RealTime Conference (RTC) announced its return, with several sessions dedicated to exploring the growth and future of real-time tools in VFX.
The first of two events will be held on April 26-28. Some of the best and brightest minds in VFX will dive into all things real-time, from LED walls to MetaHumans and everything in between. Backed by names like Epic Games and Foundry, with additional talks from Digital Domain and other VFX powerhouses, RTC 2021 is bringing it all together – for free!
This article first appeared in Shutterstock.com. This is a summary.
Shutterstock users from around the world search for images, videos, and music tracks every day—by the millions. The keywords they use allow us to uncover what trends are on the horizon and will define creativity in 2021. These trends include:
Eccentric Animation. As the software behind VFX and animation gets more advanced, artists are developing unique approaches, giving content creators new ways to express their ideas. We’ve seen a rise in searches for playful animation styles and motion graphics in a time when new live action footage is harder to come by.
Design Trends. Free-flowing inkspaces, one-of-a-kind tie dye patterns, and twisting, surreal line portraiture show the embrace of individuality—and the imperfection—in digital art. Hang loose with this misfit crowd of textures, backgrounds, and illustrations.
Surreal Faces. The avant-garde is again on the horizon, and Picasso-esque designs are leading the charge. Combining abstract attributes with reality, these linear elements transcend boundaries, making the normal look fantastic. Celebrate this trend of all things extraordinary, glorious, and inherently human.
Inkscapes. Currents of translucent hues, snaking metallic swirls, and foamy sprays of color shape the landscape of these free-flowing textures. The marbling techniques at play leave room for beautiful imperfections amidst the chaos.
Tie Dye. The DIY breakout hit of at-home fashion is now claiming new territory in digital design. Tie dye patterns are an instant pick-me-up of ’70s nostalgia with a distinctive flair. With hundreds of dyeing techniques available, this trend is the perfect foundation for your unique point of view.
Photography. Photographers, more and more, are ditching the studio and focusing their lenses on a new scenario: reality. Out with the staged and in with the real—we’re talking real people, real situations, real life.
There are ten trends in all – each illustrated with a variety of visuals. Even if you aren’t a designer, the images alone will rejuvenate your eye.
LibreOffice, unlike Apple’s apps, can convert decodes old text and images.
LibreOffice logo
I’ve been creating files on computers for a long, long time. One of the challenges is opening files that are decades old created with dead codecs. Here’s an invaluable application that can help solve this problem.
LibreOffice, unlike Apple’s current applications, can convert decades old images and text into something readable today. LibreOffice is free, open-source and continually evolving – without losing track of its past.
I find this software especially useful for AppleWorks/ClarisWorks files and older PICT (.pct and .pic) image files.
Once opened, LibreOffice can convert a file into a PDF, which simplifies preserving history for the future.
FFmpeg is the Swiss Army knife of media compression.
This gets pretty geeky. Why? Because this command line tweak describes how to use FFmpeg for HEVC compression that plays on iOS devices.
One of the benefits of using HEVC, especially for videos we don’t plan to edit, is the small file size this codec creates.
This is very helpful for storing media on mobile devices where storage is frequently limited. The problem is that FFmpeg, by default, creates HEVC files which won’t play on an iOS device.
The fix, as Aaron K. reported is changing a command line tag – either before or after encoding – that fixes this problem.
What is especially useful about this technique is that it can be applied after a file is compressed as well as process a group of files stored in a folder.
Please rate the helpfulness of this tip.
Click on a star to rate it!
https://www.theinsidetips.com/wp-content/uploads/2019/09/Tips-Logo-700x150.jpg00Larry Jordanhttps://www.theinsidetips.com/wp-content/uploads/2019/09/Tips-Logo-700x150.jpgLarry Jordan2021-03-30 01:30:002021-03-26 16:26:58Tip #1521: Use FFmpeg to Create HEVC Files for iPhones
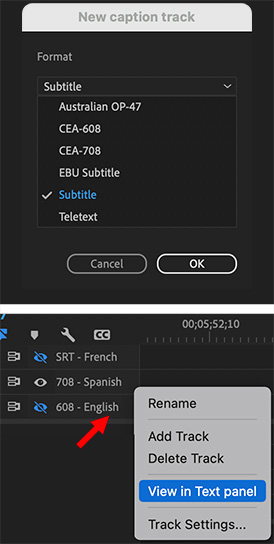
Captions are now much more flexible and easier to use in Premiere Pro.
Caption track window (top) and caption track menu (lower).
One of the exciting new features in Premiere’s new caption workflow is its flexibility. There is no limit to the number of caption tracks (the container for captions) you can create. There is also no limit to the number of captions you can put in each track.
NOTE: Well, there is, I guess. Captions need to display for at least a second, so you are limited by the length of your program. But, um, hold your captions on-screen longer than a second…
When you add a new caption track, you can determine the format for all the captions it contains. However, you can’t mix caption formats in the same track.
You can have tracks for different languages, and each track can be a different format (as illustrated in the lower half of the screen shot).
Control-click a caption track to reveal other options.
Here’s a tutorial from my website that describes captions in more detail.
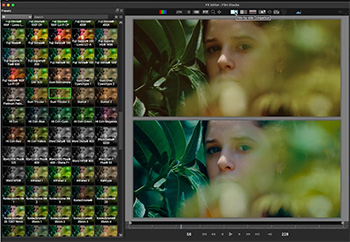
Adjusting where a clip starts is a huge benefit for media replacement.
Placement and timing settings for replaced media in Essential Graphics.
There’s a hidden feature in the new motion graphic templates that allow media replacement. I mentioned this in last week’s tip, but it deserves more attention.
When you add a template that allows media replacement – and not all of them do – you have a lot of control over which part of the inserted image is displayed in the timeline.
After you drag an image into the placeholder graphic (see Tip #1504) look immediately below the image in the Essential Graphics panel.
Scale to… This provides four options for scaling the image to fit within the placeholder.
H & W. These scale an image symmetrically, if the chain icon is linked, or asymmetrically, if the chain icon has a line through it.
The four icons across the bottom determine:
Horizontal position
Vertical position
Rotation
Timecode where the inserted image should start
This last setting is key. In the past, we would need to create subclips that start where we wanted them to start. Now, all we need to do is enter a timecode. This makes it very easy to experiment with the best place to start an inserted video – the only downside is that every time we change one of these settings, we need to re-render the effect.
Please rate the helpfulness of this tip.
Click on a star to rate it!
https://www.theinsidetips.com/wp-content/uploads/2019/09/Tips-Logo-700x150.jpg00Larry Jordanhttps://www.theinsidetips.com/wp-content/uploads/2019/09/Tips-Logo-700x150.jpgLarry Jordan2021-03-30 01:30:002021-03-30 01:30:00Tip #1519: Hidden Media Replacement Controls
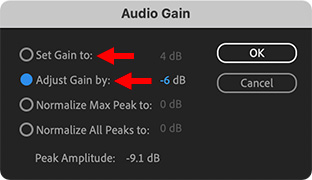
Generally, we adjust clip volumes relatively and monitor them absolutely.
The Gain wndow in Adobe Premiere Pro.
There are two ways to adjust the volume of any audio clip: Absolute and Relative. Here’s what these terms mean and how they work.
An absolute audio level adjustment sets audio levels regardless of the audio volume of that clip before the adjustment. For example, setting one or more clips to -6 dB. If one clip is at -4 dB and a second clip is at 0 dB before the change, they will both be at -6 dB after the change.
A relative audio level adjustment sets audio levels based upon the audio levels before the adjustment. For example, raising the level of one or more clips by 4 dB. If one clip is at -4 dB and a second clip is at 0 dB before the change, the first clip will be at 0 dB and the second clip will be a +4 dB after the change.
NOTE: Audio meters always show absolute levels, the precise volume of all active clips, regardless of the dB setting of their individual clip volume.
KEYBOARD SHORTCUTS
Select the clips you want to adjust in the timeline.
Type G, to open the Gain window.
Set Gain to performs an absolute audio adjustment.
Adjust Gain by performs a relative audio adjustment.
The waveforms in clips you adjust will change, but the volume line will not.
FFmpeg: Open-source transcoding software for the media industry.
Underlying many popular transcoding or media viewer applications, like VLC Player or Handbrake, is FFmpeg.
FFmpeg is a free and open-source software project consisting of a large suite of libraries and programs for handling video, audio, and other multimedia files and streams. At its core is the FFmpeg program itself, designed for command-line-based processing of video and audio files.
FFmpeg is part of the workflow of hundreds of other software projects, and its libraries are a core part of software media players such as VLC, and has been included in core processing for YouTube and iTunes. Codecs for the encoding and/or decoding of most audio and video file formats is included, making it highly useful for the transcoding of common and uncommon media files into a single common format.
NOTE: One of the license stipulations to using FFmpeg is that it can not be sold, it can only be given away. And, it can’t be bundled with any transcoding software that is sold.
You may not have used it directly because it can only be accessed via the command line in Terminal. But numerous applications exist to provide a front-end to FFmpeg.
It should be noted that Apple has issues with FFmpeg:
In some instances, unauthorized codec implementations have been used in third-party software and hardware products. Using any unauthorized implementation (such as FFmpeg and derivative implementations) might lead to decoding errors, performance degradation, incompatibility, and instability.
https://www.theinsidetips.com/wp-content/uploads/2019/09/Tips-Logo-700x150.jpg00Larry Jordanhttps://www.theinsidetips.com/wp-content/uploads/2019/09/Tips-Logo-700x150.jpgLarry Jordan2021-03-30 01:30:002021-03-26 16:31:03Tip #1516: What is FFmpeg?
Generally, we adjust clip volumes relatively and monitor them absolutely.
There are two ways to adjust the volume of any audio clip: Absolute and Relative. Here’s what these terms mean and how they work.
An absolute audio level adjustment sets audio levels regardless of the audio volume of that clip before the adjustment. For example, setting one or more clips to -6 dB. If one clip is at -4 dB and a second clip is at 0 dB before the change, they will both be at -6 dB after the change.
A relative audio level adjustment sets audio levels based upon the audio levels before the adjustment. For example, raising the level of one or more clips by 4 dB. If one clip is at -4 dB and a second clip is at 0 dB before the change, the first clip will be at 0 dB and the second clip will be a +4 dB after the change.
NOTE: Audio meters always show absolute levels, the precise volume of all active clips, regardless of the dB setting of their individual clip volume.
KEYBOARD SHORTCUTS
To make an absolute adjustment, first, select the clips you want to adjust, then type Control + Option + L and enter the audio level you want to assign.
To make a relative audio adjustment, select the clips you want to adjust, then type Control + [minus ] / [ plus ] to decrease/increase audio levels in 1 dB increments.
We may request cookies to be set on your device. We use cookies to let us know when you visit our websites, how you interact with us, to enrich your user experience, and to customize your relationship with our website.
Click on the different category headings to find out more. You can also change some of your preferences. Note that blocking some types of cookies may impact your experience on our websites and the services we are able to offer.
Essential Website Cookies
These cookies are strictly necessary to provide you with services available through our website and to use some of its features.
Because these cookies are strictly necessary to deliver the website, refuseing them will have impact how our site functions. You always can block or delete cookies by changing your browser settings and force blocking all cookies on this website. But this will always prompt you to accept/refuse cookies when revisiting our site.
We fully respect if you want to refuse cookies but to avoid asking you again and again kindly allow us to store a cookie for that. You are free to opt out any time or opt in for other cookies to get a better experience. If you refuse cookies we will remove all set cookies in our domain.
We provide you with a list of stored cookies on your computer in our domain so you can check what we stored. Due to security reasons we are not able to show or modify cookies from other domains. You can check these in your browser security settings.
Google Analytics Cookies
These cookies collect information that is used either in aggregate form to help us understand how our website is being used or how effective our marketing campaigns are, or to help us customize our website and application for you in order to enhance your experience.
If you do not want that we track your visit to our site you can disable tracking in your browser here:
Other external services
We also use different external services like Google Webfonts, Google Maps, and external Video providers. Since these providers may collect personal data like your IP address we allow you to block them here. Please be aware that this might heavily reduce the functionality and appearance of our site. Changes will take effect once you reload the page.
Google Webfont Settings:
Google Map Settings:
Google reCaptcha Settings:
Vimeo and Youtube video embeds:
Other cookies
The following cookies are also needed - You can choose if you want to allow them:
Privacy Policy
You can read about our cookies and privacy settings in detail on our Privacy Policy Page.