High-quality, visually-interesting generic footage is a money-maker.
Image courtesy of Ferdinand Studio for Pexels.com.
This article first appeared in MotionArray.com. This is a summary.
Let’s be real. If someone sets out to make stock video footage, they’re probably not doing it just for fun. They’re doing it to make cash. But just how much cash they end up making largely depends on a few key factors.
Find A Niche. The more specialized your craft, the more money you’ll make.
Quality. Quality is one of the biggest, if not the biggest, factors that divide stock footage that sells from stock footage that languishes. Shoot outdoors in natural light, until you know how to light a set. At minimum, shoot 1080p. Don’t use Automatic mode on your camera.
Avoid Branding. Don’t include labels, logos, or other ad-related images.
Upload to Multiple Sites. The review process takes time. And each site pays differently.
Market Your Work. Put a sizzle reel on YouTube.
Track Results to Find Out What Sells. Regularly search the ‘Popular’ or ‘Top Seller’ pages of your go-to stock footage websites, looking specifically at what comes up under the keywords related to your niche.
Don’t Expect Overnight Success. When it comes to making stock footage, the main things to remember (along with the 7 handy tips above) is to start slow, manage your expectations, and gradually work your way up. Oh, and of course…HAVE FUN!
Please rate the helpfulness of this tip.
Click on a star to rate it!
https://www.theinsidetips.com/wp-content/uploads/2019/09/Tips-Logo-700x150.jpg00Larry Jordanhttps://www.theinsidetips.com/wp-content/uploads/2019/09/Tips-Logo-700x150.jpgLarry Jordan2021-01-29 01:30:002021-01-22 18:16:05Tip #1362: Create Stock Video That Sells
Knowing how to explain what you are doing improves the quality of your images.
Image courtesy of Learn Online Video.
This article, written by Oakley Anderson-Moore, first appeared in NoFilmSchool.com. This is a summary.
Not so long ago, epic cinematic shots were mainstays of jibs, cranes, and dollies. Now, a lone filmmaker with a few hundred bucks can pull off Hollywood-caliber movement—with one hand and a gimbal.
However, just buying a gimbal doesn’t equal good cinematography. You have to know how to use it, and how to communicate to your cast and crew what you are planning.
Steve Wright at Learn Online Video, provides 10 moves – and names – to help us communicate better.
The Follow
The Reverse Follow
Step In Reveal
Mini Jib Reveal
Side Track
Chest Transition
Soft Focus Reveal
Wipe Transition
The Orbit
The Fake Drone
EXTRA CREDIT
The article includes details on each shot, plus a video that illustrates them in use.
Please rate the helpfulness of this tip.
Click on a star to rate it!
https://www.theinsidetips.com/wp-content/uploads/2019/09/Tips-Logo-700x150.jpg00Larry Jordanhttps://www.theinsidetips.com/wp-content/uploads/2019/09/Tips-Logo-700x150.jpgLarry Jordan2021-01-29 01:30:002021-01-29 01:30:00Tip #1361: The Vocabulary of the Gimbal
Plan what you are going to do – then leave yourself options.
(Image courtesy ÓMKÃR ÑAÍDU, Pexels.com.
This article, written by Jourdan Aldredge, first appeared in PremiumBeat.com. This is a summary.
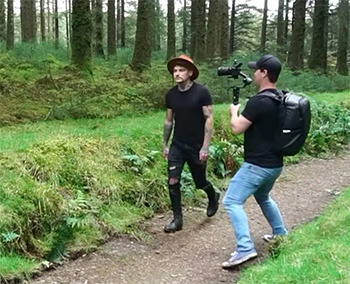
Just as in great investigative journalism, documentary filmmaking is about filming the very things that powerful people and subjects want to have filmed the least. That means, for those interested in careers as documentarians, that you’ll need to get used to filming undercover and undetected.
Research and Have a Plan. From my own experience working in documentary filmmaking—usually as a one man “Shreditor” (shooter, producer, editor)—you’ll often find yourself in situations that can be best described as “gray areas” in regards to whether you should be filming or not. Regardless of how you find yourself in one of these incognito or gray areas, your best bet is simply to do your research and have a plan.
The Right Tools for the Job. The trick is to find a camera, gear, and setup that will allow you the most flexibility to record with as little impact as possible, while still striving for quality footage, solid recording time, and enough dynamic range to work in a variety of lighting situations.
Inconspicuous Filming Techniques. Another popular technique for many documentary filmmakers looking to remain undercover is to shoot with many of the popular DSLR or mirrorless cameras that can often pass as simple photography cameras.
DIY Equipment and Hidden Cameras. I wouldn’t recommend using any of these cameras or methods as your primary means of documentary filmmaking. But, if you’re ever in a pinch and want to really stretch just how undercover you can go, these will certainly help you remain undetected.
Be Ready to Record and Improvise. I’ve personally found that the best shots come from spontaneous situations and from simply being quick on-the-draw, so to speak. Working on projects where you need to remain out of sight will stretch you even further to really push what your focus, gear, and expertise can handle.
EXTRA CREDIT
This article has several videos illustrating its points, additional links for more resources and lots of additional detail.
Please rate the helpfulness of this tip.
Click on a star to rate it!
https://www.theinsidetips.com/wp-content/uploads/2019/09/Tips-Logo-700x150.jpg00Larry Jordanhttps://www.theinsidetips.com/wp-content/uploads/2019/09/Tips-Logo-700x150.jpgLarry Jordan2021-01-29 01:30:002021-01-29 01:30:00Tip #1360: Tips for Filming Undercover
Reflection settings allow reflections to more closely model reality.
Reflection settings and their results (bottom). Rectangle shows the reflecting object.
By default, Motion does not allow one object – such as text – to reflect off another object. Not only can you change this, you can also modify the reflections themselves.
First, to create a reflection, you need to create a source object – say some text – then a second object for that text to reflect from.
NOTE: This is identical to a mirror. Your face needs to reflect off something in order for you to see it.
It is beyond the scope of these tips to describe all the different ways we can create a reflection in Motion. However, once that reflection exists on the reflecting object – generally a black rectangle placed near the text – you have several formatting options.
In the screen shot, I colored some text blue and added a black rectangle under it to catch the reflection.
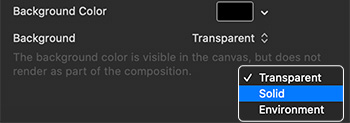
For full-screen projects, set the background to a solid color.
Background settings in Project Properties. Transparent is the default.
By default, the background in Motion is transparent, though it is displayed in the Viewer as black. However, you DO have options.
Also by default, the background color is black. This means that the Viewer displays black behind all elements, BUT it does not export this color.
To change the background, type Cmd + J, this displays the Project Properties panel.
Transparent. The background color does not export, though it does appear in the Viewer.
Solid. The background color appears in the Viewer and is exported as a solid color with your project.
Environment. The background color appears in the Viewer, exports with your project and interacts with elements in your project, for example, using blend modes..
EXTRA CREDIT
To change the background color in the Viewer, change the background color setting in Project Properties.
Please rate the helpfulness of this tip.
Click on a star to rate it!
https://www.theinsidetips.com/wp-content/uploads/2019/09/Tips-Logo-700x150.jpg00Larry Jordanhttps://www.theinsidetips.com/wp-content/uploads/2019/09/Tips-Logo-700x150.jpgLarry Jordan2021-01-28 01:30:002021-01-28 01:30:00Tip #1364: Change the Motion Background
All project properties can be modified – except frame rate.
The Project Properties panel.
Normally, you set essential Motion project properties when you create a project using the Project Browser. But, what happens if you need to change project settings after the project is created?
That’s where Project Properties come in.
To change them, select the Project in the Layers panel.
Then, go to Inspector > Properties and change what you need to change.
NOTE: A faster way to do this is to type Cmd + J.
This allows you to change all the technical settings of a project EXCEPT frame rate. If you need to change the frame rate, you’ll need to create a whole new project.
NOTE: Unlike Final Cut, even if the project is empty you can’t change frame rate once a project is created.
EXTRA CREDIT
Changing the project duration does not modify the timing of any elements already added to it.
How to create high-impact images in After Effects using Cinema 4D.
Image courtesy of Cineversity.com
Cinema 4D Lite is the free version of Cinema 4D that ships with Adobe After Effects. In this free 31-video tutorial series, Athanasios Pozantzis illustrates the interface, navigation, customization, modeling, texturing, light, animation, sweeping, lathing, moving, rotating, deforming, scaling and many others.
https://www.theinsidetips.com/wp-content/uploads/2019/09/Tips-Logo-700x150.jpg00Larry Jordanhttps://www.theinsidetips.com/wp-content/uploads/2019/09/Tips-Logo-700x150.jpgLarry Jordan2021-01-27 01:30:002021-01-22 17:26:44Tip #1368: Learn 3D in Cinema 4D Lite
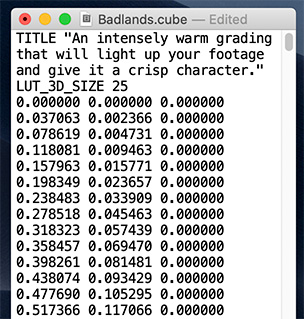
A LUT is a look-up table. Ideal for on-set use, more limited in post.
A LUT opened in TextEdit – just a table of numbers.
This article, written by Charles Haine, first appeared in NoFilmSchool.com. This is a summary.
A LUT is just a “lookup table.” That’s it. It’s a table of values. In fact, if you have a LUT of some sort, you can open that LUT in TextEdit or Notepad and read it. (See screen shot)
Every LUT format spells out what those numbers mean. So each number in the table refers to a specific color value in your image, and the numbers in the table tell the system how to change it. Make it brighter, make it darker, make it bluer, redder, greener.
You can think of a LUT as being a bit like a filter that changes what your footage looks like.
You’ll see a lot about 1D and 3D LUTs, and once you know the difference, it’s easy to remember.
A 1D LUT only covers one direction, brightness. So you’ll often see 1D LUTs used for converting log to linear footage, since that is a transformation of brightness.
A 3D LUT covers 3 dimensions, which are the red, green, and blue channels of color video. If you want to change the color of something, you’ll need a 3D LUT. Of course, brightness can be changed with a 3D LUT, but not as precisely and the files are bigger, so 1D LUTs remain popular for what they are used for.
Some might hear this and think, “Oh, a LUT is just a look!” And in some ways, a LUT and a “look” are somewhat similar. …A LUT can’t do sharpness. So it’s important to remember that a LUT and a look are different, with a LUT being a simple file designed for contrast, brightness, and color cast changes, while a “look” refers to all the things affecting the personality or vibe of an image.
First and foremost, it’s that a LUT affects your whole image the same way. You can’t apply any shape information on a LUT, so you can’t do a subtle vignette to point the eye or do anything else with shapes. A LUT affects every pixel in the frame the same way.
On top of that, LUTs have some technical issues that come from bit depth and banding. Because the file sizes of LUTs are small, you sometimes run into an issue where fine detail in a gradient comes in between steps in the table. This leads to an output that looks banded.
LUTs are best avoided as part of the final creative color grading process. When you get into your grading session, you might bring along your LUTs to show them to the colorist to help give them perspective on the looks you were using while shooting and editing, but it’s better for the colorist to recreate that look from scratch in their editing platform than to work with the LUT on.
Because of banding and gamut issues, LUTs can get in the way of taking full advantage of everything available to you in a final grade.
While LUTs are wonderful and are likely here to stay on set, they are slowly being moved out of post. The replacement is what is called a transform. Transforms are incredibly powerful because they don’t have the banding and gamut issues of LUTs. Since it’s math, there is no “out of gamut” error caused by the transform. It can always calculate a new value.
Please rate the helpfulness of this tip.
Click on a star to rate it!
https://www.theinsidetips.com/wp-content/uploads/2019/09/Tips-Logo-700x150.jpg00Larry Jordanhttps://www.theinsidetips.com/wp-content/uploads/2019/09/Tips-Logo-700x150.jpgLarry Jordan2021-01-27 01:30:002021-01-22 17:27:53Tip #1367: When to Use, or NOT Use, a LUT
Machine learning is accelerating all sorts of slow processes in visual effects.
Arraiy’s A.I.-based tracking solution in action.
This article, written by Ian Failes, first appeared in PremiumBeat.com. This is a summary.
If there’s a buzz phrase right now in visual effects, it’s “machine learning.” In fact, there are three: machine learning, deep learning and artificial intelligence (A.I.). Each phrase tends to be used interchangeably to mean the new wave of smart software solutions in VFX, computer graphics and animation that lean on A.I. techniques.
VFX Voice asked several key players – from studios to software companies and researchers – about the areas of the industry that will likely be impacted by this new world of A.I.
What exactly is machine or deep learning? An authority on the subject is Hao Li, a researcher and the CEO and co-founder of Pinscreen, which is developing ‘instant’ 3D avatars via mobile applications with the help of machine learning techniques. He describes machine learning (of which deep learning is a subset) as the use of “computational frameworks that are based on artificial neural networks which can be trained to perform highly complex tasks when a lot of training data exists.”
Since many graphics-related challenges are directly connected to vision-related ones – such as motion capture, performance-driven 3D facial animation, 3D scanning and others – it has become obvious that many existing techniques would immediately benefit from deep learning-based techniques once sufficient training data can be obtained.
The use of machine and deep learning techniques in the creation of CG creatures and materials is still relatively new, but incredibly promising, which is why several companies have been dipping their toes in the area. Ziva Dynamics, which offers physically-based simulation software called Ziva VFX, has been exploring machine learning, particularly in relation to its real-time solver technology.
“This technology,” explains Ziva Dynamics co-CEO and co-founder James Jacobs, “makes it possible to convert high-quality offline simulations, crafted by technical directors using Ziva VFX, into performant real-time characters. We’ve deployed this tech in a few public demonstrations and engaged in confidential prototyping with several leading companies in different sectors to explore use cases and future product strategies.”
One of the promises of deep and machine learning is as an aid to artists with tasks that are presently labor-intensive. One of those tasks familiar to visual effects artists, of course, is rotoscoping. Kognat, a company started by Rising Sun Pictures pipeline software developer Sam Hodge, has made its Rotobot deep learning rotoscope and compositing tool available for use with NUKE.
Hodge’s adoption of deep learning techniques, and intense ‘training,’ enables Rotobot to isolate all of the pixels that belong to a certain class into a single mask, called segmentation. The effect is the isolation of portions of the image, just like rotoscoping. “Then there is instance segmentation,” adds Hodge, “which can isolate the pixels of a single instance of a class into its own layer. A class could be ‘person,’ so with segmentation you get all of the people on one layer. With instance segmentation you can isolate a single person from a crowd.
Digital Domain’s Darren Hendler summarizes that “machine learning is making big inroads in accelerating all sorts of slow processes in visual effects. …In the future, I really see all these machine learning capabilities as additional tools for VFX artists to refocus their talents on the nuances for even better end results.”
EXTRA CREDIT
The source article has lots more detail, illustrations and links.
Please rate the helpfulness of this tip.
Click on a star to rate it!
https://www.theinsidetips.com/wp-content/uploads/2019/09/Tips-Logo-700x150.jpg00Larry Jordanhttps://www.theinsidetips.com/wp-content/uploads/2019/09/Tips-Logo-700x150.jpgLarry Jordan2021-01-27 01:30:002021-01-27 01:30:00Tip #1366: The New AI Frontier of VFX
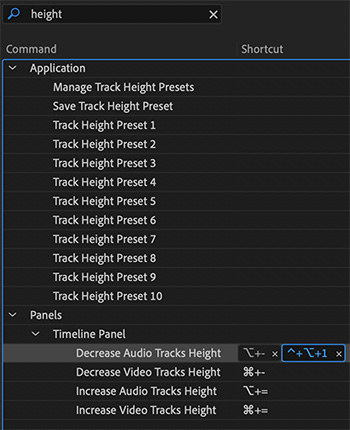
Any shortcut can have multiple keys assigned to it.
Shortcuts with no key assigned (top). Notice one shortcut has two keys assigned (blue box).
Adobe Premiere Pro has hundreds of potential keyboard shortcuts – but only a fraction of these are enabled. Here’s how to find what’s missing.
One of my favorite pastimes is looking for unassigned keyboard shortcuts. (Yes, I know, I need a life.)
Open the Keyboard Shortcuts window (Edit menu for Windows, Premiere Pro menu for Mac).
In the search box on the lower left enter the word or partial word you want to find. (“height” in the screenshot example.) This searches all shortcut titles and text and displays whatever it finds.
NOTE: I generally search on partial words to find the most potential shortcuts that I can.
Using different words will find different shortcuts. Don’t assume Adobe calls stuff the same thing you do.
If no key combination is assigned, the Shortcut field will be empty (top of screen shot).
If a key combination is assigned, you’ll see it to the right of the name (see bottom four entries in screen shot).
You can assign more than one key combination to the same shortcut. I use this to match shortcuts between Premiere and Final Cut so I don’t keep tripping over the wrong shortcut.
NOTE: To add a shortcut, double-click the gray area in the Shortcut column, or to the right of any existing assigned key.
To remove a shortcut, click the small “x” next to the key combination.
Please rate the helpfulness of this tip.
Click on a star to rate it!
https://www.theinsidetips.com/wp-content/uploads/2019/09/Tips-Logo-700x150.jpg00Larry Jordanhttps://www.theinsidetips.com/wp-content/uploads/2019/09/Tips-Logo-700x150.jpgLarry Jordan2021-01-26 01:30:002021-01-22 17:18:19Tip #1359: How to Find Available Shortcuts
We may request cookies to be set on your device. We use cookies to let us know when you visit our websites, how you interact with us, to enrich your user experience, and to customize your relationship with our website.
Click on the different category headings to find out more. You can also change some of your preferences. Note that blocking some types of cookies may impact your experience on our websites and the services we are able to offer.
Essential Website Cookies
These cookies are strictly necessary to provide you with services available through our website and to use some of its features.
Because these cookies are strictly necessary to deliver the website, refuseing them will have impact how our site functions. You always can block or delete cookies by changing your browser settings and force blocking all cookies on this website. But this will always prompt you to accept/refuse cookies when revisiting our site.
We fully respect if you want to refuse cookies but to avoid asking you again and again kindly allow us to store a cookie for that. You are free to opt out any time or opt in for other cookies to get a better experience. If you refuse cookies we will remove all set cookies in our domain.
We provide you with a list of stored cookies on your computer in our domain so you can check what we stored. Due to security reasons we are not able to show or modify cookies from other domains. You can check these in your browser security settings.
Google Analytics Cookies
These cookies collect information that is used either in aggregate form to help us understand how our website is being used or how effective our marketing campaigns are, or to help us customize our website and application for you in order to enhance your experience.
If you do not want that we track your visit to our site you can disable tracking in your browser here:
Other external services
We also use different external services like Google Webfonts, Google Maps, and external Video providers. Since these providers may collect personal data like your IP address we allow you to block them here. Please be aware that this might heavily reduce the functionality and appearance of our site. Changes will take effect once you reload the page.
Google Webfont Settings:
Google Map Settings:
Google reCaptcha Settings:
Vimeo and Youtube video embeds:
Other cookies
The following cookies are also needed - You can choose if you want to allow them:
Privacy Policy
You can read about our cookies and privacy settings in detail on our Privacy Policy Page.