… for Codecs & Media

Tip #321: Blend Modes in Brief

Larry Jordan – LarryJordan.com

Blend modes create textures.
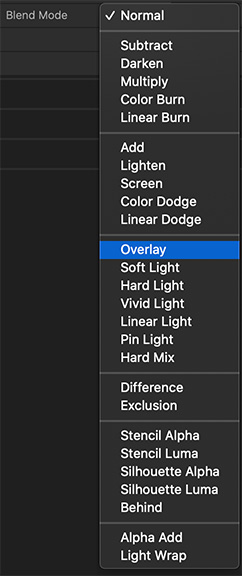
Blend mode options from Apple Motion.
Blend modes combine textures between clips. They are found in all modern NLEs.

Topic $TipTopic

Iain Anderson, at MacProVideo, wrote this up in more detail. But I liked his summary of blend modes, which I have modified from his article.

Blend modes allow us to combine textures, and sometimes colors, between clips or elements that are stacked vertically on top of each other.

Whether you are in Photoshop or Premiere, Final Cut or Motion, blend modes work the same way. These are arithmetical expressions, with nothing to adjust. You either like the effect or you don’t.

NOTE: If you don’t like the effect, tweak either the gray-scale or color value of the top clip and the results will change.

All these settings should be applied to the top clip. It will be the only clip that changes. Here’s what the settings mean.

  • Normal. This leaves the top clip’s image unaltered
  • Subtract, Darken, Multiply, Color Burn, and Linear Burn. These combine clips based upon darker grayscale values. For example, the top clip will darken clips below it. Multiply usually works best for adding darker areas.

NOTE: If nothing changes when you apply this setting, your top clip is too light. Darken it.

  • Add, Lighten, Screen, Color Dodge, and Linear Dodge. These combine textures between clips based upon lighter grayscale values. Screen usually works best for adding bright elements like sparks and flame.

IMPORTANT: Avoid using Add. It creates highlights that exceed legal white values. Screen does not.

  • Overlay, Soft Light, Hard Light, Vivid Light, Linear Light, Pin Light, and Hard Mix. These combine textures based on mid-tone grayscale values, often in a way that increases contrast. Overlay usually works best, though more often these days, I find myself using Soft Light.

NOTE: For better results, reduce opacity and play with the grayscale settings.

  • Difference and Exclusion. These mess with color values to create very hallucinogenic effects. What’s happening is that color values in the top clip are mathematically removed from the clips below in slightly different ways. Also useful for spotting the difference between two clips.
  • Stencil Alpha and Stencil Luma. These insert the background image into the foreground image. Use Stencil Alpha, provided the foreground has an alpha channel. If it doesn’t, use Stencil Luma, but the results may not be as good.
  • Silhouette Alpha and Silhouette Luma. These cut a hole into the background image based upon the foreground image shape. Again, use Silhouette Alpha if the foreground image has an alpha channel.
  • Behind. This displays the clips below the current effect. It is used when you are also using Stencil Alpha to insert one image into another.

The bottom choices will vary by application, and are covered in the Help files.


Please rate the helpfulness of this tip.

Click on a star to rate it!

… for Codecs & Media

Tip #310: A Fast Way to Set a Poster Frame

Larry Jordan – LarryJordan.com

Three steps to poster frame happiness.

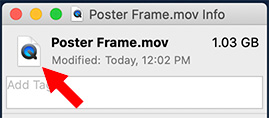
The Get Info box in the Macintosh Finder.
Paste the image you want to use for a poster frame into this icon.

Topic $TipTopic

In an earlier tip I illustrated one way to create a poster frame for a QuickTime movie. After reading it, a reader pointed out an even faster way to create a poster frame. Here are the steps:

  • Open the movie in QuickTime Player that you want to create a poster frame for.
  • Move the playhead to the frame you want to use, then copy it to the clipboard (Edit > Copy).
  • Close the file.
  • Select the file in the Finder.
  • In the Finder, chose File > Get Info.
  • In the top left corner, select the small icon to the left of the name.
  • Choose Edit > Paste.

Poof! Instant poster frame.


Please rate the helpfulness of this tip.

Click on a star to rate it!

… for Codecs & Media

Tip #308: Archive Active Versions of Compressor

Larry Jordan – LarryJordan.com

Archives allow future access to earlier versions.

Apple Compressor logo
The file icon for Apple Compressor.

Topic $TipTopic

It is often necessary, especially if you are working with different clients, to have earlier versions of Compressor available to you. However, only one version of Compressor can be active on your system at a time. Recently, I read an Apple KnowledgeBase article that explained how to create archives.

NOTE: While this won’t get you access to earlier versions of Compressor, it does mean that you’ll have access to all versions going forward.

To back up the currently installed Compressor application:

  1. Create a new folder in the Applications folder, and name it after the application (for example, “Compressor 4.4.6”). To check your version of Compressor, open the application and choose About Compressor from the Compressor menu.
  2. Select the Compressor application in the Applications folder. Choose File > Compress “Compressor.” It will take a few minutes to compress.
  3. Move the resulting “Compressor.zip” file into the folder you created in step 1.
  4. Move the folder containing the .zip file to a backup drive.

EXTRA CREDIT

These ZIP files can be stored anywhere, but I generally try to keep all my program archives in the same place. Remember, before you revert back to an earlier version, archive or delete the version of Compressor currently stored in your Applications folder.

Also, if you revert to an earlier version of Compressor, it may also require an earlier version of the macOS, so keep a note of which version of Compressor uses which version of the macOS.


Please rate the helpfulness of this tip.

Click on a star to rate it!

… for Adobe Premiere Pro CC

Tip #279: A Faster Way to Enable Tracks

Larry Jordan – LarryJordan.com

Sometimes, doing something faster simply requires a shift in thinking.

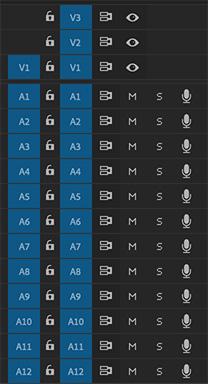
The timeline track header in Adobe Premiere Pro CC.
When a box in the track header of Premiere Pro is blue, it is enabled.

Topic $TipTopic

The blue boxes in the timeline track headers in Premiere Pro CC have two very different functions: The blue boxes on the left control signal patching between the Source monitor and the timeline, while the blue boxes on the right determine active tracks. Both are essential to fast editing. Here’s a cool trick to disable, or enable, them.

NOTE: We have separate tips covering how these work.

In both groups, to disable or enable all the video boxes, or all the audio boxes, click any box while pressing the Shift key.

Poof.


Please rate the helpfulness of this tip.

Click on a star to rate it!

… for Adobe Premiere Pro CC

Tip #278: How to Burn-in Timecode

Larry Jordan – LarryJordan.com

Burned-in Timecode creates the perfect reference video for clients.

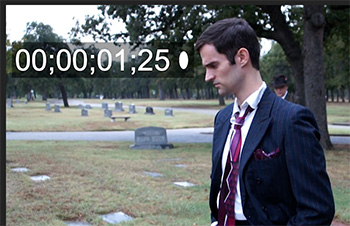
Timecode burned into a video.
Timecode is a label expressed as Hours:Minutes:Seconds:Frames.

Topic $TipTopic

Often, a client needs to review the current state of an edit. The easiest way to provide this is using burned-in timecode. Timecode is a label that uniquely identifies every frame in a video. No two frames in the same clip have the same timecode.

NOTE: Timecode should not be confused with time-of-day. While it can reflect the actual time of a recording, most of the time, it doesn’t.

To display timecode for a clip:

  • Select the clip
  • In the Effects panel, search for “Timecode” (Its located in the Video category.)
  • Drag the timecode effect onto the clip

Poof! Instant timecode.

Adjust size and position in the Effect Controls panel. Remember, your goal is visibility, not tastefulness.

EXTRA CREDIT

A better way to display timecode for an entire project is to add an adjustment layer. We’ll cover that in a later tip.


Please rate the helpfulness of this tip.

Click on a star to rate it!

… for Adobe Premiere Pro CC

Tip #265: Smart Rendering in Premiere Pro CC

Larry Jordan – LarryJordan.com

This is a way to speed rendering and export.

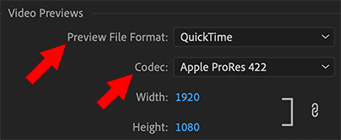
The Video Preview section of Premiere's Sequence Settings window.
These Video Preview settings are critical to getting Smart Render to work.

Topic $TipTopic

I was exploring Adobe’s website for Premiere and discovered Smart Rendering. Smart rendering is, essentially, media optimization before and during editing. It allows you to create better quality output by avoiding recompression where possible. This isn’t a new feature, it first showed up in Premiere CS6. But, if you are outputting MXF files, you’ll need to turn it on.

Smart rendering cuts down on the processing of exporting even more by doing a bit more work up front. Any smart rendering workflow you can add prior to exporting will speed up your exporting process even more than improving hardware and working with optimized media.

Smart rendering works only if the source codec, size, frame rate, and bit rate match the export settings. Smart Rendering is supported for both MXF and QuickTime wrappers.

While you are editing:

  • Render any clips you have added an effect to whenever you get a free moment, ideally when you are taking a break.
  • Render the entire timeline before attempting to export.

Before exporting:

  • Change settings to export to the same codec you ingested and set previews to match it in the Export Settings dialog box.
  • Check the “Use Previews” checkbox in the Export Settings dialog box, as well. This ensures you are merely copying files rather than processing and encoding the files.

Adobe’s Kevin Monahan adds: “I should also point out that it is a much nicer editing experience when cutting with ProRes or the like, over Long GOP footage like H.264 or AVCHD. You drop fewer frames, and can view in a higher resolution with these intraframe codecs. You can even create proxies for them if you have an underpowered computer system and need better fluidity when editing.”

EXTRA CREDIT

Here’s a link that explains this in more detail.


Please rate the helpfulness of this tip.

Click on a star to rate it!

… for Apple Final Cut Pro X

Tip #319: Automatically Adjust Audio Levels

Larry Jordan – LarryJordan.com

Use the Modify menu to adjust an entire range at once.

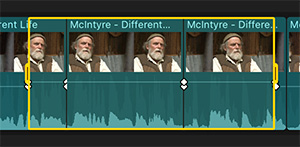
Use the Range Selection tool to select a portion of clips in an Apple Final Cut Pro X timeline.
Note that ONLY the portion of the clips inside the selection range had their audio adjusted – and by the same amount.

Topic $TipTopic

There’s a very cool feature that allows you to quickly adjust audio volume across a selected range of clips. But, it isn’t where you expect. Here’s what you need to know.

  • Using the Range Selection tool (R), select a range within the timeline. This could be a single clip or multiple clips.
  • Then, go to Modify > Audio Volume and use either Up, Down or Relative to adjust every clip in the selected range by the same amount. (Relative, which is my personal preference, allows you to enter the number of dB by which you want to adjust the audio.)

NOTE: This menu option does this by adding and adjusting keyframes at the edges of the range and ends of clips.

What doesn’t work:

  • Drag the volume line. This only adjusts a single clip.
  • Use the Volume setting in the Audio Inspector. This adjusts all clips that contain the range, but ignores the range itself.

EXTRA CREDIT

Here’s an Apple KnowledgeBase article that covers this, but the article does not match the behavior of FCP X.


Please rate the helpfulness of this tip.

Click on a star to rate it!

… for Apple Final Cut Pro X

Tip #317: Working with Chapter Markers

Larry Jordan – LarryJordan.com

Chapter Markers provide fast navigation for editors and viewers.

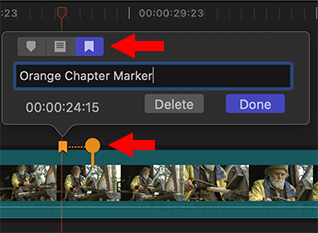
The Edit Marker dialog in Apple Final Cut Pro X.
An orange chapter marker. Click top right icon to convert, drag pin to change image.

Topic $TipTopic

The following is taken from an Apple KnowledgeBase article.

Chapter markers are a standard feature in DVDs, Blu-ray discs, and podcasts. You can add chapter markers to your project so that when you share your finished movie, viewers can use the markers to quickly jump to those points in the movie. Apps and devices that recognize Final Cut Pro chapter markers during playback include iPod, iPhone, iPad, Apple TV, QuickTime Player, DVD Player, and most standard DVD and Blu-ray players.

Similar to a regular marker, chapter markers enable editors to move around inside a project. Unlike regular markers, the text and location associated with a chapter marker can be exported.

  • To create a chapter marker, put the playhead at the location you want the marker to appear, then type M. (This creates a standard marker.)
  • To change the marker to a chapter marker, double-click the marker and select the chapter marker icon (on the right) from the Edit Marker window.
  • To change the image associated with the chapter marker, click it once in the timeline to select it.
  • Then, drag the orange “pin” to the frame you want. By default, this flag appears 11 frames after a chapter marker.

NOTE: The chapter marker thumbnail image is the composited image from that location in the timeline and includes titles and any other superimposed imagery.

If the chapter marker is in the primary storyline, you can drag the chapter marker thumbnail pin as far as the beginning or the end of the primary storyline. If the chapter marker is in a connected storyline, you can drag the chapter marker thumbnail pin as far as the beginning or the end of the connected storyline.

EXTRA CREDIT

Here’s an Apple KnowledgeBase article that goes into more detail.


Please rate the helpfulness of this tip.

Click on a star to rate it!

… for Apple Final Cut Pro X

Tip #306: Archive Active Versions of FCP X

Larry Jordan – LarryJordan.com

Archives allow future access to earlier versions.

Topic $TipTopic

It is often necessary, especially if you are working with different clients, to have earlier versions of Final Cut Pro X available to you. However, only one version of FCP X can be active on your system at a time. Recently, I read an Apple KnowledgeBase article that explained how to create archives.

NOTE: While this won’t get you access to earlier versions of Final Cut Pro X, it does mean that you’ll have access to all versions going forward.

To back up the currently installed Final Cut Pro X application:

  1. Create a new folder in the Applications folder, and name it after the application (for example, “Final Cut Pro X 10.4.8”). To check your version of Final Cut Pro X, open the application and choose About Final Cut Pro X from the Final Cut Pro X menu.
  2. Select the Final Cut Pro X application in the Applications folder. Choose File > Compress “Final Cut Pro X.” It will take a few minutes to compress.
  3. Move the resulting “Final Cut Pro X.zip” file into the folder you created in step 1.
  4. Move the folder containing the .zip file to a backup drive.

EXTRA CREDIT

These ZIP files can be stored anywhere, but I generally try to keep all my program archives in the same place. Remember, before you revert back to an earlier version, archive or delete the version of Final Cut Pro X currently stored in your Applications folder.

Also, if you revert to an earlier version of Final Cut Pro X, it may also require an earlier version of the macOS, so keep a note of which version of Final Cut Pro X uses which version of the macOS.

[Thanks, and a tip of the hat to Mark Spencer for telling me about this.]


Please rate the helpfulness of this tip.

Click on a star to rate it!

… for Random Weirdness

Tip #291: 12 Documentary Editing Tips

Larry Jordan – LarryJordan.com

These steps will help you organize and focus your work.

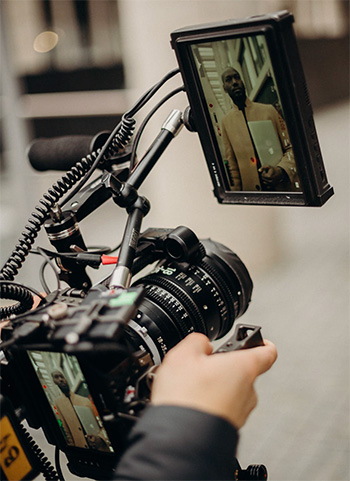
On location with a documentary crew.

Topic $TipTopic

Michael Maher first wrote about this for PremiumBeat. Perhaps the most difficult aspect of editing a documentary is the amount of unscripted responses during interviews. Here are twelve tips to help you focus.

  1. Organize Folder and Label Bins. There is SO MUCH content in a feature that organization is critical. Consider using Post Haste, from Digital Rebellion. This free program instantly creates folder structures from templates, such as video editing, motion graphics, visual effects and more.
  2. Create Sequences for Individual Interviews. Rather than build everything into one master sequence, divide the work. This allows you to quickly build selects from an interview and also simplified later transcription.
  3. Transcribe all footage. New automated speech-to-text transcriptions can often get you close enough for editing. And editing from a transcripts is MUCH faster.
  4. Backup everything. Always. All the time. Like every night.
  5. Edit for a Story Arc. Whether it’s a documentary or work of fiction, every film needs to tell a story. In doing so, you want to make sure you have a beginning, middle, and end. In that series of events, you want to take your audience on an emotional roller-coaster — or story arc. It doesn’t matter if your documentary is two minutes long or two hours, if the story doesn’t progress — don’t expect anyone to watch.
  6. Use Close-up and Medium Shots More Than Wide Shots. Wide shots are great for establishing a scene or as an introduction to a new speaker, but they aren’t enough. By cutting to medium shots and close-ups, you are making the speaker more relatable. The medium shot is most often used for conversational pieces, as the audience feels the subject is right there talking to them. However, documentary films frequently use close-ups of only a speaker’s head. This is common due to the varying sets and backgrounds that can be jarring when cutting between speakers.
  7. Cut on Action. Actions make perfect cutting points that seem natural.
  8. Cut on Dialogue. Cut to words with a strong pronunciation. Also, cut at the beginning of a new sentence/theme.
  9. Avoid Jump Cuts. Hide cuts by switching angles, or covering edits with B-roll.
  10. Use Photos When You Don’t Have Footage. Still photos can help you hide edits or break away from static shots.
  11. Keep Graphics and Lower-Thirds Easy to Read. You don’t need a ton of moving parts or motion graphics. In fact, text with a drop shadow is the most common lower third for a reason. It’s simple and legible. Be sure to also use a font that is easy to read, as well as a nice font color. Don’t go crazy.
  12. Build an Archive of Assets. Keep media you can use across projects in a handy folder.

Please rate the helpfulness of this tip.

Click on a star to rate it!