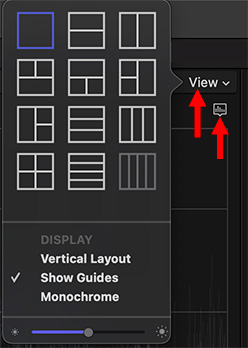
Final Cut’s scopes can be selected and modified using these controls.
The View menu determines video scope layout, the small menu selects which scope to display in each panel.
The video scopes in Apple Final Cut Pro are both flexible and powerful. Even so, we can still tweak them further. Here are three tips I find useful in almost every project.
TIP 1: CHANGE LAYOUT
Open the video scopes (Cmd + 7). Click the word View to select how many scopes you want to view. I tend to prefer the “two side-by-side option” in the top right corner of the View menu.
This allows me to see both Waveform monitor and Vectorscope at the same time.
TIP #2: REMOVE COLOR
By default, Final Cut’s video scopes display the color associated with a specific pixel values, for instance dark green, in the Waveform monitor.
While very cool, you can turn these colors off by selecting Monochrome.
TIP #3: PICK YOUR SCOPES
When you have one or more scopes selected using the View menu, click the small icon below the word View and choose which scope goes in each scope panel.
Most of the time, I’m looking at Waveform (Luma) and Vectorscope (100% Vector).
Until I get into very specific color grading, these two scopes tell me everything I need to know to gauge color and grayscale values during my edit.
Please rate the helpfulness of this tip.
Click on a star to rate it!
https://www.theinsidetips.com/wp-content/uploads/2019/09/Tips-Logo-700x150.jpg00Larry Jordanhttps://www.theinsidetips.com/wp-content/uploads/2019/09/Tips-Logo-700x150.jpgLarry Jordan2021-05-31 01:30:002021-05-31 01:30:00Tip #1661: Three Quick Video Scope Tricks
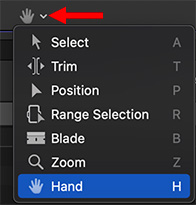
This is a very handy trick to help navigate the timeline.
The Hand tool in the Tools menu.
Here’s a very handy keyboard shortcut to help you move quickly around the Timeline.
You know that the Tools menu has an option for the Hand tool (Shortcut: H). Select it, and you can drag left or right to change your position in the timeline.
NOTE: This is the same as dragging the light gray bar at the bottom of the timeline, but easier to grab.
What you may not know is that if you press and HOLD the H key, you can drag to a new location, then, when you let go, Final Cut returns to the tool that was selected before you pressed H.
This is a very cool timesaver – especially for people like me who don’t edit using a Magic Trackpad.
Thanks and a tip of the hat to Francisco Carrasco, who reminded me of this tip.
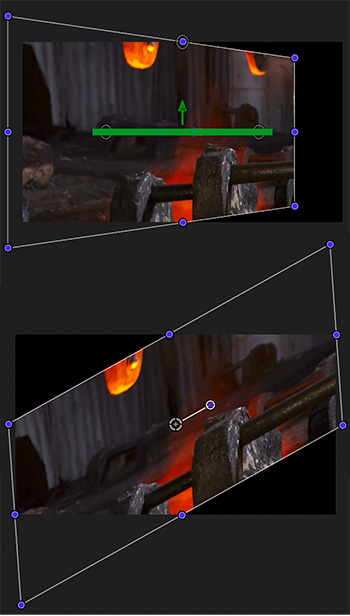
Hold frames are a very fast way to add still frames to a project.
The Speed Transition dialog (top) and the “edit hold frame” box (bottom).
A hold frame is a still frame that is attached to a clip in the Final Cut Pro timeline. Hold frames can be added to any video clip, with any duration you want.
The good news is that hold frames are attached to the clip itself, wherever a clip moves, the hold frame moves with it.
NOTE: Adding a Hold frame pauses the video and puts a gap into the audio. For this reason, hold frames are not recommended for clips with sync sound.
ADD A HOLD FRAME
To add a hold frame, put the playhead where you want to insert a pause, and type Shift + H. (Modify > Retime > Hold)
A 2-second hold frame is inserted into the selected clip at the position of the playhead.
MODIFY A HOLD FRAME
To change the duration of a hold frame, drag the vertical black line (called the “thumb”) at the end of the hold frame left (to shorten it) or right (to lengthen it).
To modify the hold frame itself, double-click the black thumb at the start of the hold frame to display the Speed Transition dialog.
Click Edit and a box appears around the frame that’s current being held. Drag this box left or right to change the frame that’s being held, without deleting either the hold frame or its duration.
To remove a hold frame, select the clip and type Shift + N (Modify > Retime > Normal (100%))
Please rate the helpfulness of this tip.
Click on a star to rate it!
https://www.theinsidetips.com/wp-content/uploads/2019/09/Tips-Logo-700x150.jpg00Larry Jordanhttps://www.theinsidetips.com/wp-content/uploads/2019/09/Tips-Logo-700x150.jpgLarry Jordan2021-05-31 01:30:002021-05-31 01:30:00Tip #1643: Add and Modify a Hold Frame in FCP
The “uncanny valley” – where something is almost human, but not quite.
Image courtesy: René Asmussen, Pexels.com
This article, written by Alyssa Miller, first appeared in NoFilmSchool.com. This is a summary.
Horror films have become predictable. There is a formula created to get a reaction out of the audience, and we are addicted to that rush of adrenaline.
However, the more you watch, the more you know when to prepare for the jumpscare. Then, directors like Ari Aster and Robert Eggers come in and change the horror genre ever so slightly by creating that uneasy feeling throughout the film through the strange and unnatural.
But how do they do this? The author calls it: “the uncanny valley” — the point in which something is almost human but not quite.
Scenes filled with uncertainty are becoming the power force behind the horror genre now. Sure, there is nostalgia in a good ol’ slasher film, but this new wave of horror is creating a new nightmare that leaves a lasting impression in the viewer’s mind. It’s why we come back to films like Midsommar, Get Out, and The Lighthouse. Even if they are not perfect films, horror fans appreciate the lasting dread and grief that the camera, sound, and visual representation of fear within the film’s world.
EXTRA CREDIT
The author goes into more detail – and provides video examples – analyzing why the Japanese film, Kairo, is so terrifying.
Please rate the helpfulness of this tip.
Click on a star to rate it!
https://www.theinsidetips.com/wp-content/uploads/2019/09/Tips-Logo-700x150.jpg00Larry Jordanhttps://www.theinsidetips.com/wp-content/uploads/2019/09/Tips-Logo-700x150.jpgLarry Jordan2021-05-28 01:30:002021-05-28 01:30:00Tip #1652: What Makes a Horror Film Scary?
Directing is exhausting, exhilarating and incredibly focused.
Uzo Aduba and David Weil on the set of Solos (Photo by Jason LaVeris)
This article, written by Jim Hemphill, first appeared in FilmmakerMagazine.com. This is a summary.
Solos is an anthology series, directed by David Weil, in which each episode features a single actor—sometimes giving a straight monologue, sometimes conversing with an offscreen voice or electronic device, in one instance (an extraordinary episode starring Anthony Mackie) talking to his own double—Solos is a master class in minimalist filmmaking for maximum philosophical effect.
After serving as showrunner for Hunters on Amazon, Weil makes his directorial debut on three of the episodes, exhibiting a control and confidence in his framing and direction of actors that distills the show’s complex conceptual premises into intensely personal and intimate conversations between the characters and the audience.
The show drops on Prime Video on May 21; Hemphill spoke with Weil by phone a few weeks before the premiere to ask about the series’ origins and his experience as a first-time director.
Filmmaker: As a first-time director there are a lot of creative risks [in Solos], in the sense that you want to keep it visually dynamic but not get too show-offy or distract from the performances — easier said than done on episodes that take place in one room.
Weil: It’s incredibly difficult. I think when we cast these incredible actors, it all became about protecting the performances and allowing the audience to access them without feeling encumbered by flashy camera movements or glaring set design. Everything was really to serve the reality and the truth of the performances, because at the end of the day, those are what capture us for these 20 to 30 minutes.
Filmmaker: The performances are great across the board, and I’m curious if working with Al Pacino on Hunters taught you anything about working with actors that informed your work on Solos.
Weil: Working with Al Pacino taught me everything—about art, and directing, and writing, and approaching and supporting actors. First of all, his commitment is unparalleled. He taught me to really listen, because he has the most incredible instincts and impulses and ideas—I learned to let him express all that and then create an environment where he would feel supported in his process. So, coming into Solos, my first question to the actors was always, “What works best for you? How can I support you?”
Filmmaker: Were there any challenges that surprised you?
Weil: Before directing, I never truly understood just how exhausting and taxing the filmmaking process is, even though I’ve been a writer and a showrunner.
EXTRA CREDIT
The entire article, which is far longer, is well worth reading as it goes into depth on each episode and David’s approach to directing and how he worked with his actors.
Please rate the helpfulness of this tip.
Click on a star to rate it!
https://www.theinsidetips.com/wp-content/uploads/2019/09/Tips-Logo-700x150.jpg00Larry Jordanhttps://www.theinsidetips.com/wp-content/uploads/2019/09/Tips-Logo-700x150.jpgLarry Jordan2021-05-28 01:30:002021-05-28 01:30:00Tip #1651: David Weil on Directing.
This article, written by Jourdan Aldredge, first appeared in PremiumBeat.com. This is a summary.
We all want to capture the zeitgeist – the imagination of the masses – with our projects. But, what exactly makes a film or TV show quotable and memorable? For many this answer will be subject to how they watch and remember their favorite shows and movies. However, there are certainly trends and techniques that make some films, shows, and specific moments and lines memorable.
With a few exceptions, most of the most quotable television shows come from standard sitcoms and other hybrid comedy shows. Whereas, interestingly enough, most of the most famous movie quotes come from dramas and romance films.
From a writing and filmmaking perspective, how does one go about coming up with great dialogue and memorable quotes? …Dialogue is all about purpose. Especially in television and shorter films, every line really needs to help advance the narrative in a significant way. Dialogue that serves no purpose is bad dialogue. Whereas, dialogue that advances the plot in a major way is good dialogue—and, more often than not, quite memorable.
Overall, creating memorable lines and quotable dialogue in your film and television projects isn’t just about the quotes themselves. Instead, it comes from the entire filmmaking process. It’s true that a good quote is only as good as it’s written. But, many famous lines and quotes have come from last minute rewrites and ad-libs.
EXTRA CREDIT
The article has three in-depth videos that discuss this in more detail, lists of famous quotes and a variety of links providing ideas on how to make your script-writing more memorable.
Please rate the helpfulness of this tip.
Click on a star to rate it!
https://www.theinsidetips.com/wp-content/uploads/2019/09/Tips-Logo-700x150.jpg00Larry Jordanhttps://www.theinsidetips.com/wp-content/uploads/2019/09/Tips-Logo-700x150.jpgLarry Jordan2021-05-28 01:30:002021-05-28 01:30:00Tip #1650: How to Make Your Script More Memorable
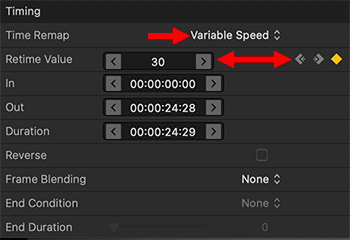
Variable speed changes requiring using frame counts, not timecode.
A variable speed change in Motion. Note keyframes and Retime Value settings.
Creating a variable speed change to a video clip in Motion is involved and somewhat hidden. Also, the Help files don’t help.
NOTE: While this feature is called “Variable Speed Change,” you are not ramping into that speed. You are switching, instantly, from one speed – say 100% – to another – say, 50%.
Here’s how this works.
Select the clip you want to modify in the Layers panel.
Go to Inspector > Properties and scroll down to show the Timing panel.
Change the Time Remap setting to Variable Speed. This sets a 100% speed timing keyframe at the beginning and end of the clip.
Put the playhead where you want the speed change to start, then set a Retime Value keyframe.
Move the playhead where you want the speed change to end and set a second Retime Value keyframe.
Then, adjust the Retime Value (which is a frame counter) to adjust which frame appears at that keyframe.
NOTE: This is a good reason to switch the timecode display to frames, by clicking the small, down-pointing white arrow to the right of the timecode display. All timing changes are measured in frames.
For example, let’s say you want the clip to run at 50% speed for the first two seconds, then freeze for two seconds, then return to normal. The project is 30 fps. (You need to know the project frame rate for this to work.)
Set a keyframe on the starting frame (Frame = 0)
Set a keyframe at the two second mark (Frame = 60)
With the playhead parked on the second keyframe, change the Retime Value to 30. This slows clip playback so that the 30th frame in the clip appears at 60th frame of the project. In other words, the clip plays at 50% speed.
Move the playhead to Frame 120 and set another Retime Value keyframe.
Set the Retime Value to 30. This creates a still frame from the second keyframe to the third. Why? Because the Retime Values are the same.
When the still frame is done, the clip returns to 100% speed as it heads to the last keyframe. Remember, these keyframes represent instantaneous switches in speed, not ramps.
EXTRA CREDIT
This feature takes experimentation to learn what works. However, as a tip, don’t remove the starting and ending keyframes.
The frame rate of the source clip does not appear to be significant.
One other note, resetting the clip does not seem to remove keyframes. If you reset a parameter, you may need to remove keyframes manually.
Please rate the helpfulness of this tip.
Click on a star to rate it!
https://www.theinsidetips.com/wp-content/uploads/2019/09/Tips-Logo-700x150.jpg00Larry Jordanhttps://www.theinsidetips.com/wp-content/uploads/2019/09/Tips-Logo-700x150.jpgLarry Jordan2021-05-27 01:30:002021-05-21 19:16:02Tip #1648: Create a Variable Speed Change in Motion
Changing clip speed isn’t easy in Motion, but it is possible.
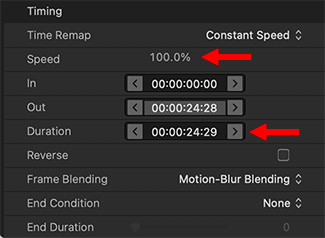
The clip Timing panel in Inspector > Properties.
Motion makes it possible for you to change the playback speed of clips, but this feature is pretty well hidden. Here’s how this feature works.
Select the video clip who’s speed you want to change in the Layers panel.
Go to Inspector > Properties and scroll to the bottom and show Timing (see screen shot).
Here is what some of the settings mean for a Constant speed change:
Time Remap switches between Constant and Variable Speed. (Tip #1648 discusses Variable Speed settings.)
To play a clip in reverse, check the Reverse checkbox.
To play a clip in slow motion, adjust the Speed setting.
To have a clip end on a certain frame, adjust either the Duration or Out timecode values. (These are paired, so if you adjust one, the other moves.)
If the speed goes below around 50%, change Frame Blending from None to Motion-Blur Blending.
If you increase the speed of a clip and don’t have enough frames to cover the total duration, set the End Condition to Hold, then add frames to the End Duration until the clip is as long as you need it.
Please rate the helpfulness of this tip.
Click on a star to rate it!
https://www.theinsidetips.com/wp-content/uploads/2019/09/Tips-Logo-700x150.jpg00Larry Jordanhttps://www.theinsidetips.com/wp-content/uploads/2019/09/Tips-Logo-700x150.jpgLarry Jordan2021-05-27 01:30:002021-05-21 19:14:47Tip #1647: Create a Constant Speed Change in Motion
Free 10-day course teaches the basics of motion graphics.
Joey Korneman, courtesy of SchoolofMotion.com
School of Motion has created a free 10-day online course that provides “an in-depth look at what it takes to be a Motion Designer. Along the way, you’ll learn about the software, principles, and techniques used in the field through in-depth case-studies and tons of bonus material.”
Presented by Joey Korenman, founder of the SchoolofMotion.com, “The Path To MoGraph” is a free 10-day course where you’ll get an in-depth look at what it takes to become a professional Motion Designer. You’ll get a tour of four very different Motion Design studios. Then, you’ll check out the creation of an entire real-world project from start to finish; showing you the software, tools, and techniques that you’ll need to know to break into this industry.
We may request cookies to be set on your device. We use cookies to let us know when you visit our websites, how you interact with us, to enrich your user experience, and to customize your relationship with our website.
Click on the different category headings to find out more. You can also change some of your preferences. Note that blocking some types of cookies may impact your experience on our websites and the services we are able to offer.
Essential Website Cookies
These cookies are strictly necessary to provide you with services available through our website and to use some of its features.
Because these cookies are strictly necessary to deliver the website, refuseing them will have impact how our site functions. You always can block or delete cookies by changing your browser settings and force blocking all cookies on this website. But this will always prompt you to accept/refuse cookies when revisiting our site.
We fully respect if you want to refuse cookies but to avoid asking you again and again kindly allow us to store a cookie for that. You are free to opt out any time or opt in for other cookies to get a better experience. If you refuse cookies we will remove all set cookies in our domain.
We provide you with a list of stored cookies on your computer in our domain so you can check what we stored. Due to security reasons we are not able to show or modify cookies from other domains. You can check these in your browser security settings.
Google Analytics Cookies
These cookies collect information that is used either in aggregate form to help us understand how our website is being used or how effective our marketing campaigns are, or to help us customize our website and application for you in order to enhance your experience.
If you do not want that we track your visit to our site you can disable tracking in your browser here:
Other external services
We also use different external services like Google Webfonts, Google Maps, and external Video providers. Since these providers may collect personal data like your IP address we allow you to block them here. Please be aware that this might heavily reduce the functionality and appearance of our site. Changes will take effect once you reload the page.
Google Webfont Settings:
Google Map Settings:
Google reCaptcha Settings:
Vimeo and Youtube video embeds:
Other cookies
The following cookies are also needed - You can choose if you want to allow them:
Privacy Policy
You can read about our cookies and privacy settings in detail on our Privacy Policy Page.