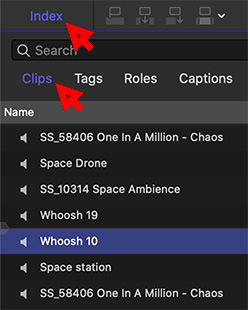
The Timeline Index is a fast way to find just about anything in your timeline.
Timeline Index > Clips section with a selected audio clip.
The Timeline Index is an underutilized feature of Final Cut Pro X. But, if you take the time to explore it, you’ll find all kinds of interesting things it can do. Here’s a quick list.
With an edited project in the timeline, open the Timeline Index (Shortcut: Shift + Cmd + 2).
Click the Clips tab at the top.
Select any clip in the Index. This also selects it in the timeline and places the playhead at the start of the selected clip.
With the timeline clip selected, you can:
Solo the clip (Option + S)
Play the clip
Delete the clip
Apply an effect to the clip
The Timeline Index is a fast way to jump to any clip, title, or marker.
EXTRA CREDIT
If you can’t find a clip, use the search box at the top to track it down.
Workflow extensions extend Final Cut to seamlessly work with other software.
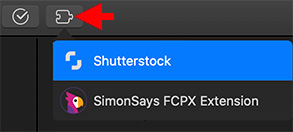
The Workflow Extensions menu in FCP X. This shows two extensions are installed.
In the top left corner of the Final Cut Pro X interface, you may see this icon (see screen shot). What does it do?
The icon indicated by the red arrow in the screen shot is the “Workflow Extension” menu for FCP X.
These are plug-ins that work inside Final Cut. Currently, Apple lists nine on its website:
APM Music
CatDV
EVC ShareBrowser
Frame.io
KeyFlow Pro
Primestream
Ripple Training
Shutterstock
Simon Says
Once an extension is installed, you access it from this menu.
Here’s a link to Apple’s ecosystem webpage to learn more.
EXTRA CREDIT
There are probably more extensions than Apple lists. If you know of others, please mention them in the Comments.
Please rate the helpfulness of this tip.
Click on a star to rate it!
https://www.theinsidetips.com/wp-content/uploads/2019/09/Tips-Logo-700x150.jpg00Larry Jordanhttps://www.theinsidetips.com/wp-content/uploads/2019/09/Tips-Logo-700x150.jpgLarry Jordan2020-11-30 01:30:002020-11-28 09:43:33Tip #1212: What Does This Icon Do?
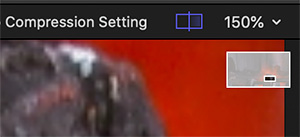
This “map” is a fast navigational aid to moving around inside a larger image.
The Zoom menu (150%) and the navigation map (white rectangle).
I’m not sure when this feature first showed up in Compressor, but it seems relatively new to me.
Once you’ve imported a clip into Compressor, if you zoom into the image in the Preview monitor so that it is bigger than the screen can display, a small “map” appears (see screen shot).
The white field represents the entire image. The darker portion represents the portion of the image that’s visible in the Viewer.
Grab the small, dark icon inside the white rectangle and drag it to reveal other portions of the image in the Viewer.
EXTRA CREDIT
This is similar to the “red box” that appears in Final Cut Pro X when the image in the Viewer is zoomed larger than the Viewer can display.
In both Compressor and Final Cut, to fit the zoomed image back into the Viewer either:
Type Shift + Z
Select Fit from the popup menu displaying the zoom percentage of the image (150% in the screen shot)
Please rate the helpfulness of this tip.
Click on a star to rate it!
https://www.theinsidetips.com/wp-content/uploads/2019/09/Tips-Logo-700x150.jpg00Larry Jordanhttps://www.theinsidetips.com/wp-content/uploads/2019/09/Tips-Logo-700x150.jpgLarry Jordan2020-11-30 01:30:002020-11-28 09:44:46Tip #1193: New On-screen Controller for Compressor
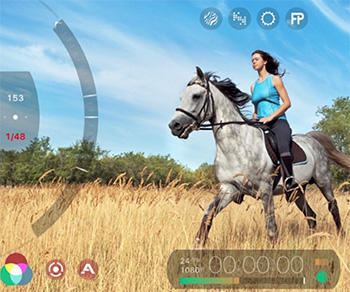
Filmic Pro has become an iPhone movie-making standard.
Image courtesy of NoFilmSchool.com.
This article first appeared in NoFilmSchool.com. This is a summary.
Filmic Pro is a versatile tool that is a must-download for any mobile filmmaker who wants more manual control over the native cameras found on smartphones. With v6.12.7 of the iOS app, it now supports 10-bit Dolby Vision HDR on the iPhone 12 series.
Whether you’re just starting out creating content or looking for a low-budget way to shoot your next short, FiLMiC Pro has the essential tools to help dial in your image. The intuitive app has options to adjust white balance, focus, exposure, resolution, frame rate, and even aspect ratio. Want to shoot 2.76:1 or 2.39:1? No problem, the app can do both.
If you’re looking for more advanced features, it has options for focus peaking, a histogram, zebra lines while supporting flat/Log gamma curves, anamorphic lenses (like the Blue Flare lens from Moment), gimbals from DJI, Movi, and Zhiyn, and Bluetooth microphones. You can even record using a clean HDMI output for livestreaming or to an external recorder. So, yeah, it’s versatile.
Dolby Vision is supported by Netflix, Amazon, and Apple iTunes, so it didn’t come as a big surprise when it was announced the iPhone 12 series supports it. The drawback to creating Dolby Vision HDR content is that you need a compatible display to watch it, so at the moment, not everyone is going to see your punchy blacks and sweet highlights. But at least as a creator you can start learning the benefits of HDR as an image pipeline.
The update is free to existing users. For new users, the app has a $15 price tag.
EXTRA CREDIT
This article includes several videos showcasing Filmic Pro, along with a variety of supporting links.
This article, written by Jourdan Aldredge, first appeared in PremiumBeat.com. This is a summary.
In this in-depth review and interview with YouTube vlogger Casey Neistat, Jourdan takes a look at the philosophy, gear and perspective of this highly-successful digital creator who, at his heart, is just another filmmaker and content creator trying to turn his creativity into art.
Jourdan: What sparks your creativity in today’s world of video content?
I find so much inspiration in how diversified YouTube is becoming. … Overall, it’s seeing creators really lean into what they’re passionate about rather than trying to conform to what some might feel is necessary to succeed.
What have you recently been shooting your videos on?
I’ve recently switched over entirely to Sony. It was a hard process because I think Canon makes fantastic cameras. For years, including my entire vlog series, I shot on Canon—I love the image straight from their cameras, love their color science—but when Sony launched the ZV-1, I really felt like it was the perfect camera for a YouTuber. Then, when the a7S III dropped with the articulating screen, it closed the deal for me.
Take us through your editing workflow and process for your videos?
I only edit my YouTube videos on a computer using Adobe Premiere Pro. …I only edit chronologically—start with the first frame of the video and don’t stop or review until I’ve made it to the end. Then, I backtrack and can rearrange and all that. I find editing scenes first to be confusing. I love discovering the story by forcing it to reveal itself this way. …Rather than cover up any scars or evidence that this video was made by one person, I embrace those flaws—often embellish them. Leaning into the imperfections is a way for me to say to my audience that I am not a pro, I am just a regular guy trying to tell a story.
What’s the single best way to create engaging videos?
I don’t know the answer to this but going back to the first question about what excites me; I think that being true to your passion, abiding by an unspoken understanding that if YOU find it interesting that someone else will also find it interesting, that then you will ultimately find your audience.
EXTRA CREDIT
The article has links to several of Casey’s videos, analysis of his answers and much more. It is quite in-depth and well-worth reading.
Please rate the helpfulness of this tip.
Click on a star to rate it!
https://www.theinsidetips.com/wp-content/uploads/2019/09/Tips-Logo-700x150.jpg00Larry Jordanhttps://www.theinsidetips.com/wp-content/uploads/2019/09/Tips-Logo-700x150.jpgLarry Jordan2020-11-27 01:30:002020-11-27 01:30:00Tip #1199: Video Creativity: Casey Neistat
Please, for the love of humanity, stop using the camera mic for dialog!
Not a camera mic. (Image courtesy of Pexels.com)
This article first appeared in MotionArray.com. This is a summary.
Not much is more distracting than bad audio in an otherwise good film or video.
Great sound typically goes unnoticed by the viewer. It stays in the subconscious, but as soon as you bring it to the conscious, that’s when you start hearing words like amateur, low budget, B-movie, and student film.
In this article, the author looks at how to improve audio recordings:
Use a Dedicated Microphone
Get Your Microphone Close to Your Subject
Don’t Clip Your Audio
Location
Get a Dead Cat
Capture Room Tone
It includes a details on each subject, along with a seven-minute tutorial video.
The key to 3D space is to stay oriented. Top view, and tracking the grid, help.
These are the nine views when working with cameras. Top is my favorite.
When I first started learning Motion, I got hopelessly lost when exploring 3D space. (I still remember how frustrated I felt when 3D in Motion did not equate to the 3D in my normal life…)
The 3D world opens up when you assign a camera to a project (Object > New Camera). While explaining how 3D space and cameras work requires at least a chapter in a book, there is a cool orientation tip that helps me stay oriented.
Once you’ve applied a camera, the View menu in the top left corner of the Viewer provides nine different perspectives on how to view your scene.
Active camera shows what Motion will output; in other words the finished view.
Top, for me, is the best way to create a 3D effect because it emulates an architectural floor plan – and I’ve been looking at set designs all my life.
So I use Top to determine position and movement, then tweak based upon what Active Camera shows the results to be.
EXTRA CREDIT
In the Standard keyboard command set:
Active Camera uses Control + A as it’s shortcut.
Top can be assigned a shortcut using Motion > Commands.
Please rate the helpfulness of this tip.
Click on a star to rate it!
https://www.theinsidetips.com/wp-content/uploads/2019/09/Tips-Logo-700x150.jpg00Larry Jordanhttps://www.theinsidetips.com/wp-content/uploads/2019/09/Tips-Logo-700x150.jpgLarry Jordan2020-11-26 01:30:002020-11-26 01:30:00Tip #1197: Stay Oriented in 3D Space
Replicators duplicate selected objects into geometric shapes, then animate them.
A group of elements, each with different color and movement, all replicated.
Replicators are a great way to duplicate an element. What you may not know is that replicators can contain multiple elements.
To create a replicator, select it, then click the Replicate button in the top right section of the Motion interface.
Select the Replicator element in the Layers panel, then, adjust it using Inspector > Replicator. Basically, change something and watch what happens.
However, the key point is that a replicator is made from whatever you first select. If you create a group – as I did in this screen shot – then, select the group, all the elements in the group are then replicated.
Plus, each element in the source group can have its own style, position, color, and movement applied to it.
This makes replicators far more versatile than you might at first think.
Please rate the helpfulness of this tip.
Click on a star to rate it!
https://www.theinsidetips.com/wp-content/uploads/2019/09/Tips-Logo-700x150.jpg00Larry Jordanhttps://www.theinsidetips.com/wp-content/uploads/2019/09/Tips-Logo-700x150.jpgLarry Jordan2020-11-26 01:30:002020-11-26 01:30:00Tip #1196: Replicators Can Use Multiple Shapes
Watermarks are like a footnote in a book – used as a reference, not as the subject.
A sample moving watermark in Motion – tucked into the lower-right corner near Title Safe.
We first looked at watermarks, a logo that’s added to a compressed video, in Tip #1191. Here, I want to explain more about how to create a moving watermark in Motion.
Most watermarks are stationary – a logo that sits quietly in the corner of your video to identify the source. Stationary watermarks are easy to create in Photoshop. But, a moving watermark is more visually interesting and might fit the style of your video better.
Create a Motion project at the same size as the video to which you want to apply it. Motion creates all projects with an alpha channel, meaning that any part of the background that’s black is transparent.
NOTE: Apple Compressor allows you to scale the watermark to fit the source file, but this changes its size, position and resolution, which you may not want.
Add whatever text and animation you prefer (see screen shot). Don’t add drop shadows or fine detail, watermarks are designed to be semi-transparent. Go for clarity, readability and non-distracting colors.
Export the project as a movie, not as a Motion project.
Then, following the instructions in Tip #1191, combine it with your video using Apple Compressor.
EXTRA CREDIT
Keep in mind that, while color is more interesting, be careful to pick colors that don’t clash too severely with your main movie.
Please rate the helpfulness of this tip.
Click on a star to rate it!
https://www.theinsidetips.com/wp-content/uploads/2019/09/Tips-Logo-700x150.jpg00Larry Jordanhttps://www.theinsidetips.com/wp-content/uploads/2019/09/Tips-Logo-700x150.jpgLarry Jordan2020-11-26 01:30:002020-11-21 10:49:08Tip #1195: Create a Watermark That Moves
OFX: Improve interoperability, reduce support and development time.
The Open Effects Association logo.
OFX. Many visual effects tools reference this – but what is it?
The OFX Image Effect Plug-in API, is an open standard for 2D visual effects or compositing plug-ins. It allows plug-ins written to the standard to work on any application that supports the standard. It is widely used for visual effects and video processing and is supported by numerous hosts, including Assimilate, Blackmagic Design, Digital Anarchy, FXHOME, NewBlueFX, RE:Vision Effects and more.
Bruno Nicoletti of The Foundry created it in 2004. The OFX API was established because each developer had its own proprietary interface, so developers at different companies couldn’t work together or share code very easily. Developers had to create their own method of porting their plug-ins into each host, which, as you can imagine, can be expensive and time-consuming.
Out of this confusion, the Open Effects Association – and OFX – was born.
Here’s an article from ToolFarm with more details on which software supports it and what plug-ins are available.
Please rate the helpfulness of this tip.
Click on a star to rate it!
https://www.theinsidetips.com/wp-content/uploads/2019/09/Tips-Logo-700x150.jpg00Larry Jordanhttps://www.theinsidetips.com/wp-content/uploads/2019/09/Tips-Logo-700x150.jpgLarry Jordan2020-11-25 01:30:002020-11-21 10:39:01Tip #1203: What is OFX?
We may request cookies to be set on your device. We use cookies to let us know when you visit our websites, how you interact with us, to enrich your user experience, and to customize your relationship with our website.
Click on the different category headings to find out more. You can also change some of your preferences. Note that blocking some types of cookies may impact your experience on our websites and the services we are able to offer.
Essential Website Cookies
These cookies are strictly necessary to provide you with services available through our website and to use some of its features.
Because these cookies are strictly necessary to deliver the website, refuseing them will have impact how our site functions. You always can block or delete cookies by changing your browser settings and force blocking all cookies on this website. But this will always prompt you to accept/refuse cookies when revisiting our site.
We fully respect if you want to refuse cookies but to avoid asking you again and again kindly allow us to store a cookie for that. You are free to opt out any time or opt in for other cookies to get a better experience. If you refuse cookies we will remove all set cookies in our domain.
We provide you with a list of stored cookies on your computer in our domain so you can check what we stored. Due to security reasons we are not able to show or modify cookies from other domains. You can check these in your browser security settings.
Google Analytics Cookies
These cookies collect information that is used either in aggregate form to help us understand how our website is being used or how effective our marketing campaigns are, or to help us customize our website and application for you in order to enhance your experience.
If you do not want that we track your visit to our site you can disable tracking in your browser here:
Other external services
We also use different external services like Google Webfonts, Google Maps, and external Video providers. Since these providers may collect personal data like your IP address we allow you to block them here. Please be aware that this might heavily reduce the functionality and appearance of our site. Changes will take effect once you reload the page.
Google Webfont Settings:
Google Map Settings:
Google reCaptcha Settings:
Vimeo and Youtube video embeds:
Other cookies
The following cookies are also needed - You can choose if you want to allow them:
Privacy Policy
You can read about our cookies and privacy settings in detail on our Privacy Policy Page.