… for Random Weirdness

Tip #1843: Digital Anarchy Updates Rough Cutter

Larry Jordan – LarryJordan.com

Transcriptive Rough Cutter allows you to make video edits via a text transcript.

Logo courtesy: Digital Anarchy

Topic $TipTopic

Digital Anarchy updates Transcriptive Rough Cutter. Creating transcript-based rough-cuts in Premiere Pro and online, Transcriptive Rough Cutter for Premiere, the PowerSearch metadata search engine and Transcriptive Web App are designed to harness text-based video editing.

Their integration with Premiere Pro and each other allows Adobe users to create collaborative, transcript-based rough cuts in Premiere Pro and quickly share transcripts online. By using either the Rough Cut or Selects workflow, Transcriptive Rough Cutter provides two powerful ways of creating transcript-based rough cuts in Premiere.

A Rough Cut new feature let’s you delete text from a transcript, either in Premiere or the Transcriptive Web App, and have Transcriptive automatically create a sequence based on that edited transcript creating edits in the sequence where the edits in the transcript are.

What we’re calling Transcriptive Selects is really just an improvement on existing functionality. It’s easier to set In and Out points in Clip transcripts and insert them into a sequence. We’ve also rewrote portions of PowerSearch to make it faster and better able to handle a large number of results. So the process of finding text and inserting it into an assembly is much more powerful.

Here’s the link to the Digital Anarchy website to learn more.


Please rate the helpfulness of this tip.

Click on a star to rate it!

… for Random Weirdness

Tip #1842: Blackmagic Updates Studio Cameras

Larry Jordan – LarryJordan.com

New gear targeted at streaming and small studios.

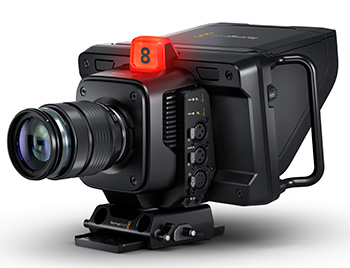
The new Blackmagic Design Studio Camera (image courtesy: Blackmagic Design)

Topic $TipTopic

Blackmagic Design updated their studio cameras, HyperDeck recorders, and Web Presenter, a small switcher designed for live streaming. According to their press release:

The new Blackmagic Studio Cameras include design features such as carbon fiber reinforced polycarbonate and large integrated 7″ viewfinders so they are very light weight making them much easier to transport and setup than large traditional studio cameras. To eliminate the need to reach around to adjust the lens zoom and focus, the optional focus and zoom demands let customers adjust the lens from the tripod handles just like a large studio camera.

  • Blackmagic Studio Camera 4K Plus (US$1,295): Designed as the perfect camera for ATEM Mini. It’s the same high quality broadcast camera, but the HDMI centric design removes all the expensive broadcast connections so it’s much lower cost. The HDMI is incredibly powerful as it connects video to the ATEM Mini, while at the same time camera control, tally and the remote record trigger is sent to the camera using the same HDMI connection. That makes it very fast to set up for a job.
  • Blackmagic Studio Camera 4K Pro (US$1,795): Designed for powerful SDI switchers, Blackmagic Studio Camera 4K Pro adds professional 12G-SDI and 10G Ethernet connections. That’s perfect when the camera is located a long distance from a switcher. There’s a 12G-SDI output and a 12G-SDI program return input that includes camera control, talkback and tally. You also get the same powerful HDMI output with control features. Plus the 10G Ethernet connection allows all connections on a single cable for a SMPTE style workflow that’s much lower cost.

Blackmagic also released a new family of HyperDeck Studio recorders (available immediately): Feature better design, upgraded codecs and support for more media types. All models now support record and playback to H.264, ProRes and DNx files, as well as PCM or AAC audio. Plus all models support SD Cards and UHS-II cards, with the Pro models adding extra SSD support.

There are four different models of HyperDeck Studio, perfect for all types of work:

  • The 3G-SDI based HyperDeck Studio HD Mini model (US$495) records and plays H.264, ProRes or DNxHD files onto SD cards, UHS-II cards or external USB disks in SD and HD formats up to 1080p60.
  • The larger HyperDeck Studio HD Plus model (US$695) adds better transport controls, front panel headphone and speaker, 6G-SDI with fill and key out, SDI monitoring and records H.264 up to 1080p60 or ProRes and DNxHD up to 2160p30.
  • The full rack HyperDeck Studio HD Pro model (US$995) is the same as the HD Plus model but adds two SSD slots and a machined metal search dial with clutch.
  • The incredibly powerful HyperDeck Studio 4K Pro model (US$1,495) records H.264, H.265, ProRes or DNx in SD, HD and Ultra HD in standards up to 2160p60.

EXTRA CREDIT

Here’s the full press release.


Please rate the helpfulness of this tip.

Click on a star to rate it!

… for Random Weirdness

Tip #1836: The Inside Tips Take a Hiatus

Larry Jordan – LarryJordan.com

The Inside Tips will return in September.

Photo credit: Jonas Ferlin, Pexels.com

Topic $TipTopic

The Inside Tips are taking a hiatus for the month of August. We’ll be back the first week of September with more Inside Tips.

Thanks for your readership and comments. Enjoy the rest of your summer.

Feel free to contribute some tips of your own here.


Please rate the helpfulness of this tip.

Click on a star to rate it!

… for Apple Motion

Tip #1841: Combine Filters for Better Comic Look

Larry Jordan – LarryJordan.com

Often, combining filters looks better than a single filter alone.

The source image (top) and the finished comic look.

Topic $TipTopic

The Comic filter in Motion converts a photo into a “comic book look.” And, while it isn’t bad, it can be better. Here’s how to enhance sharpness without losing the comic touch.

  • The top image in the screen shot illustrates the source image. Import the source into Motion, then select it in the Layers panel.
  • Add Filters > Stylize > Color Emboss to the image. This creates a high contrast edge to the color areas in the image.

NOTE: This especially helps with hair and eye detail.

  • Now apply Filters > Stylize > Comic. Because of the enhanced edging, your comic book look will be sharper and more detailed, without losing the comic look.

Please rate the helpfulness of this tip.

Click on a star to rate it!

… for Apple Motion

Tip #1840: Don’t Accept the Defaults

Larry Jordan – LarryJordan.com

Replicators can create fascinating effects, once you change the default settings.

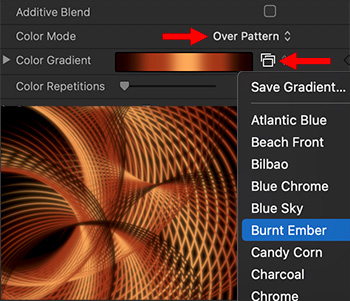
Inspector > Color Pattern settings (red arrows) and the Arcs effect (color insert).

Topic $TipTopic

One of the less understood effects in Motion are Replicators. These create animated patterns over time. The problem is that when you look at them, they are pretty ugly. That’s because the default settings are set to: “Bland.”

Here’s an example.

  • Go to Library > Replicators and drag Arcs 3 into the Viewer.
  • Twirl down the main Group.
  • Twirl down the Arcs 3 group.
  • Select the Arcs element.
  • Go to Inspector > Properties and change Color to Over Pattern.
  • Click the small rectangles icon (red arrow in screen shot) to reveal a menu and choose any color pattern. My pattern was Burnt Ember.
  • Select the group containing the replicator and apply Filters > Blur > Soft Focus

You just created a nice animated background for text or video inserts.

EXTRA CREDIT

For extra interest:

  • Rotate the group containing the replicator.
  • Enlarge the group containing the replicator so it fills more of the frame
  • Experiment with other blurs.

Please rate the helpfulness of this tip.

Click on a star to rate it!

… for Apple Motion

Tip #1835: The Inside Tips Take a Hiatus

Larry Jordan – LarryJordan.com

The Inside Tips will return in September.

Photo credit: Jonas Ferlin, Pexels.com

Topic $TipTopic

The Inside Tips are taking a hiatus for the month of August. We’ll be back the first week of September with more Inside Tips.

Thanks for your readership and comments. Enjoy the rest of your summer.

Feel free to contribute some tips of your own here.


Please rate the helpfulness of this tip.

Click on a star to rate it!

… for Visual Effects

Tip #1839: Visual Effects for Low-Budget Sci-Fi

Larry Jordan – LarryJordan.com

Effects don’t have to be explosive, they just need to help carry the story.

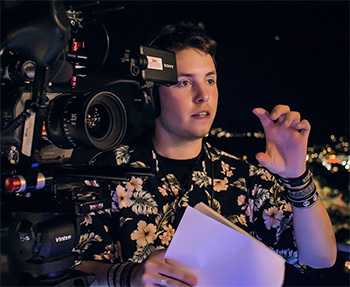
Jonathan Wilhelmsson directing “Untitles Earth Sim 64.”

Topic $TipTopic

This article, written by Jonathan Wilhelmsson, first appeared in Motionographer.com. This is an excerpt.

My name is Jonathan; I’m a Swedish filmmaker and visual effects artist. My friends and I recently released our new short film Untitled Earth Sim 64, a sci-fi comedy about a woman faced with an existential crisis when she discovers that her universe is a simulation.

While prepping another film, I started working on different visual effects tests to design the look of the “glitches” that would feature in the film. The more I tested, the more I realized how much fun I could have with this concept. …I saw this as an opportunity to use these new ideas to make a short and sweet comedy focusing entirely on the simulation aspect (and a bit of a lighthearted exploration of existentialism).

We wanted to make something low-budget that we could get off the ground on our own, which meant we couldn’t afford any special sets, costumes, or props. Filming took place during a sweltering weekend in Gothenburg with a skeleton crew of three people behind the camera and two actors on set – British actress Karen Olrich-White and Swedish actress and pro wrestler Aya Frick. The Australian actor James Fraser joined us virtually as the voice of an alien researcher, pre-recording his lines so that we could have playback on set.

The film then went into several months of post-production.But this is where I got to use what I think is the secret superpower of low-budget filmmaking: time.

The most involved process was the visual effects work. The film consists of 73 shots in total, and 67 of those are effects shots. They range from simple sky replacements or morph cuts to the more intricate glitch effects.

My favorite shots in Untitled Earth Sim 64 are actually the ones you might not suspect to have any effects. One example that amuses me is a scene that features a CG lamppost. One day I found myself at an abandoned parking lot by the harbor and thought it would make for a great location, the only problem being that it didn’t have the lamppost that we needed.

I think all of this is an excellent example of how accessible filmmaking has become and that certain genres or types of film that have usually been reserved for bigger budget projects are becoming more and more achievable even on smaller budgets.

EXTRA CREDIT

Here’s a link to the full article, along with a behind the scenes video and lots more details.


Please rate the helpfulness of this tip.

Click on a star to rate it!

… for Visual Effects

Tip #1834: The Inside Tips Take a Hiatus

Larry Jordan – LarryJordan.com

The Inside Tips will return in September.

Photo credit: Jonas Ferlin, Pexels.com

Topic $TipTopic

The Inside Tips are taking a hiatus for the month of August. We’ll be back the first week of September with more Inside Tips.

Thanks for your readership and comments. Enjoy the rest of your summer.

Feel free to contribute some tips of your own here.


Please rate the helpfulness of this tip.

Click on a star to rate it!

… for Visual Effects

Tip #1819: History & Symbolism of Paisley

Larry Jordan – LarryJordan.com

Once for the elite, paisley patterns have lasted for centuries.

The paisley “tear drop,” in blue. Image credit: Shutterstock.

Topic $TipTopic

This article, written by Kiera Coffee, first appeared in Shutterstock.com. This is a summary.

Paisley patterns can be lush with dense swirls and intricate lines or comprised of sparse shapes set on a placid background. Elaborate or understated, paisley is recognizable for the unique figure at its core. People around the world compare it to a tear drop, a flower, a pinecone, a tadpole, a seed, half of the yin yang symbol.

One of the earliest examples of paisley is found in the decorative brick work on a 9th century mosque in Afghanistan (Noh Gunbad Mosque). Much of the building is in ruins, but the fluid paisley shapes are easily recognizable as the adaptable design we know today.

The Persian word for paisley is boteh. Traditionally, boteh-jegheh (roughly meaning paisley patterns) were woven into silk or wool cloths called Termeh. Marco Polo, in 1272, passed through some of the cities where Termeh was woven and wrote about “quantities of a certain silk tissue.” His writing is thought to be about paisley fabric.

The famous East India Company was established in the 17th century, allowing imports to move from East to West—and back again—along the silk routes. Many exotic goods arrived in Europe, including (by the 18th century) paisley shawls. Britain had access to them first, and English women adored these astonishingly beautiful garments.

Because the European elite began splurging on paisley, the desire for it grew amongst less wealthy citizens, as well. Seeing this, keen mill owners worked out how to weave paisley locally, on mechanized looms. In the 1790s, paisley mills opened in a number of European cities such as Lyons, Norwich, and Vienna.

The most noteworthy mill opened in 1808, in Paisley, Scotland. This is also where the name for this paisley pattern originates. The Scottish mill became the lead producer of paisley. At its peak, well over fifty shawl manufacturers were based there, working with varying layouts and designs.

Weaving paisley shawls on machinated looms cost a fraction of what the handwoven Indian shawls did, so the price in Europe dropped precipitously as local mills flooded the market with affordable paisley. By the late 1800s, even a maid could afford a paisley shawl. This was greatly damaging for many villages in the East, whose economies had been tied to weaving paisley for two hundred years. Technology utterly outpaced their handmade looms, and livelihoods vanished.

EXTRA CREDIT

This article is filled with illustrations and more on the design and meaning of the paisley pattern.


Please rate the helpfulness of this tip.

Click on a star to rate it!

… for Adobe Premiere Pro CC

Tip #1837: Trimming Captions

Larry Jordan – LarryJordan.com

Captions should only be trimmed using the red Roll tool.

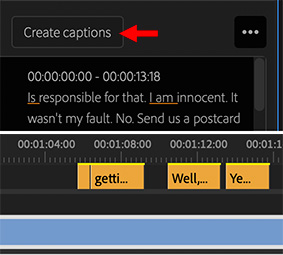
The Text > Create Captions button (top) and captions in the Timeline (bottom).

Topic $TipTopic

Once you create a transcript using the new Speech-to-Text feature in Adobe Premiere Pro, click the Create Captions button in the new Text panel to create captions.

The key to remember when trimming captions is to always use the red “Roll Trim” tool. This adjusts the In or the Out of the selected caption without changing the timing of any downstream captions.

If you use the yellow “Ripple Trim” tool, you’ll adjust the In or the Out of the selected caption AND shift the position of all downstream captions.

Since, most of the time, you create captions when the edit is complete, shifting the position of captions means that they will no longer sync to the dialog.


Please rate the helpfulness of this tip.

Click on a star to rate it!