… for Apple Motion

Tip #653: Adjust Keyframe Landing Speed

Larry Jordan – LarryJordan.com

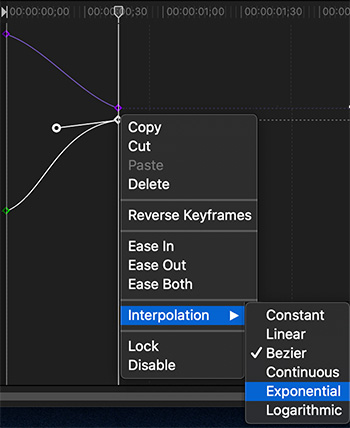
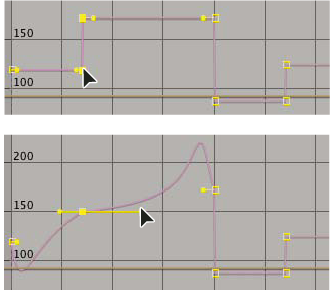
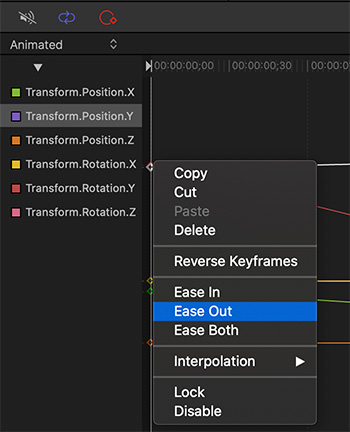
Ease In/Out Behavior can be changed in the Keyframe Editor

Control click any keyframe in the Keyframe timeline to display timing options.

Topic $TipTopic

Normally, keyframes move at a linear rate. However, this can be altered. Here’s what you need to know.

To adjust the speed with which animation approaches or leaves a keyframe:

  • Display the Keyframe Editor (Window > Keyframe Editor)
  • Control-click any keyframe and choose:
  • Ease In to slow animation as it approaches a keyframe.
  • Ease Out to accelerate from a keyframe
  • Ease Both to slow as animation approaches a keyframe and accelerate animation as it leaves it.

For additional control, experiment with the options in the Interpolation menu.

NOTE: Keyframes must be applied before they can be modified.


Please rate the helpfulness of this tip.

Click on a star to rate it!

… for Apple Motion

Tip #648: Keyframe a 3D Move

Larry Jordan – LarryJordan.com

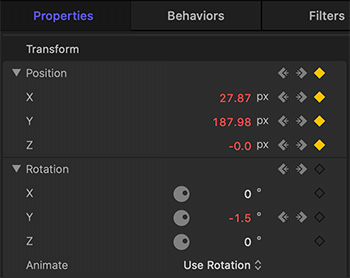
Once you set a keyframe, whenever you change a parameter, a new keyframe is set.

Position and rotation keyframes are set in Inspector > Properties for the selected element.

Topic $TipTopic

Behaviors make it easy to animate text. But, many times, the behavior is just too manic – especially for 3D text. In those situations, keyframes are a better choice. Here’s a quick technique.

Keyframes are set in the Inspector. You can use the Record Keyframe control (the big red circle below the Viewer) but, I find that sets too many keyframes which makes editing harder.

Instead, to animate position or rotation:

  • Position and rotate the element to its starting position.
  • Position the playhead in the mini-timeline where you want to set the first keyframe.
  • Go to Inspector > Properties.
  • Twirl down Position and Rotation to review additional X, Y, and Z axis controls.
  • NOTE: I find Y-axis rotation to be the most effective way to display 3D text.

  • Click one of the gray gray diamonds. Gray diamonds indicate frames without a keyframe. Gold diamonds indlcate a rame with keyframes.
  • Change the position of the playhead (FIRST!) then reposition the element. New keyframes are created automatically.
  • Repeat until the move is complete.

EXTRA CREDIT

  • Move between keyframes by clicking the left / right arrows in the Properties panel.
  • To change a keyframe, position the playhead on the frame you want to change, then reposition the element. Keyframes are modified automatically.

Please rate the helpfulness of this tip.

Click on a star to rate it!

… for Apple Motion

Tip #643: Change the Default Settings of an Effect

Larry Jordan – LarryJordan.com

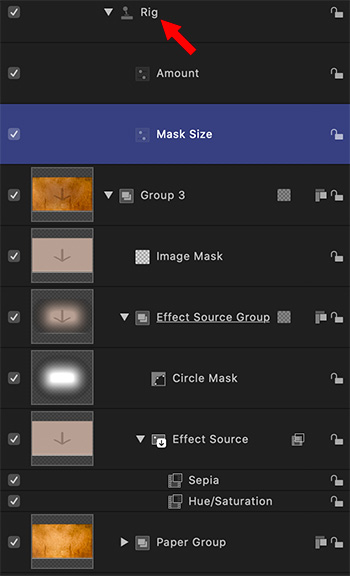
The rigging, elements and effects in the Aged Paper effect, displayed in Motion.

Topic $TipTopic

Virtually all the effects in Final Cut Pro X were first created in Motion and saved as a template for Final Cut Pro X. This means that, in many cases, if you don’t like the default settings, they are easy to change.

For example, these are the settings for Aged Paper. You can change the look itself by adjusting elements on each layer.

However, if all you need is to adjust a default setting:

  • Twirl down Rig.
  • Select one of the widgets, like Mask Size.
  • Go to Inspector > Widget and adjust the settings to suit.
  • Save the file, give it a name that reflects your changes and save it in a category that makes sense to you.

Done.


Please rate the helpfulness of this tip.

Click on a star to rate it!

… for Visual Effects

Tip #656: Keyframe Interpolation Tips

Larry Jordan – LarryJordan.com

Interpolation is the process of estimating unknown values that fall between known values.

The interpolation settings in Apple Motion. Adobe After Effects is similar.

Topic $TipTopic

Interpolation is the process of estimating unknown values that fall between known values. The key phrase is: “between two known values.” (By comparison, extrapolation attempts to figure out where a line is going outside of a set of known points.)

Interpolation is at the heart of keyframe animation. We set a starting point and an ending point, then the software calculates all the points in the middle. What the interpolation settings determine is how those points are calculated.

Because interpolation generates the property values between keyframes, interpolation is sometimes called tweening. Interpolation between keyframes can be used to animate movement, effects, audio levels, image adjustments, transparency, color changes, and many other visual and audio elements.

Temporal interpolation is the interpolation of values in time; spatial interpolation is the interpolation of values in space. Some properties—such as Opacity—have only a temporal component. Other properties—such as Position—also have spatial components.

  • Constant: When applied to a keyframe or curve segment, this method holds the keyframe at its current value and then abruptly changes to the new value at the next keyframe.
  • Linear: When applied to a keyframe, this method creates a uniform distribution of values through the keyframe from its two adjacent keyframes. When applied to a segment, this method creates uniform distribution of values between points.
  • Bezier: This method lets you manipulate the keyframe curve manually by dragging the tangent handles. If multiple Bezier keyframes are selected, or Bezier interpolation is applied to the curve segment, the handles of all selected keyframes are modified.
  • Continuous: This method behaves like Bezier interpolation, but without access to the tangent handles (which are calculated automatically).
  • Exponential: This method creates an exponential curve between the current keyframe and the next, changing the value slowly at first, then reaching its maximum rate of acceleration as it approaches the next keyframe.
  • Logarithmic: This method creates a logarithmic curve between the current keyframe and the next, changing the value rapidly at first, then slowing drastically as it approaches the next keyframe.

EXTRA CREDIT

Here’s an Apple Support article to learn more.


Please rate the helpfulness of this tip.

Click on a star to rate it!

… for Visual Effects

Tip #655: Control Keyframe Speed

Larry Jordan – LarryJordan.com

Keyframe speed is determined by distance and interpolation.

Image courtesy Adobe Systems, Inc.
Linear Interpolation (top) has sharp corners. Bezier interpolation has curves.

Topic $TipTopic

In After Effects, when you animate a property in the Graph Editor, you can view and adjust the rate of change (speed) of the property in the speed graph.

The following factors affect the speed at which a property value changes:

  • The time difference between keyframes in the Timeline panel. The shorter the time interval between keyframes, the more quickly the layer has to change to reach the next keyframe value. If the interval is longer, the layer changes more slowly, because it must make the change over a longer period of time. You can adjust the rate of change by moving keyframes forward or backward along the timeline.
  • The difference between the values of adjacent keyframes. A large difference between keyframe values, such as the difference between 75% and 20% opacity, creates a faster rate of change than a smaller difference, such as the difference between 30% and 20% opacity. You can adjust the rate of change by increasing or decreasing the value of a layer property at a keyframe.
  • The interpolation type applied for a keyframe. For example, it is difficult to make a value change smoothly through a keyframe when the keyframe is set to Linear interpolation, but you can switch to Bezier interpolation at any time, which provides a smooth change through a keyframe. If you use Bezier interpolation, you can adjust the rate of change even more precisely using direction handles.

EXTRA CREDIT

Here’s an Adobe Help article to learn more.


Please rate the helpfulness of this tip.

Click on a star to rate it!

… for Visual Effects

Tip #654: What is a B-spline curve?

Larry Jordan – LarryJordan.com

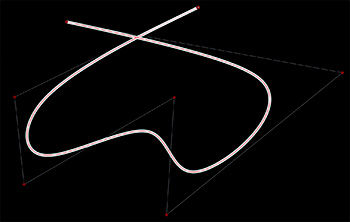
The key benefit of B-spline curves is their smoothness.

A simple B-spline curve, emphasizing it’s smoothness. (That corner isn’t a corner, it’s where two lines cross.)

Topic $TipTopic

A B-spline function is a combination of flexible bands that passes through the number of points that are called control points and creates smooth curves. These functions enable the creation and management of complex shapes and surfaces using a number of points. (That’s what it says here, not that I fully understand it.)

The term “B-spline” was coined by Isaac Jacob Schoenberg and is short for basis spline. B-splines are more general curves than Bezier curves. More simply, a Bezier is a special case of a B-spline.

The big difference between B-splnes and Bezier curves is smoothness. B-splines are made out several curve segments that are joined “smoothly.” Bezier’s on the other hand, can have corners.

A B-Spline curve can be a Bezier curve whenever the programmer so desires. Further B-Spline curves offer more control and flexibility than a Bezier curve. It is possible to use lower degree curves and still maintain a large number of control points. B-Spline, despite being more useful, are still polynomial curves and cannot represent simple curves like circles and ellipses. For these shapes, a further generalization of B-Spline curves, known as NURBS, is used.

EXTRA CREDIT

I’d share the math of B-splines with you, but, frankly, I don’t understand it. A Google search will turn up lots of university references.


Please rate the helpfulness of this tip.

Click on a star to rate it!

… for Adobe Premiere Pro CC

Tip #652: The Five Lumetri Color Curves

Larry Jordan – LarryJordan.com

The Color curves allow you to adjust colors in a wide variety of ways.

The Hue vs. Luma curve, with its range indicator visible.

Topic $TipTopic

Premiere Pro offers five color curves in the Lumetri color panel that you can use to make different types of curve-based color adjustments to your clip.

  • Hue versus Saturation. Select a hue range and adjust its saturation level
  • Hue versus Hue. Select a hue range and change it to another hue
  • Hue versus Luma. Select a hue range and adjust the luma
  • Luma versus Saturation. Select a luma range and adjust its saturation
  • Saturation versus Saturation. Select a saturation range and increase or decrease its saturation

SAMPLE A COLOR

With one of the color curves tabs open, click the Eyedropper tool to sample a color in the Program Monitor. Three control points are automatically placed on the curve. The center point corresponds to the color you selected. For the three Hue curves, this Hue value is for the selected pixel. For the Luma and Sat curves, the point is placed corresponding to the Luma or Saturation value of the pixel selected.

By default, the Eyedropper samples a 5 x 5 pixel area and averages the selected color. Press the Command (Mac) or Control (Win) keys while using the Eyedropper to sample a larger 10 x 10 pixel area.

REMOVE CONTROL POINTS

  • To remove a single control point, select the control point and press Command + Click (Mac) or Control + Click (Windows).
  • To remove all control points and reset the curve, double-click any control point.

EXTRA CREDIT

Here’s an Adobe Help page to learn more.


Please rate the helpfulness of this tip.

Click on a star to rate it!

… for Adobe Premiere Pro CC

Tip #651: Make Adjusting Color Curves More Precise

Larry Jordan – LarryJordan.com

Curves make selecting and correcting specific ranges of color easy.

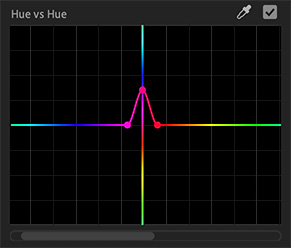
The Hue vs. Hue curve in Premiere’s Lumetri color panel.

Topic $TipTopic

Here are three tips to help make color adjustments more precise using Curves in the Lumetri color panel.

When adjusting color using Curves in the Lumetri color panel, press the Shift key to lock the control point so it only moves up and down.

Use the eyedropper to select more than one color in the same image. Each color will have it’s own control points. To restrict the range, use three control points.

While moving a control point, a vertical band appears to help you judge your final result. It is useful in the Hue versus Hue curve, where it can be tricky to judge the resulting hue. For example: you want to fine-tune some skin tone values which look a bit red. You can use the Hue versus Hue curve to select a range of red colors; with the center control point selected the vertical indicator helpfully shows you that pulling down shifts the red toward orange, which is much better for skin-tone.

NOTE: To make adjustment easier to see, drag the slider at the bottom to center your adjustments.

EXTRA CREDIT

Here’s an Adobe Help page to learn more.


Please rate the helpfulness of this tip.

Click on a star to rate it!

… for Codecs & Media

Tip #650: What is a Raw file format

Larry Jordan – LarryJordan.com

Raw is not an acronym, it simply means “unprocessed.”

Topic $TipTopic

Raw is an image and video file format used by many high-end and professional digital cameras. RAW files are considered to be the best form of image file, since it does not process the picture, leaving total control of the editing to the user.

A camera raw image file contains minimally processed data from the image sensor of either a digital camera, a motion picture film scanner, or other image scanner. Raw files are named so because they are not yet processed and therefore are not ready to be printed or edited.

Raw image files are sometimes incorrectly described as “digital negatives”, but neither are they negatives nor do the unprocessed files constitute visible images. Rather, the Raw datasets are more like exposed but undeveloped film.

Like undeveloped photographic film, a raw digital image may have a wider dynamic range or color gamut than the developed film or print. Unlike physical film after development, the Raw file preserves the information captured at the time of exposure. The purpose of raw image formats is to save, with minimum loss of information, data obtained from the sensor.

There are dozens of raw formats in use by different manufacturers of digital image capture equipment.

EXTRA CREDIT

Here’s an Apple White Paper to learn more.


Please rate the helpfulness of this tip.

Click on a star to rate it!

… for Codecs & Media

Tip #647: What is ffMPEG

Larry Jordan – LarryJordan.com

FFmpeg cannot be sold, it can only be given away.

Topic $TipTopic

FFmpeg is a free and open-source project consisting of a vast software suite of libraries and programs for handling video, audio, and other multimedia files and streams. At its core is the FFmpeg program itself, designed for command-line-based processing of video and audio files, and widely used for format transcoding, basic editing (trimming and concatenation), video scaling, video post-production effects, and standards compliance.

FFmpeg is able to decode, encode, transcode, mux, demux, stream, filter and play pretty much anything that humans and machines have created. It supports the most obscure ancient formats up to the cutting edge. It runs on Linux, Mac OS X, Microsoft Windows, the BSDs, Solaris, etc. under a wide variety of build environments, machine architectures, and configurations.

The FFmpeg project tries to provide the best technically possible solution for developers of applications and end users alike. Wherever the question of “best” cannot be answered we support both options so the end user can
choose.

FFmpeg is used by software such as VLC media player, xine, Cinelerra-GG video editor, Plex, Kodi, Blender, HandBrake, YouTube, and MPC-HC; it handles video and audio playback in Google Chrome, and Linux version of Firefox.

FFmpeg is free for personal use, however, it does not have a user interface. Graphical user interface front-ends for FFmpeg have been developed, including XMedia Recode and ffWorks.

Please rate the helpfulness of this tip.

Click on a star to rate it!