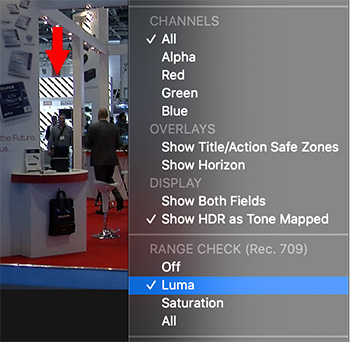
Range Check flags excessive white levels or chroma (color) saturation.
The View menu, top right corner of the Final Cut Viewer, showing Range Check options.
Have you ever wondered what “Range Check” does in the View menu? It’s actually really useful – it flags excessive white and chroma (color) saturation levels. Here’s what you need to know.
If you are posting media to the web, virtually any gray-scale or chroma value will be fine. The web is very forgiving.
But, not so broadcast, cable or digital cinema. Here, because of technical constraints, white levels can not exceed 100% and chroma levels can’t exceed certain amounts of saturation for SDR (Standard Dynamic Range) media.
What Range Check does is flag – using a moving series of red lines (red arrow in screen shot). These indicate areas in the frame that exceed white level limits (Luma), excessive saturation (Chroma) or both (All).
To fix this problem, either adjust your color grading or apply Effects > Color > Broadcast Safe.
EXTRA CREDIT
Tip #1827 explains how to use the Broadcast Safe filter.
Please rate the helpfulness of this tip.
Click on a star to rate it!
https://www.theinsidetips.com/wp-content/uploads/2019/09/Tips-Logo-700x150.jpg00Larry Jordanhttps://www.theinsidetips.com/wp-content/uploads/2019/09/Tips-Logo-700x150.jpgLarry Jordan2021-08-02 01:30:002021-08-02 01:30:00Tip #1826: What is Range Check?
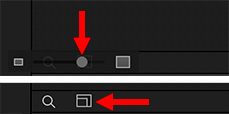
This hidden control changes the height of elements in the Layers panel.
Enable Layer sizing by clicking the rectangle icon (bottom) when the Timeline is open.
There’s a very useful setting in Motion that only appears when the Timeline is open – even though it has nothing to do with the Timeline!
When the Timeline is displayed (F6 toggles it open or closed), a magnifying glass and rectangle icon appear immediately above it.
Click the rectangle icon (bottom red arrow in screen shot) to reveal a new control (top red arrow).
As you drag this control left or right, the size of the layers in the Layers panel will increase or decrease.
What’s interesting, to me, is that the Timeline needs to be open for this Layers panel control to become visible.
Please rate the helpfulness of this tip.
Click on a star to rate it!
https://www.theinsidetips.com/wp-content/uploads/2019/09/Tips-Logo-700x150.jpg00Larry Jordanhttps://www.theinsidetips.com/wp-content/uploads/2019/09/Tips-Logo-700x150.jpgLarry Jordan2021-07-22 01:30:002021-07-22 01:30:00Tip #1802: Change the Height of Layer Elements
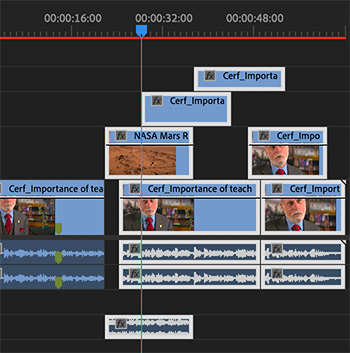
The ability to move clips as a group makes it easier to adjust segment timing.
Selected clips moving using keyboard shortcuts.
Premiere provides a fast and easy way to move multiple clips at the same time: the Track Select Forward tool. Here’s how it works.
From the toolbar, select the Track Select Forward tool. (There’s no assigned keyboard shortcut, but you can add one in Premiere > Keyboard Shortcuts.)
Click in the timeline. All clips that exist at that frame in the timeline are selected, even if it’s only the tail end of a clip.
NOTE: If you find yourself selecting clips that you don’t want to select, move the cursor past the end of the clips you don’t want to select.
Type Cmd + [left / right] arrow to move all selected clips one frame left or right.
Type Shift + Cmd + [left / right] arrow to move 5 frames left or right.
EXTRA CREDIT
In the tool bar, click the small arrow next to the Track Select Forward tool to choose the Track Select Backward tool. It works the same way, except that it selects all clips BEFORE the position you click in the timeline.
Please rate the helpfulness of this tip.
Click on a star to rate it!
https://www.theinsidetips.com/wp-content/uploads/2019/09/Tips-Logo-700x150.jpg00Larry Jordanhttps://www.theinsidetips.com/wp-content/uploads/2019/09/Tips-Logo-700x150.jpgLarry Jordan2021-07-20 01:30:002021-07-20 01:30:00Tip #1796: Move Multiple Clips with One Shortcut
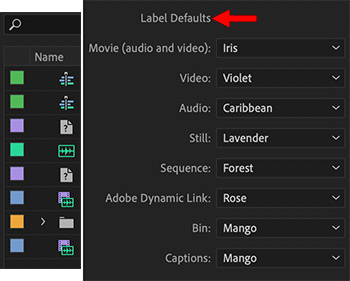
Menu colors can also be sorted, helping to group similar clips.
Labels displayed in the Project panel (left) and Preference > Labels panel.
A menu preference that I skip over ALL the time is “Labels.” However, these can be really useful – especially to help organize larger projects.
Label colors are assigned to different media types by default. These default colors are set using Preferences > Labels. (See screen shot.)
However, you can change these colors to something that works better for you.
NOTE: One reason where changing label colors might help is color blindness. Or, you may have preferred colors that help you organize media.
An added benefit to using colors is that you can sort on them in both Project and Bin panels. To sort on color, click the empty column header just above the colors. Click a second time to reverse the sort order.
NOTE: The sort order is actually based on the color order of a spectrum – from red to violet.
Please rate the helpfulness of this tip.
Click on a star to rate it!
https://www.theinsidetips.com/wp-content/uploads/2019/09/Tips-Logo-700x150.jpg00Larry Jordanhttps://www.theinsidetips.com/wp-content/uploads/2019/09/Tips-Logo-700x150.jpgLarry Jordan2021-07-13 01:30:002021-07-10 09:29:49Tip #1780: How and Why to Change Label Colors
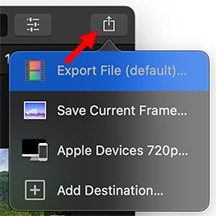
The Quick Export menu (yours may look different) in the top right corner.
Hidden in a corner of the Final Cut Pro interface is the Quick Export button. This is a fast way to get your projects out of Final Cut using just the mouse.
As the screen shot illustrates, in the top right corner of the Final Cut interface is the Send icon.
Click it to display the list of all current export destinations.
Using this menu, you can export the current project in the timeline using a single mouse click.
EXTRA CREDIT
To change the options displayed in this menu, either choose Add Destination from the bottom of this menu or go to: Final Cut Pro > Preferences > Destinations.
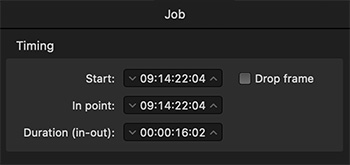
Compressor got a surprisingly large number of new features in it’s latest update from Apple. One of which is the ability to change the starting timecode for compressed clips.
NOTE: This does not change the timecode of the source media.
To do this:
Select the clip (not the compression setting) in the Compressor Batch panel.
Go to the Job section of the Inspector(see screen shot) and change the starting timecode
EXTRA CREDIT
You can also use this section to change the In for the compressed media or its duration, should you not want to compress the entire movie.
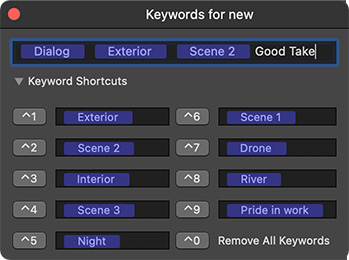
Your movies tell the world a lot about you – in ways you may not expect.
Both Final Cut Pro and Compressor embed metadata (text labels) into your movies that can be easily read by anyone using QuickTime Player – or other media viewing software.
This includes the name of the person creating the file, descriptions, keywords, Event names and much more. This metadata can be customized – for example, I use it to embed a copyright date.
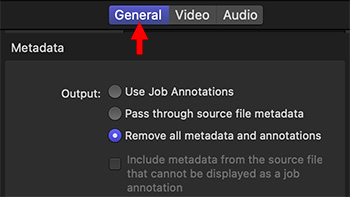
However, sometimes, you may NOT want this information embedded for security, secrecy or personal reasons. Apple Compressor 4.5.3 features a new function that disables embedding metadata and prevents any that is already embedded in the source media from passing through to the compressed file.
NOTE: This only affects compressed files, source files are not modified.
Here’s how:
Select the compression setting applied to a clip.
Scroll to the bottom of the General tab.
Click the Remove all metadata and annotations radio button.
EXTRA CREDIT
This setting can only be applied to individual compression settings.
To set this as a default for a setting, select a compression setting in the Settings panel, then disable metadata from the General Inspector.
Please rate the helpfulness of this tip.
Click on a star to rate it!
https://www.theinsidetips.com/wp-content/uploads/2019/09/Tips-Logo-700x150.jpg00Larry Jordanhttps://www.theinsidetips.com/wp-content/uploads/2019/09/Tips-Logo-700x150.jpgLarry Jordan2021-06-29 01:30:002021-06-26 09:27:44Tip #1735: Keep Your Movie Data Secret
Adobe’s on-going interface cleanup continues in the Header Bar.
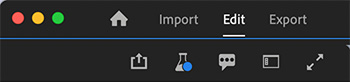
New Premiere Pro header bar. Left side on top, right side on the bottom.
In the beta release of Adobe Premiere Pro last week, Adobe cleaned up the Header Bar. While the big news surrounds the new import and export workflows, the newly-cleaned-up look of the Header Bar is also worth mentioning.
NOTE: Beta software, by definition, is unstable and likely to change. You can install the beta version without losing access to the current release of Premiere. However, use beta software only for exploration and experimentation; because there is always the possibility of losing your work due to a software bug.
THE HEADER BAR
Starting with the initial Creative Cloud release several years ago, Adobe began the process of cleaning up the Premiere interface. Because, frankly, there were so many icons, controls and widgets it was almost impossible to figure out what you needed to tweak to accomplish even simple tasks.
The latest beta release continues that trend. Once you create a new project – or open an existing one – you’ll see a lot fewer icons at the top of the interface.
Adobe calls this the Header Bar and it now divides into two sections. On the left (at the top of the screen shot) are:
Home. This brings you back to the opening screen where you can choose which project to open or create.
Import. This opens a new approach to importing media and creating a new project.
NOTE: You can by-pass this window by clicking Create in the lower right corner.
Edit. This opens the editing window with the familiar Premiere interface.
Export. This opens a new approach to exporting projects.
NOTE: I’ll cover both import and export workflows in future tips.
On the right (lower portion of the screen shot) are icons to:
Quick Export. This expands on the Quick Export option in the current release version of Premiere.
New Features. This, not surprisingly, displays a “What’s New in Premiere” screen.
Feedback. This speeds sending feedback to Adobe during the beta process.
Workspaces. Rather than listing all workspaces across the top of the screen, they are now consolidated into this menu. Their function is the same, however.
Maximize video output. This displays video in the current timeline full screen.
Adobe concludes: “We’ll be rolling out these new experiences on a timeline starting with this public Beta to ensure that our customers can provide feedback, explore the changes and continue to use Premiere Pro to its fullest potential. These changes are additive and not a replacement to current workflows. We understand how important muscle-memory is and we don’t want to disrupt your flow in any way.”
Here’s a link to Adobe’s blog with more details on all the changes.
Please rate the helpfulness of this tip.
Click on a star to rate it!
https://www.theinsidetips.com/wp-content/uploads/2019/09/Tips-Logo-700x150.jpg00Larry Jordanhttps://www.theinsidetips.com/wp-content/uploads/2019/09/Tips-Logo-700x150.jpgLarry Jordan2021-06-29 01:30:002021-06-29 01:30:00Tip #1743: Adobe Cleans Up the Header Bar
We may request cookies to be set on your device. We use cookies to let us know when you visit our websites, how you interact with us, to enrich your user experience, and to customize your relationship with our website.
Click on the different category headings to find out more. You can also change some of your preferences. Note that blocking some types of cookies may impact your experience on our websites and the services we are able to offer.
Essential Website Cookies
These cookies are strictly necessary to provide you with services available through our website and to use some of its features.
Because these cookies are strictly necessary to deliver the website, refuseing them will have impact how our site functions. You always can block or delete cookies by changing your browser settings and force blocking all cookies on this website. But this will always prompt you to accept/refuse cookies when revisiting our site.
We fully respect if you want to refuse cookies but to avoid asking you again and again kindly allow us to store a cookie for that. You are free to opt out any time or opt in for other cookies to get a better experience. If you refuse cookies we will remove all set cookies in our domain.
We provide you with a list of stored cookies on your computer in our domain so you can check what we stored. Due to security reasons we are not able to show or modify cookies from other domains. You can check these in your browser security settings.
Google Analytics Cookies
These cookies collect information that is used either in aggregate form to help us understand how our website is being used or how effective our marketing campaigns are, or to help us customize our website and application for you in order to enhance your experience.
If you do not want that we track your visit to our site you can disable tracking in your browser here:
Other external services
We also use different external services like Google Webfonts, Google Maps, and external Video providers. Since these providers may collect personal data like your IP address we allow you to block them here. Please be aware that this might heavily reduce the functionality and appearance of our site. Changes will take effect once you reload the page.
Google Webfont Settings:
Google Map Settings:
Google reCaptcha Settings:
Vimeo and Youtube video embeds:
Other cookies
The following cookies are also needed - You can choose if you want to allow them:
Privacy Policy
You can read about our cookies and privacy settings in detail on our Privacy Policy Page.