… for Codecs & Media

Tip #815: Download the Safari Technology Preview

Larry Jordan – LarryJordan.com

Safari Technology Preview provides an early look at “what’s coming.”

The Safari Technology Preview logo.

Topic $TipTopic

Apple’s Safari Technology Preview provides an early look at upcoming web technologies in macOS and iOS. It showcases the latest layout technologies, visual effects, developer tools, and more, so users can provide input on how they are implemented.

Designed more for web developers than end users, this free software:

  • Previews the latest web technologies. Get a preview of the latest advances in Safari web technologies, including HTML, JavaScript, and CSS.
  • Easy to update. You can update Safari Technology Preview right from the Mac App Store. Updates occur every few weeks.
  • Access powerful developer tools. Use the latest version of the powerful Web Inspector and Responsive Design Mode to modify, debug, and optimize your websites.
  • Provide feedback. Use Feedback Assistant to send feedback directly to Apple about issues and enhancement requests. Simply select Report an Issue from the Help menu in Safari Technology Preview.
  • Run side-by-side with Safari. Safari Technology Preview is a standalone app that works side-by-side with the current version of Safari, so you can continue to use and reference the current release.
  • Surf seamlessly with iCloud. Safari Technology Preview works with iCloud, so you can access your latest Safari Favorites, bookmarks, and Reading List.

Here’s the link to learn more and download the latest version, or beta copies of upcoming versions.


Please rate the helpfulness of this tip.

Click on a star to rate it!

… for Codecs & Media

Tip #814: What is the VP9 codec?

Larry Jordan – LarryJordan.com

VP9 is a replacement codec for HEVC.

Topic $TipTopic

One of the complaints heard after WWDC was that Apple did not make mention of VP9 during the two keynotes. Still, this got me wondering what VP9 is?

According to Wikipedia:

VP9 is an open and royalty-free video coding format developed by Google. It is supported in Windows, Android and Linux, but not Mac or iOS.

VP9 is the successor to VP8 and competes mainly with MPEG’s High Efficiency Video Coding (HEVC/H.265).

In contrast to HEVC, VP9 support is common among modern web browsers with the exception of Apple’s Safari (both desktop and mobile versions). Android has supported VP9 since version 4.4 KitKat.

An offline encoder comparison between libvpx, two HEVC encoders and x264 in May 2017 by Jan Ozer of Streaming Media Magazine, with encoding parameters supplied or reviewed by each encoder vendor (Google, MulticoreWare and MainConcept respectively), and using Netflix’s VMAF objective metric, concluded that “VP9 and both HEVC codecs produce very similar performance” and “Particularly at lower bitrates, both HEVC codecs and VP9 deliver substantially better performance than H.264”.

Here’s a link for more information.


Please rate the helpfulness of this tip.

Click on a star to rate it!

… for Codecs & Media

Tip #813: What is Handbrake?

Larry Jordan – LarryJordan.com

Handbrake is a free, general-purpose media compression program.

Topic $TipTopic

HandBrake is an open-source video transcoder available for Linux, Mac, and Windows. Everyone can use HandBrake to make videos for free.

HandBrake takes videos you already have and makes new ones that work on your mobile phone, tablet, TV media player, game console, computer, or web browser—nearly anything that supports modern video formats.

HandBrake does:

  • Convert nearly any video to MP4 or MKV
  • Crop and resize video
  • Restore old and low-quality video
  • Remove combing artifacts caused by interlacing and telecine
  • Pass-through audio without conversion for certain audio types
  • Downmix discrete surround sound to matrixed surround or stereo
  • Adjust audio volume levels, and dynamic range for certain audio types
  • Preserve existing subtitles, and add or remove soft subtitles (subtitles stored as text)

HandBrake does not:

  • Combine multiple video clips into one
  • Pass-through video without conversion (video is always converted)
  • Create Blu-ray, AVCHD, or DVD discs

HandBrake also does not defeat or circumvent copy protection of any kind. It does not work with video files employing Digital Rights Management (DRM). This includes but is not limited to, copy protected content from iTunes, Amazon Video, Netflix, or other online providers, and many commercial DVD and Blu-ray discs.

Here’s the link to learn more.


Please rate the helpfulness of this tip.

Click on a star to rate it!

… for Adobe Premiere Pro CC

Tip #803: Optimize the Audio Meters

Larry Jordan – LarryJordan.com

Modifying the audio meter display helps us better control audio levels.

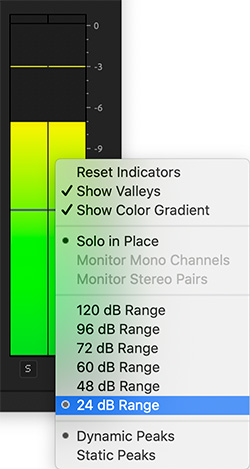
Control-click inside the audio meters to display this configuration menu.

Topic $TipTopic

The configuration settings for the audio meters in Premiere aren’t “bad,” but they can be optimized to better monitor audio for the video editing most of us do.

Control-click inside the audio meters to display the configuration menu shown in this screen shot. These settings illustrate how I customize the audio meters for my work.

  • Dynamic Peaks. This is the yellow bar at the top, showing the loudest level of your audio for the last second.
  • Show Color Gradient. This displays a smooth color shift from green to red as levels increase.
  • 24 dB Range. We don’t really care about how soft our audio is. We care about how loud it is. This displays just the top 24 dB of a mix. Since we want peaks to bounce between -3 and -6 dB for video posted to social media, this provides the clearest indication of audio level.
  • Show Valleys. These are the blue bars in the middle of the color gradient, showing how soft our audio has been during the last second.

Try these settings and see if they don’t give you a better idea of your audio levels.


Please rate the helpfulness of this tip.

Click on a star to rate it!

… for Adobe Premiere Pro CC

Tip #801: Change the Default Video Transition

Larry Jordan – LarryJordan.com

Any video transition can be set as the default.

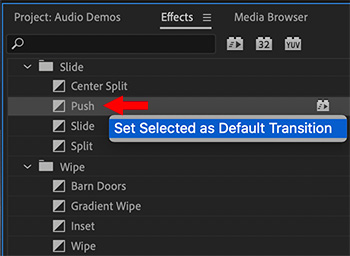
Control-click any video transition to set it as the default transition.

Topic $TipTopic

I re-discovered this tip while researching a recent webinar covering the basics of editing in Premiere.

The default video transition is a standard cross-dissolve, but you can change this setting at any time. Here’s how.

  • In the Effects panel, find the video transition you want to use as a default.
  • Control-click the name of the transition, then select Set Selected to Default Transition.

That’s it.

NOTE: To quickly apply the default video transition, select the edit point, clip, or clips you want to apply it to, then type Cmd + D. (Windows type Cntrl + D).

EXTRA CREDIT

The default audio transition is a cross-fade. You can change the default duration for both audio and video transitions in Preferences > Timeline.


Please rate the helpfulness of this tip.

Click on a star to rate it!

… for Adobe Premiere Pro CC

Tip #799: A Faster Way to Remove Keyframes

Larry Jordan – LarryJordan.com

The Pen tool does more than draw, it can also select… keyframes, for instance.

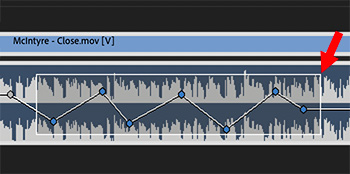
The Pen tool is selecting audio keyframes to modify or remove.

Topic $TipTopic

I discovered this tip while researching a recent webinar covering the basics of editing in Premiere.

During my demo, I found myself with a number of audio keyframes that I needed to remove. While I could – and did – Control-click each keyframe to remove it, I wondered if there was a faster way.

And there is!

  • Select the Pen tool (Shortcut: P), then drag a selection rectangle INSIDE the clip. It will select any keyframe that it touches.
  • Then, press the big Delete key to remove them.

Done!

NOTE: The cool thing about this process is that you can quickly remove one, several or all the keyframes in a clip. This isn’t an “all-or-nothing” technique.


Please rate the helpfulness of this tip.

Click on a star to rate it!

… for Apple Final Cut Pro X

Tip #802: Remove Attributes vs. Remove Effects

Larry Jordan – LarryJordan.com

Remove Effects is faster, Remove Attributes provides more control.

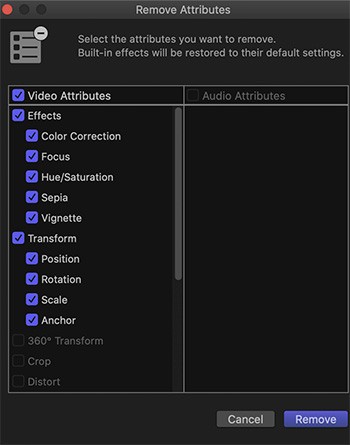
The Remove Attributes window. Blue checkboxes indicate applied effects or changed effect settings.

Topic $TipTopic

In the Edit menu for Final Cut Pro X are two options, both of which relate to removing effects. The key question is: what’s the difference?

  • Remove Attributes
  • Remove Effects

Here’s the difference:

  • When you select Edit > Remove Effects, all effects settings applied to all selected clips are instantly removed. This is the fastest way to reset one or more clips to its default (native) settings.
  • When you select Edit > Remove Attributes (screen shot), you are presented with a screen where you can select which effects you want to keep or remove from all the selected clips.

Remove Effects is the fastest way to totally reset a clip. Remove Attributes gives you more control over what is actually reset.

NOTE: It is important to note that both of these menu options can apply to one or more clips. Simply the select the clips you want to reset before choosing one of these two menues.


Please rate the helpfulness of this tip.

Click on a star to rate it!

… for Apple Final Cut Pro X

Tip #800: Reset Clip Effects Quickly

Larry Jordan – LarryJordan.com

You can reset a single parameter, a section or the entire clip.

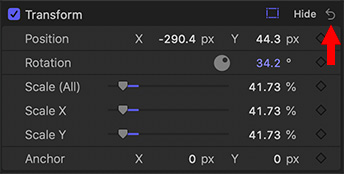
Click the “hooked arrow” to reset a section or a single parameter.

Topic $TipTopic

Have you ever wanted to reset a clip quickly; say, to remove an effect or position change? You can. That’s where these hooked arrows come in.

  • Click a hooked arrow next to a section name – i.e. Transform – to reset all section settings at once.
  • Click a hooked arrow next to a single parameter to reset that parameter to its default settings.

NOTE: If you need to reset all effects and settings applied to a clip, choose Edit > Remove Effects.


Please rate the helpfulness of this tip.

Click on a star to rate it!

… for Apple Final Cut Pro X

Tip #789: The Floating Source Timecode Window

Larry Jordan – LarryJordan.com

The Source Timecode window displays timecode for all project clips under the playhead.

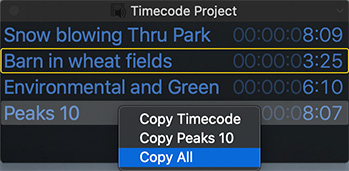
The floating Source Timecode window.

Topic $TipTopic

Most of the time, we don’t need to pay attention to the specific timecode of the clips in a project. However, for those times when we do, Final Cut makes it easy.

  • Choose Window > Source Timecode to display a floating window containing the timecode of every clip under the playhead in the timeline.
  • Drag any edge to change the size of the display.

Control-click a clip to:

  • Copy just the timecode of the control-clicked clip to the clipboard
  • Copy the file name and the timecode of the control-clicked clip to the clipboard
  • Copy the file name and the timecode of all clips displayed in the window to the clipboard

NOTE: If a clip is selected, as “Barn in wheat fields” is here, it is highlighted with a gold box.

EXTRA CREDIT

Tip #788 discussed the floating Project timecode window.


Please rate the helpfulness of this tip.

Click on a star to rate it!

… for Random Weirdness

Tip #791: Tips for Better Battle Scenes

Larry Jordan – LarryJordan.com

Creating visceral battles only requires emphasizing basic tenets of filmmaking

(Image courtesy of Pexels.com)

Topic $TipTopic

This article, written by Jourdan Aldredge, first appeared in PremiumBeat.com. These are the highlights.

If you think about it, every battle scene comes down to one thing: one side wants something that the other side doesn’t want to give up — the high ground. A beach. A prisoner, information, or maybe a way home.

Fortunately, creating visceral battles in smaller film projects only requires some of the most basic tenets of filmmaking — world-creating, empathetic storytelling, safely performed stunts, and lots of simulated explosions.

Here are some tips:

  • Create an Accurate World. When it comes to classic battle scenes, you can’t do much better than the harrowing, large-scale sequences found in the Francis Ford Coppola horrors-of-war epic Apocalypse Now. And, while it’s a bit dated (released in 1979), its world building is by far the standard for great battles and impressive set pieces.
  • Long Takes Add Realism. Shoot long sequences that keep your viewers on the edge of their seats, trying not to blink. The long take sequence is a hallmark of many notable action, adventure, and war movies like Saving Private Ryan and The Raid: Redemption.
  • Compositing Stunts. Compositing action sequences in post is a great way to create highly technical stunts in a safe and controlled manner. This approach is perfect for anyone with limited production resources who needs battle, fight, and action sequences on a budget.
  • Explosion Sounds and Visual Effects. War and battle scenes have only grown more over the top over the years. However, an alternative for DIY filmmakers is working with explosive elements in the edit.
  • The Importance of Your Soundtrack. Background music highlights cinematic elements and heightens the narrative stakes. The right background music elevates individual scenes and adds an undeniable high-production-value sheen to your entire project. Don’t sleep on your soundtrack.

EXTRA CREDIT

The full article, linked above, has videos and links that illustrate this in much more detail.


Please rate the helpfulness of this tip.

Click on a star to rate it!