Tip #041: Optimizing Premiere Transition Preferences
… for Adobe Premiere Pro CC
Tip #041: Optimizing Premiere Transition Preferences
Larry Jordan – https://LarryJordan.com
Premiere’s defaults aren’t bad. But they aren’t very good, either.


Preferences are exactly that – YOUR preferences on how the software should work. This means that you can set your preferences however you want. But, as a starting point to your own modifications, let me share some of my preferences with you. Use or modify these in whatever ways seem good to you.
Preferences > Timeline
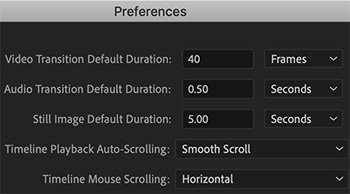
The hidden “gotcha” with the transition settings are that they use frames to determine durations. Which is fine – until your frame rates change. At which point, all these durations need to change as well.
- Video. I prefer transitional dissolves that last 2/3 of a second; a one-second transition just hangs on screen for too long. However, I also shoot mostly 60 fps material. So I change this to 40 frames (40/60 = 2/3).
- Audio Transition. Most of the time, I like a 1/4 second fade-up, while for fade-outs, I prefer about one second. Sadly, Premiere only allows me to pick one so I generally leave this at the default.
- Still image. Here’s a cool tip. If you are building a still image montage set to music, figure out the duration between beats, then import all your stills to match that duration. This means you can edit stills into the timeline without setting an In or an Out.
- Timeline Playback Auto-Scrolling. It takes more CPU power, but Smooth Scroll looks nicer. Use Page Scroll on slower systems, as it uses less CPU overhead.
- Timeline mouse scrolling. Vertical allows you to quickly scroll up in projects that use many stacked clips. Most of my edits are five tracks or less, so I change this to Horizontal, so I can quickly move around the timeline.


Leave a Reply
Want to join the discussion?Feel free to contribute!