Tip #1024: Moving the Anchor Point
… for Adobe Premiere Pro CC
Tip #1024: Moving the Anchor Point
Larry Jordan – LarryJordan.com
The Anchor Point can be easily moved using the Move tool.

The Anchor point is that spot in an element around which it rotates or scales. Clips, shapes and text each have separate anchor points, but moving them is the same.
- Select the clip who’s anchor point you want to move.
- Select the Move tool.
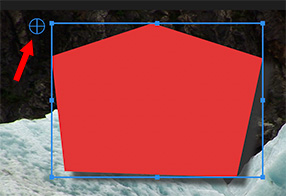
- In the Program Monitor, drag the small circle with the cross-hair to the position you want. The EXACT position is the center of the cross-hair.
If you need more precision, or need to match anchor points for multiple clips, select the clip, then, in the Effect Controls panel, enter the precise numbers you need for the Anchor point for the selected clip.
EXTRA CREDIT
Here’s where to find the appropriate Anchor point. Using the Move tool, select the object in the Program Monitor you want to adjust. It will highlight in the Effect Controls panel.
- Video: Effect Controls > Motion
- Shapes: Effect Controls > Shape > Transform
- Text: Effect Controls > Text > Transform
Leave a Reply
Want to join the discussion?Feel free to contribute!