Tip #1056: Move a Mix from Audition to Premiere
… for Adobe Premiere Pro CC
Tip #1056: Move a Mix from Audition to Premiere
Larry Jordan – LarryJordan.com
Take the time to verify the technical quality of your mix using Amplitude Statistics.

Recently, when I was preparing my webinar An Overview of Adobe Audition, I was reminded of an important tip I learned a while ago.
When sending an audio mix from Audition back to Premiere, don’t use Multitrack > Export to Adobe Premiere. Why? Because you don’t know what you are getting. There’s a better way.
Instead, choose File > Export > Multitrack Mixdown > Entire Session.
This displays a window where you can set various parameters for your exported mix. In general, for video, choose:
- WAV
- 48K sample rate
- 16-bit depth
- Stereo
- Check Open files after export
When the mix is complete, the exported file will be displayed in the Files panel. Double-click it to open it the Waveform Editor. This next step is the reason for this whole process: choose Window > Amplitude Statistics and click Scan in the lower left corner of the window.
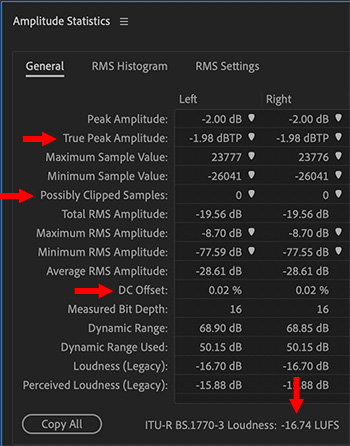
This analyzes your clip for a variety of technical parameters. Here are the four fields I ALWAYS check:
- True Peak. This is the loudest level in your mix. This must be below 0.
- Possibly clipped samples. This must be 0. Anything larger means you have distortion in your mix.
- DC Offset. This should be at or very close to 0
- LUFS. This measures the average level of the total mix.
For broadcast, digital cinema and cable, LUFS should be -24 ±1. For the web, LUFS should be around -16. (LUFS is also referred to as LKFS.)
Once I verify that my audio meets all technical specs, I import it into Premiere and add it to the timeline as the final mix. The benefit to this approach is that I KNOW my audio is good, before final output, rather than HOPING it is good.
EXTRA CREDIT
Here’s a video that shows this process in operation.
Leave a Reply
Want to join the discussion?Feel free to contribute!