Tip #1150: Audio Effect Order is Important
… for Adobe Premiere Pro CC
Tip #1150: Audio Effect Order is Important
Larry Jordan – LarryJordan.com
Audio effects process in a specific order. Make sure the Limiter/Compressor is last.


When adding effects to audio clips in Premiere (or Audition), the order in which those effects are applied makes a difference. Here’s what you need to know.
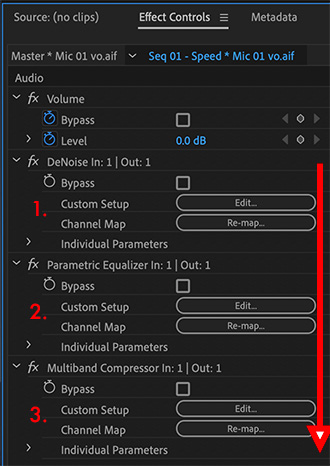
Audio effects are processed from the top of the Effect Controls panel to the bottom. (See screen shot.)
The first effect to apply – if you need it – is noise reduction. Get rid of what you don’t want before you start shaping the sounds you do. Remember, your goal is to reduce noise, not eliminate it. If you want it gone, re-record in a studio.
NOTE: Noise reduction can often degrade the spoken voice. By processing this early, you can then use effects farther down the “stack” to try to replace what noise reduction took away. This is why we reduce, not remove, noise.
Next, add any EQ or special effects you need to shape the sounds the way you want. Add any reasonable number of filters here.
Finally, at the bottom and ALWAYS last, apply either a compression or limiter filter. This makes sure that audio levels don’t exceed the level you specifiy.
I should mention that you don’t apply both a compression filter AND a limiter filter to the same track. Pick one or the other.
NOTE: For my mixes, I apply the Multiband Compressor to all dialog tracks, with the Limiter filter applied to the master track and set to -3 dB to catch any errant levels before they distort the final mix. I don’t generally use compression on either effects or music.


Leave a Reply
Want to join the discussion?Feel free to contribute!