Tip #1151: Rescue Your Storage Using Recovery Mode
… for Random Weirdness
Tip #1151: Rescue Your Storage Using Recovery Mode
Larry Jordan – LarryJordan.com
The key is to be sure you are pressing the keys before you restart your system.


There’s a new way to keep your Mac running smoothly – it’s called “Recovery Mode.” Here’s how it works.
Shut down your Mac. (You can do this from a restart, but the timing of when to press the keys is trickier.)
Before you push the power button, press and hold Cmd + R. Then, turn your system on.
Continue pressing both keys until the startup thermometer gets about half-way across the screen.
What you’ve just done is tell your Mac to boot into a hidden start-up volume called the Recovery disk. You can’t run your normal applications with it, but you CAN:
- Reinstall the latest version of macOS.
- Repair your boot disks using Disk Utility
- And two other options that I, ah, forget
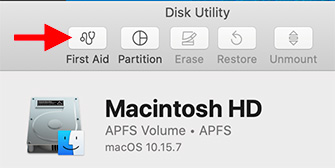
Once boot up finishes, you’ll see a menu with four choices. Click the bottom one: Run Disk Utility.
When it opens, you’ll see two internal drives in the sidebar on the left:
- Macintosh HD
- Macintosh HD – Data
Select each one in turn and run First Aid. This fixes any problems with your boot disks; which are the ones most likely to show signs of disk corruption.
NOTE: In the distant past, we would sometimes zap the PRAM or reset the SMC. The vast majority of the time those old stand-bys won’t help today. Recovery Mode will.
When you are done, restart your Mac and get back to work.
NOTE: This is a good utility to run every month or so and is much superior to launching into Safe Boot, which we used to do in the past.


Is this something worth doing regardless of any problems?
Edward:
Yes. I recommend doing this every month or so. I’ve used this frequently on my own gear and not had any problems with it – and my systems seem to perk up after running it.
Larry