Tip #1333: Set vs. Scale to Frame Size
… for Adobe Premiere Pro CC
Tip #1333: Set vs. Scale to Frame Size
Larry Jordan – LarryJordan.com
For greatest flexibility, always choose “Set to Frame Size” when scaling images.

When placing an image, or video, that has a different size from the sequence, Premiere provides three different ways to scale it. But not all these choices are good ones.
When the clip frame size and sequence frame size don’t match, Premiere offers three options:
- None. This places the image at 100% size in the timeline, regardless of the sequence frame size.
- Scale to Frame Size. This scales the image to fit in the sequence frame, but does not change the Scale setting in the Effect Controls panel. This means that you don’t know how much the size of an image has been changed.
- Set to Frame Size. This scales the image to fit in the sequence frame AND changes the Scale setting in the Effect Controls panel to indicate how much the image size changed.
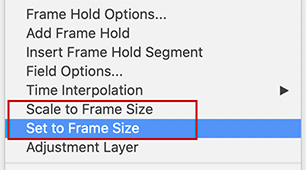
You can create a default setting using the Default Media Scaling menu in Preferences > Media. Or you can set these individually for each clip by control-clicking the clip in the Timeline. (See screen shot.)
If you want to create “Ken Burns” style moves on stills, None is the best choice.
Otherwise, use Set to Frame Size. This fits the image into the frame and shows how much it was scaled in the Effect Controls panel.
NOTE: I can’t think of any reason to use Scale to Frame Size.
EXTRA CREDIT
Image quality degrades if you enlarge an image much more than 100%.
Leave a Reply
Want to join the discussion?Feel free to contribute!