Tip #1474: Adjust the Anchor Point for Better Moves
… for Apple Final Cut Pro X
Tip #1474: Adjust the Anchor Point for Better Moves
Larry Jordan – LarryJordan.com
The anchor point determines where an image revolves or scales.


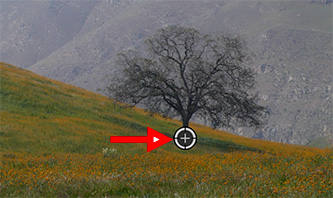
The Anchor Point is that position around which an image rotates or scales. It is indicated by a plus sign in a white circle – red arrow in the screen shot – whenever you activate the Transform controls for a clip in the Timeline.
NOTE: I find scaling or rotating an image looks MUCH more interesting when you move the Anchor Point to a corner, rather than the center. Or, to a central element in the frame, as shown in this screen shot.
While it would be great to drag the Anchor Point, Final Cut does not support this, even if the Transport controls are active in the Viewer. Instead:
- Select the clip in the Timeline.
- Go to Inspector > Transform and adjust the Anchor point settings.
By default the anchor point is in the center of the frame. When you move the anchor point, you’ll also need to move the clip to get it back to the center of the frame.


Leave a Reply
Want to join the discussion?Feel free to contribute!