Tip #154: 3D Transform Tool Adds Perspective
… for Apple Motion
Tip #154: 3D Transform Tool Adds Perspective
Larry Jordan – https://LarryJordan.com
On-screen controls allow faster element manipulation.
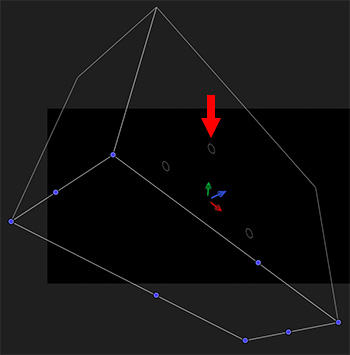

There are two ways to add perspective to any element in Motion: The Inspector and the 3D Transform tool. To enable the 3D Transform tool, click the icon to the immediate right of the Arrow tool that looks like a wire globe.
When you select an element in the Layers panel, a white wireframe box appears around it. Inside are three circles and three color arrows. The secret code is R – G – B.
- R (Red) – Makes adjustments on the horizontal axis
- G (Green) – Makes adjustments on the vertical axis
- B (Blue) – Makes adjustments to and from the viewer (camera); the Z-axis.
For example, dragging the green arrow slides the shape vertically.
But, the real secret is in the three white circles. These create rotation.
- Left circle. Rotates on the vertical axis. (It displays a green line.)
- Top circle. Rotates on the Z-axis. (It displays a blue line.)
- Right circle. Rotates on the horizontal axis. (It displays a red line.)
By selecting the 3D Transform tool and dragging these six controls, you can quickly and intuitively adjust the position and rotation of any selected element.
Thanks Larry…another thing to practice!