Tip #1588: Stitching Clips in Adobe Media Encoder
… for Adobe Premiere Pro CC
Tip #1588: Stitching Clips in Adobe Media Encoder
Larry Jordan – LarryJordan.com
Stitching is a fast way to add an open, ad or close to a program.

[ The following tip is from the AME User Guide. ]
When using Adobe Media Encoder to compress clips, you can combine multiple media files into a single file when adding them to the queue. To stitch media files together, do the following:
- Select File > Add Source or click the Add Source button from the Queue panel in Adobe Media Encoder. The File Explorer opens.
- Select the assets you want to stitch together.
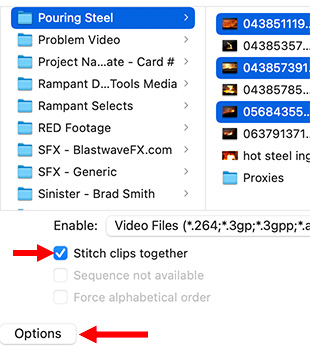
- Click the Options button (lower red arrow)
- Check the Stitch clips together check box (upper red arrow).
- Click Open to add the stitched clip to the queue.
NOTE: Alternately, select the clips you want to stitch. Drag them to the Queue panel and release on top of the option Drop here to stitch clips together.
The stitched clips are loaded in the queue in the order they were clicked. To view the individual clips, click Show sources. By default, the clips are sorted alphabetically. You can rearrange them according to your preference.
The name of the stitched clips is automatically set to the first clip in the series. To change the name of a clip, click the name.
NOTE: Stitched clips adhere to In and Out Points set in media browser. However, you cannot edit the duration of sources once they have been added to a stitched clip.


Leave a Reply
Want to join the discussion?Feel free to contribute!