Tip #1592: A “Better” Way to Adjust Audio in Motion
… for Apple Motion
Tip #1592: A “Better” Way to Adjust Audio in Motion
Larry Jordan – LarryJordan.com
Nothing about audio in Motion is easy. Here’s proof.

Audio always seems like an afterthought in Motion. Audio clips are impossible to find and almost impossible to adjust. But, here’s a trick that makes setting levels a bit easier.
Import an audio clip into Motion, then:
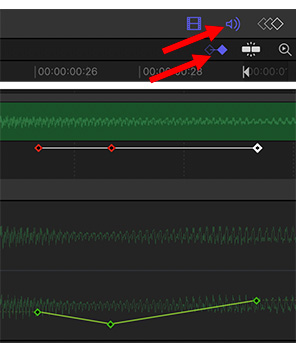
- Reveal the Timeline (Shortcut: F6).
- Click the Audio icon in the top right corner (top red arrow). This reveals the audio clip in the middle of the pane (middle section of screen shot).
- Click the Keyframe icon (lower red arrow).
- Put the playhead where you want the first keyframe to appear and select the audio clip in the Timeline pane.
- Go to Inspector > Audio Track and add a keyframe for Audio Level. A small red dot appears below the audio clip in the Timeline pane. (Middle portion of the screen shot.)
NOTE: You would think you could adjust the keyframe audio level by dragging it. You would be wrong.
- Adjust the audio level for that keyframe in the Inspector.
- Move the playhead to where you want the next keyframe to appear and repeat the keyframe setting process.
NOTE: You would think the keyframes in the Timeline would indicate the different levels. You would be wrong.
- To see audio levels once they are set, Control-click the keyframe and choose Show in Keyframe Editor. (Lower section of screen shot.)
NOTE: You would think Motion would make adjusting audio easier. You would be wrong.
Leave a Reply
Want to join the discussion?Feel free to contribute!