Tip #1594: What the Keyframe Controls Do
… for Apple Motion
Tip #1594: What the Keyframe Controls Do
Larry Jordan – LarryJordan.com
The Timing Pane displays and edits keyframes for any selected element.

Most of the time, we don’t need to access keyframes as a group. But, when we do, the Timing Pane has the tools you’ll need.
When you open the Timing pane, depending upon which display option you select, you can view all the keyframes that are associated with the selected element.
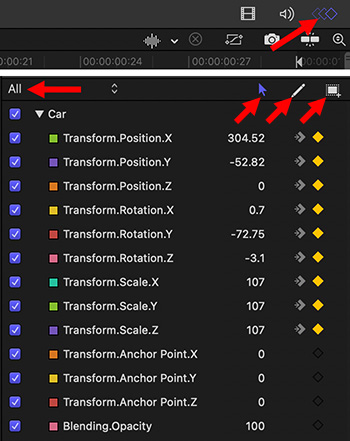
To view keyframes:
- Select the element you want to review in the Layers pane.
- Display the Timing Pane (Window > Show Timing Pane)
- Click the “3 Diamonds” in the top right corner (top red arrow in screen shot).
- Select All from the Untitled Set menu on the top left (left red arrow in screen shot). This reveals all keyframes associated with the selected element.
- Arrow. Double-click a keyframe dot to edit its value or position.
- Pencil. Sketch keyframes tool. Select a keyframe from the list on the left, then drag the Pencil to manually draw an animation curve for that setting.
- Rectangle. Transform keyframes tool. Use the Transform Keyframes tool to drag a selection rectangle around multiple keyframes and then manipulate their positions by dragging the bounding box or adjusting its handles. Dragging the bounding box moves the selected keyframes in whatever direction you move.
Leave a Reply
Want to join the discussion?Feel free to contribute!