Tip #1633: New! Text Color Gradients in Premiere
… for Adobe Premiere Pro CC
Tip #1633: New! Text Color Gradients in Premiere
Larry Jordan – LarryJordan.com
Text gradients now can be created directly in Premiere.

Text gradients have been a part of the legacy Titler in Premiere for a while. Now, however, you can create them directly in Premiere itself. Here’s how.
- Select the text to which you want to apply the gradient.
- Switch to the Essential Graphics workspace.
- In the Appearance section click the Fill color chip.
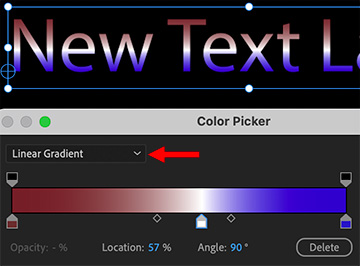
- In the Color Picker dialog that opens, select one of the gradient options from the drop-down list at the top left. There are three choices: Solid, Linear Gradient, and Radial Gradient. (Red arrow in the screen shot.)
To adjust the colors in the gradient:
- Click any of the color stops below the gradient slider to show different color options and change the color.
- To remove a color stop, click one and either drag it away from the gradient slider and release, or click Delete at the bottom right of the gradient slider.
To adjust the opacity of the gradient:
- Move the Opacity Stop at the top of the gradient slider.
- Then change the opacity in the Opacity % field
To adjust the angle and location of the gradient:
- Angle: Type in a value in the Angle field or drag on the blue hot text to change a linear gradient’s angle.
- Location: Type in a value in the Location field or drag on the blue hot text for an interactive experience to change the location of a selected stop or midpoint.
As you adjust all the controls in the gradient, you can see your changes to the text live in the Program Monitor.
Click OK to apply the gradient to the text.
Leave a Reply
Want to join the discussion?Feel free to contribute!