Tip #1661: Three Quick Video Scope Tricks
… for Apple Final Cut Pro X
Tip #1661: Three Quick Video Scope Tricks
Larry Jordan – LarryJordan.com
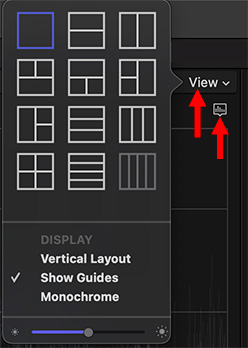
Final Cut’s scopes can be selected and modified using these controls.

The video scopes in Apple Final Cut Pro are both flexible and powerful. Even so, we can still tweak them further. Here are three tips I find useful in almost every project.
TIP 1: CHANGE LAYOUT
Open the video scopes (Cmd + 7). Click the word View to select how many scopes you want to view. I tend to prefer the “two side-by-side option” in the top right corner of the View menu.
This allows me to see both Waveform monitor and Vectorscope at the same time.
TIP #2: REMOVE COLOR
By default, Final Cut’s video scopes display the color associated with a specific pixel values, for instance dark green, in the Waveform monitor.
While very cool, you can turn these colors off by selecting Monochrome.
TIP #3: PICK YOUR SCOPES
When you have one or more scopes selected using the View menu, click the small icon below the word View and choose which scope goes in each scope panel.
Most of the time, I’m looking at Waveform (Luma) and Vectorscope (100% Vector).
Until I get into very specific color grading, these two scopes tell me everything I need to know to gauge color and grayscale values during my edit.
Leave a Reply
Want to join the discussion?Feel free to contribute!