Tip #1746: Create an HDR Project in Apple Motion
… for Apple Motion
Tip #1746: Create an HDR Project in Apple Motion
Larry Jordan – LarryJordan.com
Creating an HDR project requires changing three settings.

Creating an HDR project in Motion requires changing three settings. However, those settings are pretty well hidden. Here’s how to do it.
SET COLOR PROCESSING
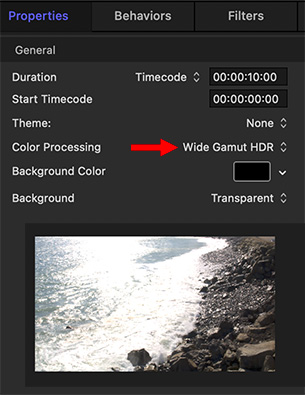
By default, all Motion projects are set to HD (Rec. 709) color space. We need to change this first.
- Select the Project in the Layers pane.
- Go to Inspector > Properties and change the Color Processing menu from Standard to Wide Gamut HDR.
SET RENDER PROCESSING
This setting determines the color of images you see in the canvas, as well as the color space and appearance of your exported project (the output media file) when “Use canvas setting” is selected in the Settings pane of the share window.
- Go to the View menu in the menu bar, then select Render Color Space.
- From this menu, select the video format of your project. In my example, I set this to HDR Rec. 2020 HLG, which matches my media.
NOTE: If your media does not match your project, you’ll need to convert it using HDR Tools.
SWITCH NON-HDR MONITORS TO TONE MAPPING
- If you have a Pro Display XDR monitor, you are done.
- If you are using your Mac display, which does not display HDR media, go to the View menu in the menu bar at the top and check Show HDR as tone mapped.
NOTE: This View menu option is only enabled when the Project is set to Wide Gamut HDR.
You have now created an HDR project and allowed HDR media to be displayed accurately on the Mac monitor. This is still HDR media, however, so exporting video from this project won’t look good on a non-HDR monitor.
EXTRA CREDIT
While this allows Motion to display and export HDR media, you will probably still need to apply Filters > Color > Levels to adjust the gray scale values to your liking. In other words, these steps get you close, but you’ll need to go through a color grade before you are ready for final output.
Leave a Reply
Want to join the discussion?Feel free to contribute!