Tip #1820: Use Bump Maps to Create Texture
… for Apple Motion
Tip #1820: Use Bump Maps to Create Texture
Larry Jordan – LarryJordan.com
Bump maps distort & “fracture” images based upon grayscale values.


A bump map is used to apply texture to an image, based upon input from a second image.
To apply it:
- Create some text
- Import a texture image, something with variations in grayscale
- Select the text and apply Distortion > Bump map
- Drag the icon for the texture image into the image well in Inspector > Filters
- Uncheck the texture image in the Layers panel to make it invisible.
- Adjust the filter settings in Inspector > Filters
For added impact, select the text element in the Layers panel and apply Inspector > Properties > Blend Mode > Stencil Alpha.
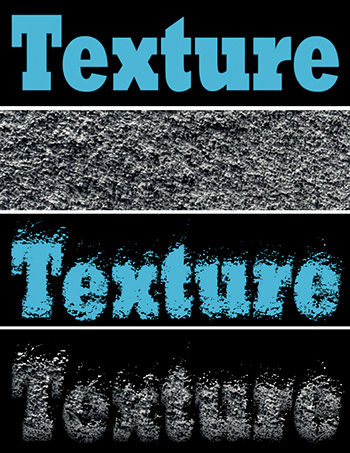
In the screen shot:
- The top image is the source text, created in Motion with a cyan color applied.
- The next image is the source texture (i.e. differences in grayscale).
- The third image is that text with Distortion > Bump map applied. The texture image was unchecked in the Layers panel to make it invisible, then dragged into the image well for the bump map filter in the Inspector.
- The bottom image adds a Stencil Alpha blend mode to the text, so that it is textured using the bump map, then filled with the texture using the blend mode.
Bump maps provide more image distortion (and texture) than a blend mode alone.
EXTRA CREDIT
Finding the right texture to use for a bump map is tricky. You want something with differences in grayscale, but not too much. Allow time to experiment.
Tip #1821 illustrates the Reflections filter, which, to my eye, provides better results than the Bump map filter.


Leave a Reply
Want to join the discussion?Feel free to contribute!