Tip #237: Prevent Accidents – Lock It Down
… for Adobe Premiere Pro CC
Tip #237: Prevent Accidents – Lock It Down
Larry Jordan – LarryJordan.com
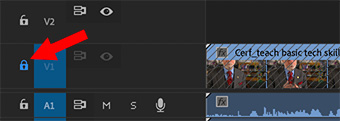
Track locks are specific to each track.


Have you ever had that sinking feeling that you just destroyed an edit because you deleted/moved/adjusted something you shouldn’t? Yeah, me, too. Here’s how to prevent it.
Minimize the chance for errors by locking your tracks.
- Click the Track Lock icon – yup, it looks like a lock. Blue locks are locked, white locks are unlocked. The default is unlocked.
- Shift – click to lock all audio or all video tracks.
- To work on one track and lock all others, Shift – click any lock to lock all tracks, then click the lock for the one track you want to adjust.
NOTE: When a track is locked, diagonal hash lines appear on the track.
EXTRA CREDIT
These locks are not for security, you can’t password-protect them. Rather, they are to help prevent mistakes.
Also, keep in mind that if you lock a video track, for example, you are still able to move its audio track, which would knock it out of sync.


Leave a Reply
Want to join the discussion?Feel free to contribute!